With the new LEADTOOLS Excel SDK, developers can programmatically create or edit Excel files. This blog is the first in a three-part series exploring the toolkit’s basic yet powerful features. In this first part, we’ll demonstrate how to modify a small table within a reimbursement form for an employer.
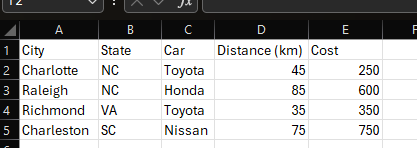
Here is the current table we are working with, which tracks the cities and states driven through, the car brands used, the distance traveled in kilometers, and the cost of the trip. In this example, we will demonstrate how easy it is to convert the distances from kilometers to miles using LEADTOOLS. Let’s switch over to our code to show how straightforward this task is.
Before we begin – be sure to grab the latest LEADTOOLS SDK to gain access to all the new features with V23! With 60 free days of evaluation, you can follow along with this blog and explore LEADTOOLS’ advanced SDKs for intelligent document processing, OCR/ICR, image processing, barcode, and more.
using Leadtools;
using Leadtools.Document.LEADOffice.Sheet;
using System.Text;

namespace ProgrammaticallyExcel
{
    internal class Program
    {
        static void Main(string[] args)
        {
            InitLEAD();
            //we load in our exsiting Excel file's workbook
            LEADWorkbook workbook = LEADWorkbookFactory.LoadFromFile("C:\\temp\\CityTravelExpenses.xlsx", null);

            try
            {
                if (workbook != null)
                {
                    ConvertToMiles(workbook, 3);
                    SaveWorkbook(workbook);
                }

            }
            catch (Exception ex)
            {
                Console.WriteLine(ex.ToString());
            }
        }
    }
}
The InitLEAD method sets our license files. For more information on this, please check out this tutorial that will go more in depth. We will be focusing on ConvertToMiles and SaveWorkbook methods.
static void ConvertToMiles(LEADWorkbook workbook, int column)
{
    //since we are only working in on the first sheet, we grab that one only
    Sheet sheet = workbook.GetSheetAt(0);

    for (int i = 1; i < sheet.LastRowIndex + 1; i++)
    {
        Row row = sheet.GetRowAt(i);
        //since we know the distance column is the only place we want to edit cell data, we only look in that column for each row we loop through
        var cell = row.GetCellAt(column);
        if (cell != null)
        {
            //we take the existing data and multiply it by a set value to convert from kilometers to miles
            cell.SetCellValue(Math.Round(cell.NumericCellValue * 0.621371));
        }
    }
}
This function takes in two parameters: the workbook declared in the main method and the specified column to be edited. Since our Excel file contains only one sheet, we ensure that it is the active sheet. Then, we create a for loop to cycle through all the rows in the sheet, starting from row 1 to avoid altering the header row. For each row, we specify the column to be edited, giving us the coordinates to locate the cell (e.g., for the first data row and the third column, the coordinates would be [1, 3]). Finally, we convert the distance from kilometers to miles using basic math, round the result, and set the cell value to the computed number.
static void SaveWorkbook(LEADWorkbook workbook)
{

    string filePath = @"C:\\temp\\CityTravelExpenses_fixedDistance.xlsx";
    using FileStream fs = new(filePath, FileMode.CreateNew);
    workbook.Save(fs);
}
Saving a workbook is easily done with just 3 lines of code:
- Create a string to house where we will save the file
- Use a FileStream to create a new file at a specified location
- Save the workbook data to the newly created file
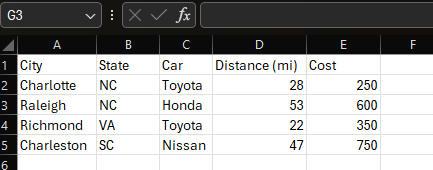
In these results, you can see that the distance column has been successfully changed from kilometers to miles.
That's it! This simple example demonstrates how you can use the LEADTOOLS Excel SDK to programmatically alter and save Excel files. With our FREE 60 day evaluation SDK, fully supported by our expert support team, this is simply too good to pass up. Try integrating the LEADTOOLS SDK into your current or next application!
Here is the project file for the code we created in this blog. Stay tuned for part two of this three-part blog series showcasing the LEADTOOLS Excel SDK!


