|
|
Available in LEADTOOLS Document and Medical Imaging toolkits. |
Automated User Interface for Annotations
The annotation example program that ships with LEADTOOLS is implemented using the high-level LAnnotationWindow class automated features. This topic describes how the example program uses the LAnnotationWindow class.
First, the example derives a user-defined class from the LEADTOOLS LAnnotationWindow class. Then, the example assigns the handle of the window created by the MFC framework to the LAnnotationWindow derived class in the CAnnDemoView::OnCreate function. This allows the LEADTOOLS class object to do all of the necessary processing for displaying images and annotations in the MDI child windows. (Note: This example is using the LAnnotationWindow class object as a window, not as a control.)
The demo creates the Annotation Toolbar by using the LAnnotationWindow::GetToolBar function to get a pointer to an LAnnToolbar object. Then, it calls LAnnToolbar::Create to create the toolbar.The example code also handles selecting the appropriate button on the toolbar in response to the menu items.
The pull-down menus in the example program let you control the automation, but the menu items, themselves, are not automated. (Only the pop-up menus, invoked with the right mouse button, are automated.) The pull-down menu options that affect annotations do the following:
File > Open lets you load an image file. If the image file has an associated annotation file (with the same file name, but with a file extension of ANN), this menu option also loads the annotation file using the LAnnotationWindow::AnnLoad function. If there is no associated annotation file, the LAnnotationWindow object automatically creates an annotation container that is the same size as the bitmap. The LAnnotationWindow object also creates and assigns an automation object automatically. (The automation object lets you control the default properties.)
File > Save lets you save the image file as you normally would, but it also saves an annotation file, giving it the same name as the image file, but with a file extension of ANN.
File > Print lets you print the image as you normally would, but it also prints the annotations using the LAnnotationWindow::AnnPrint function.
Edit > User Mode sets the automated user mode to design mode or run mode by first calling LAnnotationWindow::GetContainerObject and then using the returned object to call LAnnContainer::SetUserMode.
Edit > Tool changes the selected tool in the toolbar by first calling LAnnotationWindow::GetAutomationObject and then using the returned object to call LAnnAutomation::SetTool.
View > Normal, Zoom, and Fit Image to Window change the display rectangle for painting the image by calling the base class LBitmapWindow::SetZoomMode. The LAnnotationWindow class automatically handles scrolling and/or zooming the annotation objects.
Behavior That Is Automated
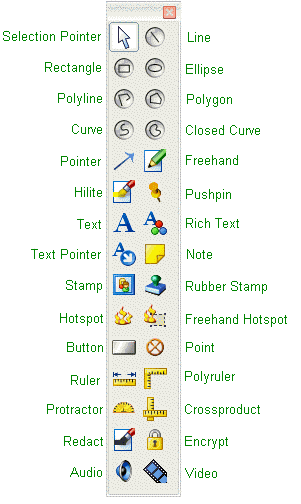
The toolbar created by the LAnnToolbar::Create function appears as follows:

In design mode, you can select tools from the toolbar and draw them over the image in the window. You can then use the right mouse button to get a pop-up menu that is tailored to each object type. The pop-up menu appears as shown in the example.
The popup menu is context sensitive. It lists only the properties that can be changed on the selected object or objects. If you use the popup menu to change a property, the value that you specify is applied to the current selection, and it becomes the default for the next object.
The following topics describe the automated annotation features for particular objects and tools: