Host LEADTOOLS services on IIS 7.* (Vista and Windows 7 OS)
The LEADTOOLS installation program will automatically configure your version of IIS to host the LEADTOOLS WCF Services. If you wish to host the LEADTOOLS WCF Services on another computer then you should follow these steps. Also, for more information about hosting WCF services, refer to: MSDN Hosting Services
When using LEADTOOLS WCF services, it is recommended to put the LEADTOOLS assemblies in the Global Assembly Cache for the following reasons:
- Loading assemblies from GAC means less overhead and security since your application will always load the correct version of the .NET library.
- Performance gain - since the assemblies are already in the GAC, the verification and checking for integrity and code access of the LEADTOOLS assemblies will be skipped. This is especially true when your application is hosted in Windows Internet Information Services (IIS).
For more information, refer to the Global Assembly Cache topic in MSDN online.
- Make sure IIS is installed and running on the machine. [See details:MSDN Hosting Services , IIS .Net - Installing IIS 7.* ]
- Create a virtual directory and map the Services directory. Here are the steps:
Create a
Host directory:
<LEADTOOLS_INSTALLDIR>\WCFHostCreate a
Bin directory:
<LEADTOOLS_INSTALLDIR>\WCFHost\BinCopy the Leadtools.
Services.* from
<LEADTOOLS_INSTALLDIR>\Bin to
<LEADTOOLS_INSTALLDIR>\WCFHost\Bin Files to copy include:
- Leadtools.Services.*.config files
- Redistributable files needed by the hosted service. For example: If you are hosting our IOcrService you need all redistributables for our OCR toolkit. Refer to redistributables for more information on files installed by the LEADTOOLS setup.
- Create a
web.config at <LEADTOOLS_INSTALLDIR>\WCFHost[See details: MSDN - Configuring Services Using Configuration Files ]
-
If the user intends to upload files larger than 4 MB on Windows Vista or 7, there is a security restriction for IIS 7.*. To get around this restriction add the following in the Web.config:
             <system.webServer>
             <security>
             <requestFiltering>
             <requestLimits maxAllowedContentLength="2147483648"/>
             </requestFiltering>
             </security>
             </system.webServer>
Then in
replace the following:
<section name="requestFiltering" overrideModeDefault="Deny" />
with
<section name="requestFiltering" overrideModeDefault="Allow" />
- Create a .svc file in
<LEADTOOLS_INSTALLDIR>\WCFHost[ See details: MSDN - Create an .svc File for the WCF Service].
- For example if you want to host the
IOcrService, create OcrService.svcfile and add the following line to it (Add to this line the percent sign after < and before >):
< @ServiceHost Language=C# Debug="true" Service="Leadtools.Services.Forms.ServiceImplementations.OcrService" >
- Go to Start > Control Panel > Administrative Tools > Internet Information Services (IIS) Manager [ See details: MSDN - How to: Host a WCF Service in IIS ].
- Expand the following node: Internet Information Services > local computer > Web Sites > Default Web Site.
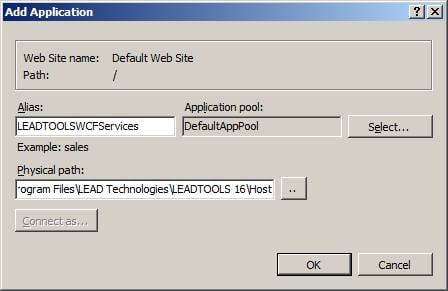
- Right click Default Web Site and select Add Application to create a new virtual directory. Enter the following parameters:
| Alias: |
LEADTOOLSWCFServices |
| Directory: |
<LEADTOOLS_INSTALLDIR>\WCFHost |
- The resulting Add Application dialog will look like this:

Special notes for OCR service
Hosting our IOCRService requires the following:
- Engine type setting: Set the value for the EngineType in Leadtools.Services.Forms.ServiceImplementations.dll.config
- Modify the security for the ltthunkserver.exe
- Go to Start > Run, type DCOMCNFG, and then click OK.
- Expand Component Services > Computers > My Computer > DCOM Config
- Scroll down and find ltthunkserver.
- Right-Click > Properties and select the Security tab.
- In Launch and Activation Permissions select customize radio button.
- Click Edit and Add the Service account (Network Service) with launch and activate permissions
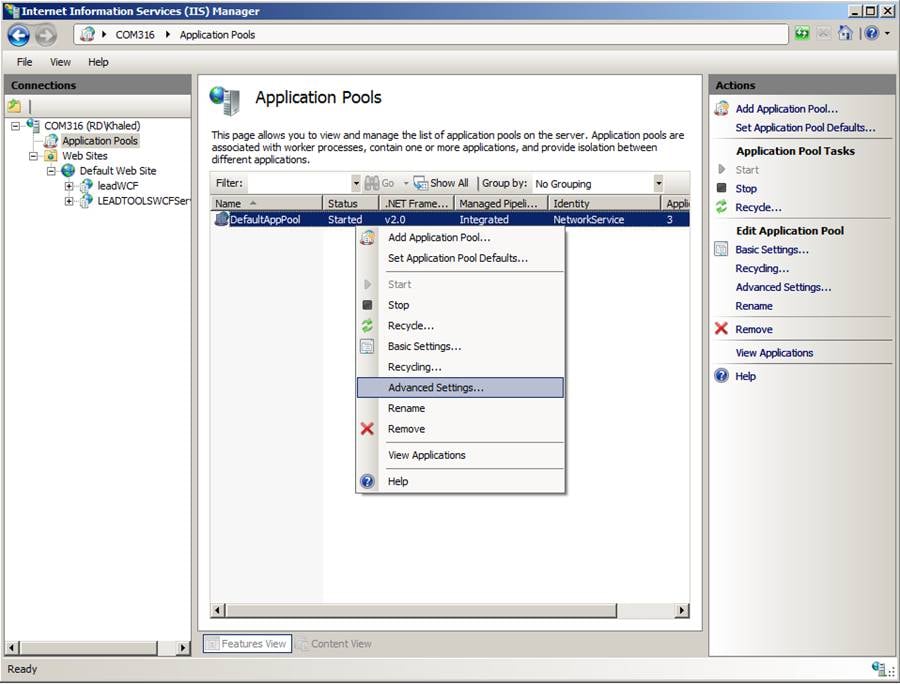
- If the engine type is plus and you are hosting IOcrService on IIS7.*, you need to run the service under Local System identity.
- Go to Start > Control Panel > Administrative Tools > Internet Information Services (IIS) Manager.
- Expand the following node: Internet Information Services > local computer > Application Pools
- On the right pan right-click on DefaultAppPool and choose Advanced Settings as shown below:

- In the Advanced Settings dialog under Process Model group, change Identity from NetWorkService to LocalSystem.
IIS Hosting Services Resources
MSDN - Building Clients
MSDN - Data Contracts
MSDN - Service Contracts
MSDN - Configuring Services
MSDN - Hosting Services
MSDN - Configuring Services Using Configuration Files
MSDN - Create an .svc File for the WCF Service
MSDN - How to: Host a WCF Service in IIS
IIS .Net - Installing IIS 7.*


