The Administration button (

) opens the Server Settings dialog with the Administration branch selected in the tree view. It contains settings for who can log into the server, what permissions they have, and password options: The Administration branch can be expanded to show the following pages:
-
Password Options page
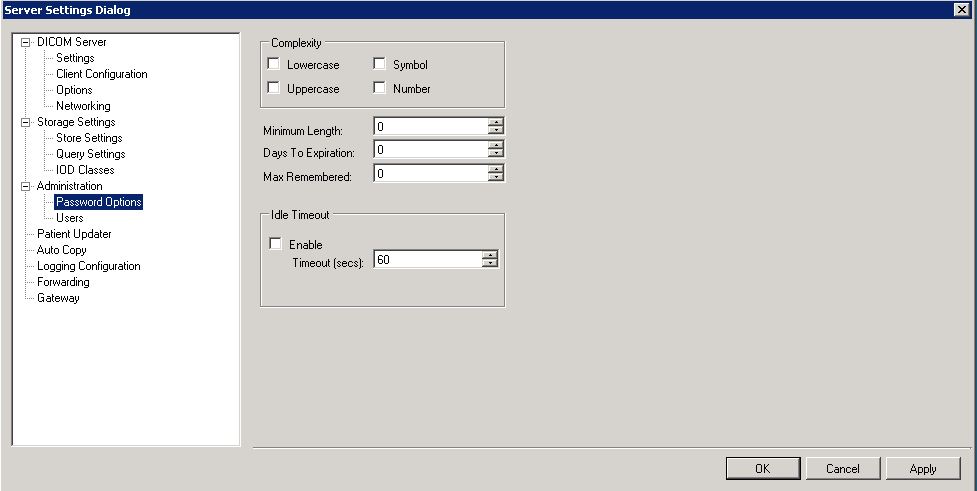
The Password Options page displays those settings that determine the requirements of user passwords for logging onto the LEADTOOLS Storage Server.

-
Complexity group
Use these options to specify which elements are required for a valid password.
-
Lowercase check box
Select the check box to require passwords to have lowercase letters.
-
Uppercase check box
Select the check box to require passwords to have uppercase letters.
-
Symbol check box
Select the check box to require passwords to have symbols.
-
Number check box
Select the check box to require passwords to have numbers.
-
Minimum Length:
Sets the minimum length of a password.
-
Days to Expiration:
Sets the number of days a user can keep a password before having to change it. After a password expires, the server requires the user to change the user's password before logging onto the server.
-
Max Remembered:
The number of tries a user has before being locked out.
-
Idle Timeout group
Sets up the idle timeout feature, when used.
-
Enable check box
Select the check box to use idle timeouts.
-
Timeout (secs) spin box.
Sets the number of seconds a session can be idle before timing out. If the session times out, the user must re-enter their credentials.
-
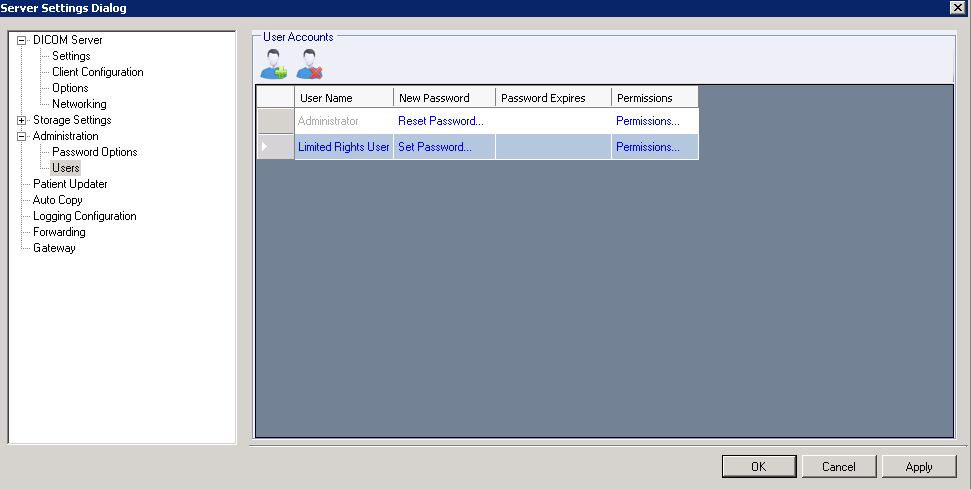
Users page
Use the Users tab to set up user accounts.

-
Add User button
Click the Add User button ( ) to add users that can log into the LEADTOOLS Storage Server. Clicking the button adds a blank row to the User Accounts list view. The cursor moves to the User Name column in the new row so you can enter the new user's name.
-
Delete User button
If a user is selected in the list view, clicking the Delete User button ( ) deletes the selected user. You cannot delete yourself.
-
User Accounts list view
List view displaying information about the users that can log onto the server.
-
Set/Reset Password link
Opens the New Password dialog for entering a new password and confirming it. Passwords must comply with the password requirements specified in the Password Options page.
-
Permissions link
Click the Permissions link beside the new user name to open the Edit Permissions dialog to select the permissions that the user will have. When finished, click OK to close the dialog and return to the Server Settings Dialog. The new user account will now be active.
-
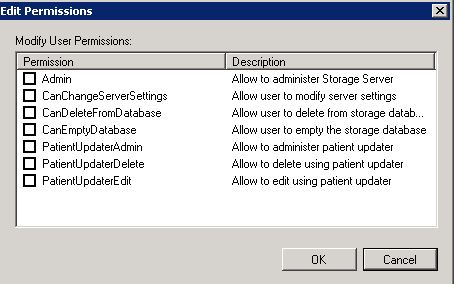
Edit Permissions dialog
The Edit Permissions dialog lists the different types of permission a user can have. Select the permission's check box to grant that kind of permission to the user.

The dialog has the following fields:
-
Admin check box
Select the check box to grant complete control of the Storage Server to the user.
-
CanChangeServerSettings check box
Select the check box to grant the user the right to modify server settings, but does not grant any Patient Updater permissions or rights to delete images.
-
CanDeleteFromDatabase check box
Select the check box to grant the user the right to delete images from the database on a case-by-case basis. Mass deletions are not allowed with this permission.
-
CanEmptyDatabase check box
Select the check box to grant the user the right to delete the entire database with just a few button clicks. It is not recommended to give this permission to anyone, even the administrator. Administrators have the right to give themselves this permission but should do so only in rare cases.
-
PatientUpdaterAdmin check box
Grants the user the right to use the Patient Updater utility to alter images, and make administrator's changes to the Patient Updater options.
-
PatientUpdaterDelete check box
Grants the user the right to use the Patient Updater utility to delete images.
-
PatientUpdaterEdit check box
Grants the user the right to use the Patient Updater utility to edit images.


 ) opens the Server Settings dialog with the Administration branch selected in the tree view. It contains settings for who can log into the server, what permissions they have, and password options: The Administration branch can be expanded to show the following pages:


 ) to add users that can log into the LEADTOOLS Storage Server. Clicking the button adds a blank row to the User Accounts list view. The cursor moves to the User Name column in the new row so you can enter the new user's name.
 ) deletes the selected user. You cannot delete yourself.
