
Products | Support | Send
comments on this topic. | Email
a link to this topic. | Back to Introduction
| Help Version 18.0.1.22
Configuring the LEADTOOLS Storage Server Application using the Control Panel:Administration
Show in webframe
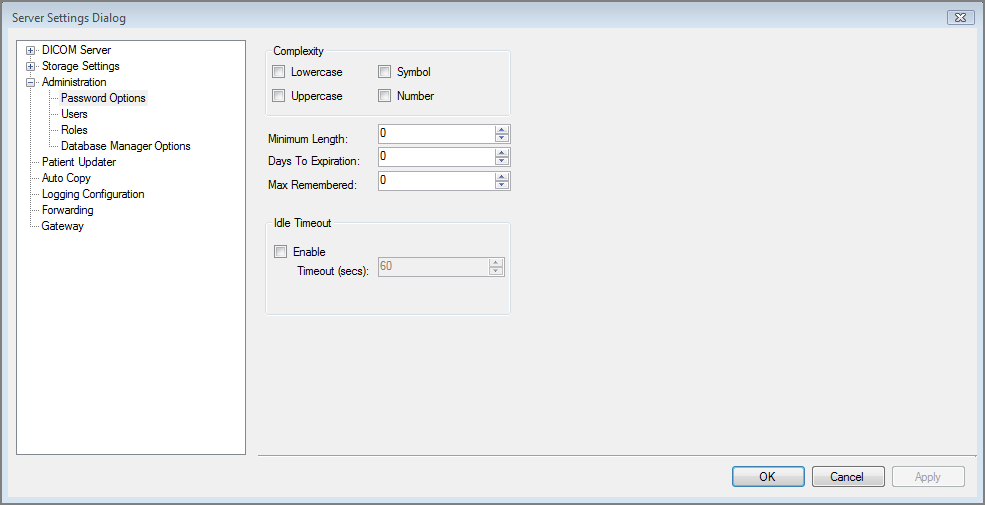
The Administration button (  )
opens the Server Settings dialog with the Administration branch selected in the
tree view. It contains settings for who can log into the server, what
permissions they have, what roles they have, in addition to password and
database manager options:
)
opens the Server Settings dialog with the Administration branch selected in the
tree view. It contains settings for who can log into the server, what
permissions they have, what roles they have, in addition to password and
database manager options:
The Administration branch can be expanded to show the following pages:
Each page is explained below.
The Password Options page displays those settings that determine the requirements of user passwords for logging onto the LEADTOOLS Storage Server.
Use these options to specify which elements are required for a valid password.
Sets the minimum length of a password.
Sets the number of days a user can keep a password before having to change it. After a password expires, the server requires the user to change the user's password before logging onto the server.
The number of tries a user has before being locked out.
Sets up the idle timeout feature, when used.
Use the Users page to set up user accounts. It is shown in the following
figure.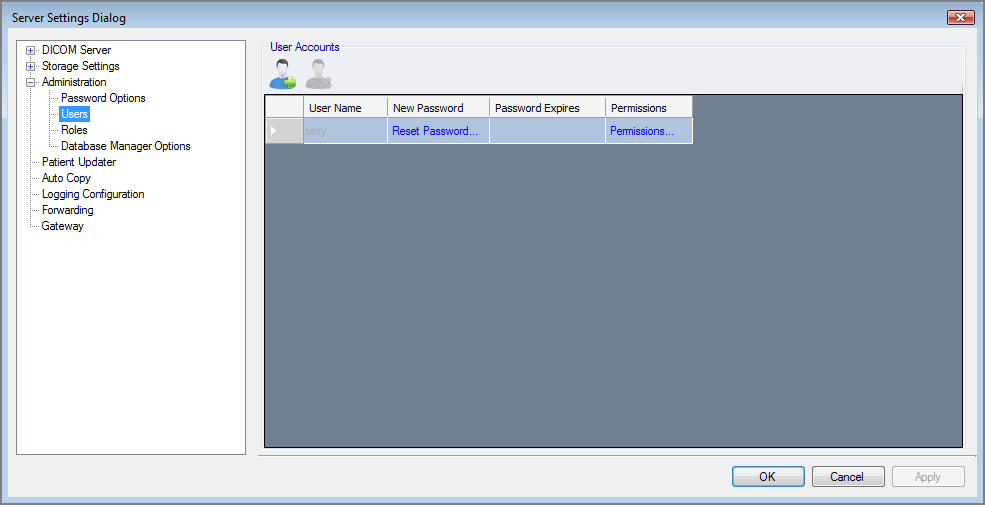
The following fields are on the Users page:
Click the Add User button (  ) to add users that can log into the LEADTOOLS Storage Server. Clicking the
button adds a blank row to the User Accounts list view. The cursor moves to the
User Name column in the new row so you can enter the new user's name.
) to add users that can log into the LEADTOOLS Storage Server. Clicking the
button adds a blank row to the User Accounts list view. The cursor moves to the
User Name column in the new row so you can enter the new user's name.
If a user is selected in the list view, clicking the Delete User button (
 ) deletes the selected user. You cannot delete yourself.
List view displaying information about the users that can log onto the server.
The Roles page is shown in the following figure:
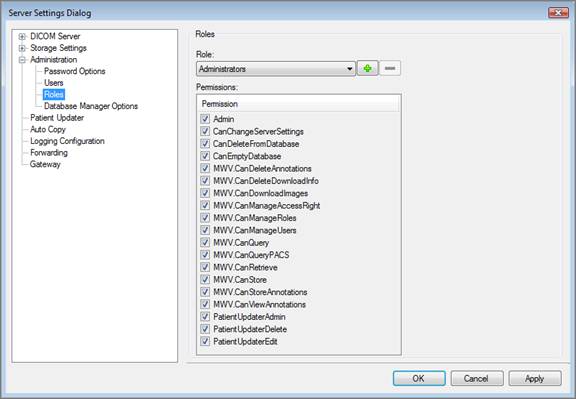
Use the Roles page to create new roles (groups of one or more permissions), and assign permissions to those roles. New or existing users can be assigned both permissions and roles.
The Roles page has the following fields:
This list contains all existing roles. By default, there is an Administrators role that contains all permissions.
To create a new role, click the Add Role button and enter the name for the role.
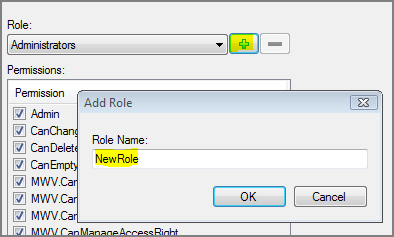
To remove a role, select the role in the role drop-down list and click the Delete Role button.
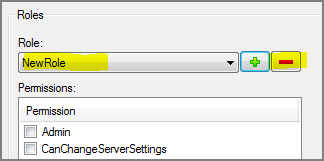
This lists all permissions that can be assigned to a role. To assign a permission to a role, select the role in the role drop-down list, and select or clear the check boxes beside the appropriate permissions.
|
Permission |
Description |
|
Admin |
Allow user to administer the Storage Server |
|
CanChangeServerSettings |
Allow user to modify server settings |
|
CanDeleteFromDatabase |
Allow user to delete from storage database |
|
CanEmptyDatabase |
Allow user to empty the storage database |
|
MWV.CanDeleteAnnotations |
Allows a Medical Web Viewer user to delete annotations. |
|
MWV.CanDeleteDownloadInfo |
Allows a Medical Web Viewer user to delete jobs in download queue. |
|
MWV.CanDownloadImages |
Allows a Medical Web Viewer user to Move images from a remote PACS. |
|
MWV.CanManageAccessRight |
Allows a Medical Web Viewer user to grant or deny access to patient information. |
|
MWV.CanManageRoles |
Allows a Medical Web Viewer user to manage other. |
|
MWV.CanManageUsers |
Allows a Medical Web Viewer user to manage other users. |
|
MWV.CanQuery |
Allows a Medical Web Viewer user to query local images. |
|
MWV.CanQueryPACS |
Allows a Medical Web Viewer user to query a remote PACS. |
|
MWV.CanRetrieve |
Allows a Medical Web Viewer user to request DICOM. |
|
MWV.CanStore |
Allows a Medical Web Viewer user to save DICOM Datasets |
|
MWV.CanStoreAnnotations |
Allows a Medical Web Viewer user to save annotations. |
|
MWV.CanViewAnnotations |
Allows a Medical Web Viewer user to load annotations. |
|
PatientUpdaterAdmin |
Allow user to administer the Patient Updater |
|
PatientUpdaterDelete |
Allow user to delete from the Patient Updater |
|
PatientUpdaterEdit |
Allow user to make edits to the Patient Updater |
The CanChangeServerSettings permission does not include Patient Updater or image deletion privileges.
The CanDeleteFromDatabase permission grants deletions on a case-by-case basis (no mass deletions).
The CanEmptyDatabase permission grants deletion of the entire database. Only Administrators should have this permission, and should give themselves this permission only rarely.
The PatientUpdaterAdmin permission grants administration privileges for the Patient Updater (image and Patient Updater options alterations).
The PatientUpdaterDelete permission grants the privilege to delete images using the Patient Updater.
The PatientUpdaterEdit permission grants the privilege to edit images using the Patient Updater.
The Database Manager Options page is shown in the following figure:
.jpg)
Use the Database Manager Options page to configure the behavior of the pagination control of the Database Manager. The Database Manager is shown in the following figure:
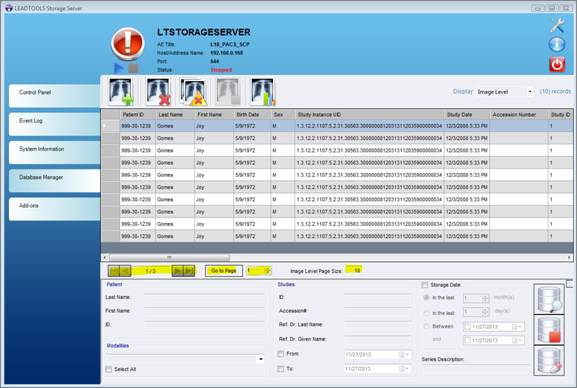
The Database Manager Options page has the following fields:
This is the maximum number of records displayed on a single page in the Database Manager. When Display is Image Level, all pages except the last one will contain exactly the specified number of records. The last page will contain the remainder. If Display is Patient Level, Study Level, or Series Level, then the number of records in each page can be less than the Image Level Page Size.
Use these options to specify when the Database Manager will display the pagination control.
(The pagination control is on the Database Manager tab and is shown in the following figure:
![]()
To navigate between pages, click the arrows or select a page number and click Go to Page.)
The Pagination Buttons group on the Database Manager Options page has the following radio buttons:
As an example, suppose there are 25 total instances in your database. If you set the ‘Image Level Page Size’ to 10, then clicking the Search button on the Database Manager will result in three pages of records. The first and second pages each display ten records, and the last page displays five records. Click the arrows or the Go to Page button to navigate between pages.
 Products | Support | Contact Us | Copyright
Notices
Products | Support | Contact Us | Copyright
Notices