| LEADTOOLS Raster Imaging C DLL Help > LEADTOOLS Raster Imaging Features > Virtual Printer Driver > Internet Printing Protocol (IPP) with the LEADTOOLS Virtual Printer |
Take the following steps to create and run a program that uses the LEADTOOLS Network Virtual Printer Driver as an IPP printer.
|
1. |
Start Visual Studio 2008. |
|
2. |
From the main menu, choose File->New->Project... |
|
3. |
In the New Project dialog box, choose Visual C++ in the Project Types drop-down list box, and choose MFC Application in the Templates. |
|
4. |
Type the project name as “LEADTOOLS IPP Demo” in the Project Name field. |
|
5. |
In the Location field, use the Browse button to navigate to the Examples subdirectory (such as <LEADTOOLS_INSTALLDIR>\Examples\CDLL\). Clear the Create Directory For Solution and Add to Source Control check boxes. Click OK. |
|
6. |
Click Next> in the MFC Application Wizard. |
|
7. |
Select dialog based application type. Then click Finish. Three folders will be created, entitled: "Header Files", "Resource Files", and "Source Files". |
|
8. |
From the main menu, choose Project->Properties. |
|
9. |
In the Properties dialog box, choose Configuration Properties then select C/C++ then select Preprocessor. |
|
10. |
On the right side set the Preprocessor Definitions Property to use LTVXX_CONFIG then click OK. |
|
11. |
In Solution Explorer, open stdafx.h, and add the following code to the end of the file: |
#include "winspool.h"
#include "..\..\..\Include\Ltprinter.h"
|
12. |
In the Source Files, right -click the folder. Choose Add->New Item. Choose Code in Categories, and C++ File (.cpp) in Templates. Type Imports in the name field and click Add. |
|
13. |
Right-click Imports.cpp and click Open. Add the following code: |
#include "stdafx.h"
#if defined(WIN64)
#pragma comment(lib, "..\\..\\..\\Lib"L_VER_DESIGNATOR\\CDLLVC10\\x64\\Ltkrn_x.lib)
#pragma comment(lib, "..\\..\\..\\Lib"L_VER_DESIGNATOR\\CDLLVC10\\x64\\Ltprinter_x.lib)
#pragma comment(lib, "..\\..\\..\\Lib"L_VER_DESIGNATOR\\CDLLVC10\\x64\\LtDocWrt_x.lib)
#pragma comment(lib, "..\\..\\..\\Lib"L_VER_DESIGNATOR\\CDLLVC10\\x64\\Ltfil_x.lib)
#pragma comment(lib, "..\\..\\..\\Lib"L_VER_DESIGNATOR\\CDLLVC10\\x64\\Ltdis_x.lib)
#else
#pragma comment(lib, "..\\..\\..\\Lib"L_VER_DESIGNATOR\\CDLLVC10\\Win32\\Ltkrn_u.lib)
#pragma comment(lib, "..\\..\\..\\Lib"L_VER_DESIGNATOR\\CDLLVC10\\win32\\Ltprinter_u.lib)
#pragma comment(lib, "..\\..\\..\\Lib"L_VER_DESIGNATOR\\CDLLVC10\\win32\\LtDocWrt_u.lib)
#pragma comment(lib, "..\\..\\..\\Lib"L_VER_DESIGNATOR\\CDLLVC10\\win32\\Ltfil_u.lib)
#pragma comment(lib, "..\\..\\..\\Lib"L_VER_DESIGNATOR\\CDLLVC10\\win32\\Ltdis_u.lib)
#endif // #if defined(WIN64)
|
14. |
Right-click LEADTOOLS IPP DemoDlg.h and click Open. Add the following function definitions to the CLEADTOOLSIPPDemoDlg class: |
afx_msg void OnBnClickedOk();
static L_INT (EXT_CALLBACK OnEmfRgsProc)( L_WCHAR*, HGLOBAL, L_UINT, L_VOID* );
static L_INT (EXT_CALLBACK OnJobInfoProc)( L_WCHAR*, DWORD, DWORD, L_VOID* );

L_L_INT EnableInternetPrinting();
L_VOID RegisterJobCallBack();
L_VOID RegisterEmfCallBack();

L_INT InstallPrinter();

BOOL SharePrinter(LPTSTR szPrinterName, LPTSTR szShareName, BOOL bShare);
|
15. |
Right-click LEADTOOLS IPP DemoDlg.cpp and click Open. Add the following function: |
//Locate BEGIN_MESSAGE_MAP(CLEADTOOLSIPPDemoDlg, CDialog) and add the following functions

ON_BN_CLICKED(IDOK, &CLEADTOOLSIPPDemoDlg::OnBnClickedOk)

 //Add the following function implementations


void CLEADTOOLSIPPDemoDlg::OnBnClickedOk()
{
  InstallPrinter();
  EnableInternetPrinting();
  RegisterEmfCallBack();
  RegisterJobCallBack();
}

L_INT CLEADTOOLSIPPDemoDlg::InstallPrinter ()
{
   PRNPRINTERINFO docPrinterInfo;
   memset(&docPrinterInfo, 0, sizeof(PRNPRINTERINFO));
   docPrinterInfo.uStructSize = sizeof(PRNPRINTERINFO);
   docPrinterInfo.pszRootDir      =  TEXT("C:\\LEADTOOLS 18\\Bin\\Common\\PrinterDriver");
   docPrinterInfo.pszPrinterName  =  TEXT("TestPrinter");
   docPrinterInfo.pszPortName     =  TEXT("TestPrinter");
   docPrinterInfo.pszMonitorName  =  TEXT("TestPrinter");
   docPrinterInfo.pszDriverName   =  TEXT("TestPrinter");
   docPrinterInfo.pszProductName  =  TEXT("TestPrinter");
   docPrinterInfo.pszRegistryKey  =  TEXT("SOFTWARE\\Printer\\TestPrinter");
   docPrinterInfo.pszUrl          =  TEXT("/default.htm");
#if defined(WIN64)
   docPrinterInfo.pszPrinterExe   =  TEXT("C:\\LEADTOOLS 18\\Bin\\CDLLVC10\\x64\\LEADTOOLS IPP Demo.exe")
#else
   docPrinterInfo.pszPrinterExe   =  TEXT("C:\\LEADTOOLS 18\\Bin\\CDLLVC10\\Win32\\LEADTOOLS IPP Demo.exe");
#endif // #if defined(WIN64)
   docPrinterInfo.pszAboutString  =  TEXT("LEADTOOLSPriner");
   docPrinterInfo.pszAboutIcon    =  TEXT("c:\\LEADTOOLSPriner.ico");
   L_INT nRet = L_PrnInstallPrinter(&docPrinterInfo, 0);
   SharePrinter(TEXT("TestPrinter"), TEXT("TestPrinter"), TRUE);
   return nRet;
}
BOOL CLEADTOOLSIPPDemoDlg::SharePrinter( LPTSTR szPrinterName, LPTSTR szShareName, BOOL bShare )
{
   HANDLE            hPrinter;
   PRINTER_DEFAULTS   pd;
   DWORD            dwNeeded;
   PRINTER_INFO_2      *pi2;
   ZeroMemory( &pd, sizeof(PRINTER_DEFAULTS) );
   pd.DesiredAccess = PRINTER_ALL_ACCESS;
   if( ! OpenPrinter( szPrinterName, &hPrinter, &pd ) )
   {
      return FALSE;
   }

   if( ! GetPrinter( hPrinter, 2, NULL, 0, &dwNeeded ) )
   {
      if( GetLastError() != ERROR_INSUFFICIENT_BUFFER )
      {
         // GetPrinter() has failed - bail out.
         ClosePrinter( hPrinter );
         return FALSE;
      }
   }
   pi2 = (PRINTER_INFO_2*)malloc( dwNeeded );
   if( pi2 == NULL )
   {
      ClosePrinter( hPrinter );
      return FALSE;
   }
   if( ! GetPrinter( hPrinter, 2, (LPBYTE)pi2, dwNeeded, &dwNeeded ) )
   {
      free( pi2 );
      ClosePrinter( hPrinter );
      return FALS
   }

   pi2->pSecurityDescriptor = NULL;

   if( bShare )
   {
      pi2->pShareName = szShareName;
      pi2->Attributes |= PRINTER_ATTRIBUTE_SHARED;
   }

   else
   {
      pi2->Attributes = pi2->Attributes & (~PRINTER_ATTRIBUTE_SHARED);
   }

   if( ! SetPrinter( hPrinter, 2, (LPBYTE)pi2, 0 ) )
   {
      // SetPrinter() has failed - bail out
      free( pi2 );
      ClosePrinter( hPrinter );
      return FALSE;
   }
   // Clean up.
   free( pi2 );
   ClosePrinter( hPrinter );
   return TRUE;
}
L_INT CLEADTOOLSIPPDemoDlg::EnableInternetPrinting()
{
   // Enable Network Printing
   L_INT nRet = L_PrnSetEnableNetworkPrinting(TEXT("TestPrinter"), TRUE);
   // Enable Internet Printin
   nRet = L_PrnSetEnableInternetPrinting(TEXT("TestPrinter"), TRUE);
   return nRet;
}
void CLEADTOOLSIPPDemoDlg::RegisterEmfCallBack()
{
   L_PrnRegisterEMFCallback(TEXT("TestPrinter"),OnEmfRgsProc,this);
}
void CLEADTOOLSIPPDemoDlg::RegisterJobCallBack()
{
   L_PrnRegisterJobCallback(TEXT("TestPrinter"),OnJobInfoProc,this);
}
L_INT CLEADTOOLSIPPDemoDlg::OnEmfRgsProc( L_WCHAR * /*pszPrinter*/,
                                         HGLOBAL hMem
                                         L_UINT  uSize,
                                         L_VOID * pData
{
   static L_INT nCounter = 0;
   HANDLE hFile = INVALID_HANDLE_VALUE;
   DWORD     uSizeWritten = 0;
   L_UCHAR * pEmfData= (L_UCHAR*) GlobalLock( hMem );
   CString szFileName = TEXT("c:\\1.emf");
   if( pEmfData
   {
      hFile = CreateFile(szFileName, GENERIC_WRITE, FILE_SHARE_READ,
         NULL, CREATE_ALWAYS, FILE_ATTRIBUTE_NORMAL,NULL)
      if( hFile != INVALID_HANDLE_VALUE )
      {
         WriteFile( hFile, pEmfData, uSize, & uSizeWritten, NULL );
         CloseHandle( hFile );
      }
      GlobalUnlock( hMem );
   }
   // Do not forget to free the memory.
   GlobalFree( hMem );
   return 1;
}

L_INT CLEADTOOLSIPPDemoDlg::OnJobInfoProc( L_WCHAR * pszPrinter, DWORD dwJobID,
                                           DWORD dwFlags, L_VOID * pData )
{
   switch( dwFlags )
   {
   case PRN_JOB_STAR
      {
         //Job was started
         CStringA str
         str.Format("Job ID: %d", dwJobID);
         MessageBoxA(NULL, str.LockBuffer(), "IPP Test Demo", 0);
         str.UnlockBuffer();
      }
      break;
   case PRN_JOB_END:
      //Job was ended
      break;
   }
   return 1;
}
|
16. |
Compile and run the code to test it. Click OK in the dialog to install a new printer then enable internet printing, and connect to it from a client machine, Try to print on the newly created printer to receive EMF and Job callback events. |
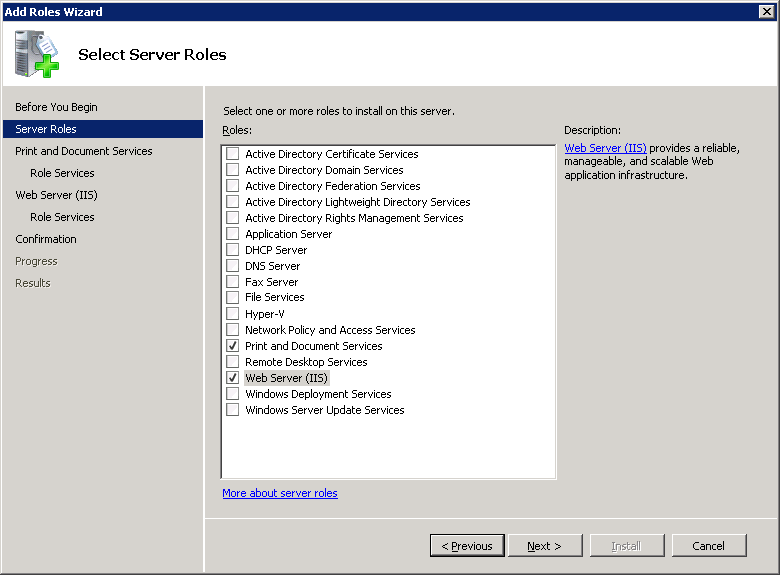
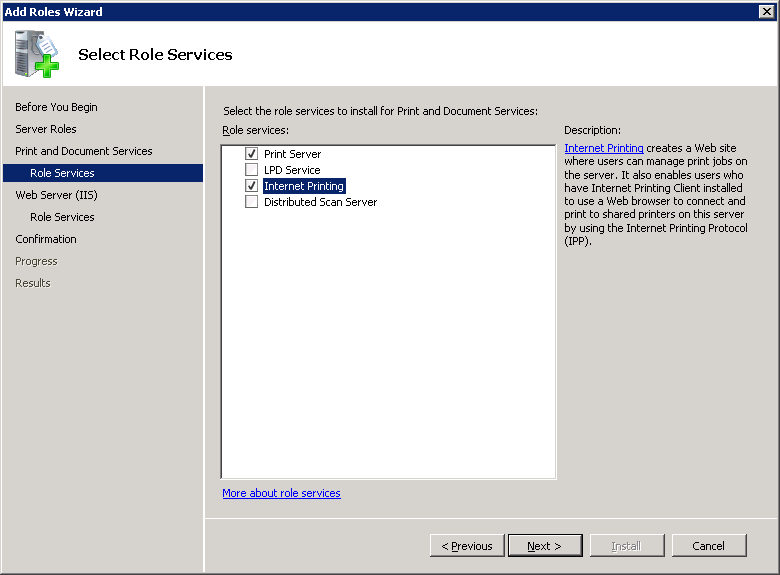
Note1: to Configure Internet printing on a computer running Windows Server 2008, perform the following steps:
1- Run the Server Manger.
2- Select Add Roles.
3- Select the following roles:
- Print and Document Services.
- Web Server (IIS).

4- In the Role Services list, select the following services:
- Print Server.
- Internet Printing.

5- Complete the Installation.
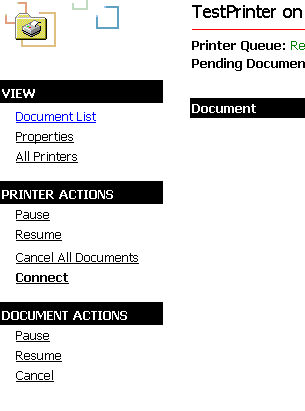
Note2: To install the printer driver on a client computer, perform the following steps:
1- Open SERVER_IP/printers in Internet Explorer:

2- Select the Installed Test Printer Name “Test Printer” and click it. The selected printer page opens.

3- Click the Connect link.
4- Complete the Installation.