| LEADTOOLS Raster Imaging C++ Class Library Help > LEADTOOLS Raster Imaging Features > Annotations > Implementing Annotations |
Annotations are based on vectored drawing functions and are associated with bitmaps as an overlay of the displayed image. LEADTOOLS supports a number of annotation types, including lines, rectangles, audio clips, hotspots, redact objects, polygons, and containers. A container is a specialized annotation object that lets you position and group other annotation objects, including other container objects. For a full list of available annotation types, refer to Types of Annotations.
LEADTOOLS maintains annotations separately from bitmaps. Your application code is responsible for maintaining the relationships between images and annotations. For example, the annotation example that ships with LEADTOOLS, creates an annotation file that has the same name as its associated image file, but with a different extension. When the image file is loaded, the program looks for an associated annotation file and loads it as well.
The functions supported by LEADTOOLS let you create automated annotations or non-automated annotations, depending on your applications requirements.
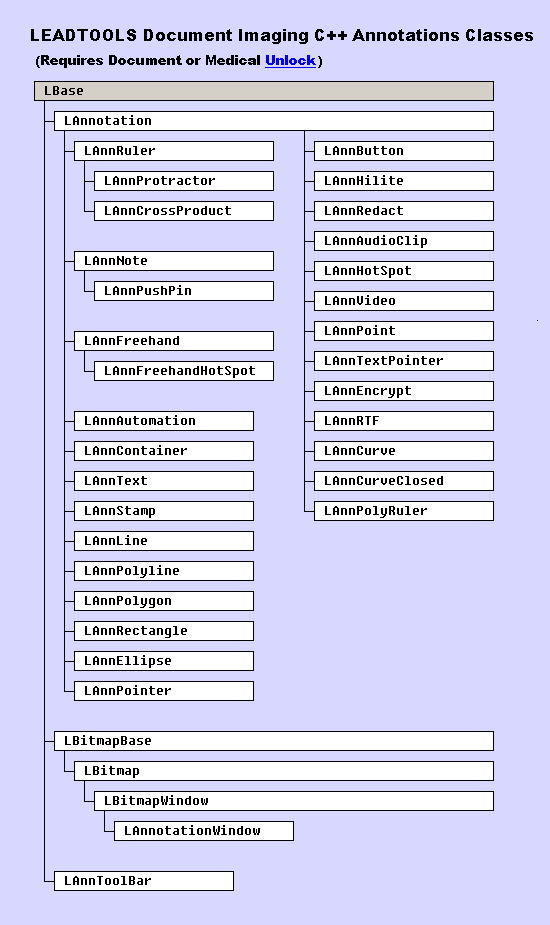
Annotations C++ Class Hierarchy Chart
The following figure displays the Annotations class hierarchy chart:

Automated Annotations
Automated annotations require an automation object to be associated with the top-level container, also known as the root container. This automation object lets you maintain default properties for all objects in the root container. For example, you can use it to set the default font and the default line width. Keep in mind, however, that scaling factors affect the appearance of these default measurements. The values are set based on the scaling factors that are in effect at the time you create the object. Features associated with automated annotations are:
Automated annotation menus appear when you right click in design mode. These menus may or may not include the hyperlink menu item.
Automated drawing lets you use the left mouse button to draw annotations in design mode.
The annotation toolbar lets you select the annotation tool to draw.
LEADTOOLS handles the activation of audio annotations and hyperlinks.
You can undo a number of user actions, executed using the automated annotations functions.
You can implement the automation using only a few supporting functions.
First, use the following function to create the root container:
Then, use the following functions to create and maintain an automation object:
LAnnAutomation::SetAutoContainer
LAnnAutomation::GetAutoContainer
LAnnAutomation::SetAutoHilightPen
LAnnAutomation::GetAutoHilightPen
The following functions provide selection capabilities:
Use the LAnnotation::CreateAnnObject function to create an annotation class object of the specified type. You can use this static function to get a proper annotation class object that is compatible and of the same type as the passed annotation handle.
You can modify and enhance the automated features using other annotation functions and the WM_LTANNEVENT message.
|
Note: |
In automation mode, the undo feature can cause the values of object handles to change. Therefore, if your application needs to identify the object that is activated or deactivated, you should use the tag property. The LAnnotation::SetTag function sets the tag, and LAnnotation::GetTag gets the current tag. |
|
Note: |
The annotation example program that ships with LEADTOOLS is implemented using high-level automated features. For more information about the annotation demo, and to see an example of the automated user interface, refer to Automated User Interface for Annotations. |
Non-automated Annotations
Non-automated annotations allow you to customize the creation of and interaction with annotations to suit your own needs. Any LEADTOOLS annotation function, except those requiring an automation object, can be used when working with non-automated annotations. When programming non-automated annotations, it is important to remember:
You must provide any menus or dialogs you wish to use for entering annotation data.
You must also provide your own means of drawing and interacting with the annotations.
No hyperlink activation is provided for non-automated annotations. In addition to providing the code for entering hyperlink type and associated parameters, you must also provide the code for accessing the default web browser and calling any programs to be run through a hyperlink.
For a list of functions pertaining to various aspects of implementing annotations, refer to:
Annotation Functions: Implementing Automation.
Annotation Functions: Working with the Toolbar.
Annotation Functions: Input and Output
Annotation Functions: Creation, Deletion and Copying
Annotation Functions: Global Properties
Annotation Functions: Size, Position and Shape
Annotation Functions: Object Properties
Annotation Functions: Display and Printing
Annotation Functions: Realizing to a Bitmap
For more information on annotations, refer to:
Automated User Interface for Annotations.
Low-Level Coordinate System for Annotations.
Implementing Annotation Security
Implementing Annotation Hyperlinks
Annotation Objects - Default Values
Annotation Objects - Automated Features
Grouping and Ungrouping Annotation Objects
Calibrating Annotation Ruler Objects
See Also:
Raster Imaging C++ Class Hierarchy Chart
Vector Imaging C++ Class Hierarchy Chart