As the final to our 3-part Excel Blog Series, we will demonstrate additional customization options available with the LEADTOOLS Excel SDK! Firstly, be sure you check out our first two blogs as we will be using the table and data from there: Load an Existing Excel File and Programmatically Change Data and Using the LEADTOOLS Excel Web Editor to Implement Functions.
As a reminder, LEADTOOLS is available to download for free via our 60-day Evaluation SDK where you can test all our amazing features and actually program with the evaluation copy before a purchase is even made.
Let's Code!
Jumping right in, we add the following to the project from the first blog: AddStyles and AddCellStyles methods to color-code the table.
static void AddStyles(LEADWorkbook workbook)
{
   Sheet sheet = workbook.GetSheetAt(0);
            CellStyle cs = workbook.CreateCellStyle();
            RasterColor[] rs =
            {
                new RasterColor(230, 57, 70),
                new RasterColor(168, 218, 220),
                new RasterColor(69, 123, 157),
                new RasterColor(29, 53, 87),
                new RasterColor(0, 0, 0)
            };
            Font boldedBlack = workbook.CreateFont("boldedBlack", 11, FontStyle.Bold, RasterColor.Black);
            Font regularBlack = workbook.CreateFont("regularBlack", 11, FontStyle.Regular, RasterColor.Black);
            Font boldedWhite = workbook.CreateFont("boldedWhite", 11, FontStyle.Bold, RasterColor.White);

            for (int i = 0; i < sheet.LastRowIndex + 1; i++)
            {
                Row row = sheet.GetRowAt(i);
                for (int j = 0; j < row.LastCellIndex; j++)
                {
                    var cell = row.GetCellAt(j);
                    switch (j)
                    {
                        case 0:
                            AddCellStyles(cs, rs[0], i == 0);
                            cs.Font = i == 0 ? boldedBlack : regularBlack;
                            break;
                        case 1:
                            AddCellStyles(cs, rs[1], i == 0);
                            cs.Font = i == 0 ? boldedBlack : regularBlack;
                            break;
                        case 2:
                            AddCellStyles(cs, rs[2], i == 0);
                            cs.Font = i == 0 ? boldedBlack : regularBlack;
                            break;
                        case 3:
                            AddCellStyles(cs, rs[3], i == 0);
                            cs.Font = i == 0 ? boldedWhite: regularBlack;
                            break;
                        case 4:
                        case 5:
                            AddCellStyles(cs, rs[4], i == 0);
                            cs.Font = i == 0 ? boldedWhite : regularBlack;
                            break;
                    }
                    cell.SetStyle(cs);
                }
            }
}
AddStyles Method to Workbook
Next, we pass the workbook to the AddStyles method. We load the sheet, create and initialize our CellStyle and RasterColor variables that we use in applying the styling to each cell, then iterate through each cell in our table and the switch statement assigns the styling to each cell. Each case corresponds to the column we are in, which will apply styles that will match the rest of the column with a border. We check to see if we are on a header column row as well, which applies a background color and a bolded font in addition to the normal styling. We call SetStyle after each loop to apply that style to the cell.
static void AddCellStyles(CellStyle cs, RasterColor rs, bool header)
{
    CellBorder cb = new CellBorder(BorderStyle.Medium, rs);
    cs.SetCellBorder(BorderType.Top, cb);
    cs.SetCellBorder(BorderType.Left, cb);
    cs.SetCellBorder(BorderType.Right, cb);
    cs.SetCellBorder(BorderType.Bottom, cb);
    if (header) { cs.BackgroundColor = rs; }
    else { cs.BackgroundColor = RasterColor.FromKnownColor(RasterKnownColor.Transparent); }
}
This is the inner workings of the helper function for our AddStyles function. We grab both the CellStyle and RasterColor we are working with for the current cell and check to see if it’s a header column cell or not.
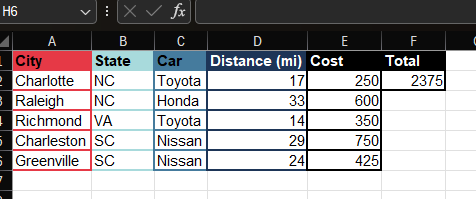 We apply the border style and color to the top, left, bottom, and right of the cell. Lastly, we use our header Boolean variable to determine if we apply a background color to the cell. You can see our styling worked!
Thanks for reading and joining us on this ride that barely scratches the surface on all of what the LEADTOOLS Excel SDK can offer you and your applications!
You can download the full project file and sample Excel files used in this series as well as the LEADTOOLS Evaluation SDK so you can test all this and more! The evaluation SDK lasts 60 days, is fully-functional, and you get help along the way with our Solution Engineers via discord, our robust documentation, and demos - all for FREE! So, what are you waiting for?
