|
Available in LEADTOOLS Imaging Pro, Vector, Document, and Medical Imaging toolkits. |
Using the Intelligent Rescale Demo
Coached Rescale (Intelligent Rescale with Applied Mask)
Coached Downscale (Intelligent Downscale with Applied Mask)
Coached Upscale (Intelligent Upscale with Applied Mask)
Opening an Image for Rescale
From \LEADTOOLS 15\Bin\API\Win32, launch ImagePF.exe
Browse to select an image to resize
On the Main Menu, select Imageà
Intelligent Rescale
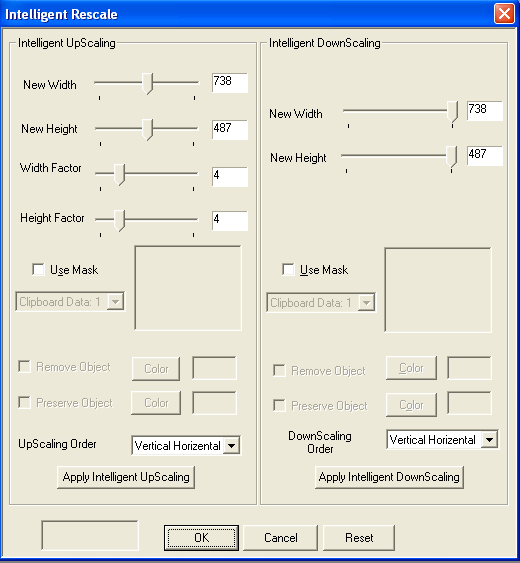
The Intelligent Rescale Dialog
will open:

Intelligent Downscale
LEADTOOLS Intelligent Downscale will calculate which horizontal or vertical chains of pixels contribute least to the important features of an image, and remove them first when resizing. This reduces image size without changing image colors, while preserving the "substance" of the image.
On the right-hand side of the dialog, from the Downscale section, select a new width, height, or both.
Choose the dimension of downscale needed (width or height).
Choose downscale order from the Downscale Order combo box.
Note: You will get the best results (fewest image artifacts) if you alternately adjust Width and Height in proportion to key image features. For example, in an image with a lot of blank blue sky, first downscale Height to achieve maximim reduction. Then downscale width.
Click Apply Downscale
To return to the original image, click Reset.
Intelligent Upscale
LEADTOOLS Intelligent Upscale calculates which horizontal or vertical chains of pixels contribute least to the important features of an image, and then inserts them twice in the new enlarged image. This has the effect of expanding the background space between major image features, without distorting the features themselves.
On the right-hand side of the dialog, from the Upscale section, select a new width, height, or both.
Choose the dimension of upscale needed (width or height).
Set the width and/or height insertion factor as 1.
Choose new width or new height or both.
Click Apply Upscale.
If the resulting image is not smooth, click Reset to return to the original image. Then, increase the insertion factor, and repeat.
Tip:
By
default, dark objects are weighted as "unimportant." This means
that dark objects are usually affected (shrunk or grown) during downscale
or upscale.
If you do not want dark objects to be affected, first negate the image,
apply downscale or upscale, and then negate the image again to return
to the colors of original image.
Coached Rescale (Intelligent Rescale with Applied Mask)
For even smarter rescale, you can designate areas to protect or remove during rescale. This allows you to maximize the space available in the image for important image features, while eliminating unimportant image areas.
Coached Downscale (Intelligent Downscale with Applied Mask)
Follow Intelligent Downscale steps 1-3 above
Select the Mask check box. This will enable the Freehand Draw tool.
Using the Freehand Draw tool, select the area to be protected or removed.
Note: For best results, paint the mask area completely from one edge of the image to the other, including the object to be protected or removed:
|
Original Image |
Wrong |
Right |
|
|
|
|
To remove the object:
In
the Downscale section of the dialog,
be sure that the Width or Height property is reduced enough to eliminate
the object.
For example, if you wish to remove an object that is approximately
100 pixels wide on the original image, you must reduce the width by at
least 100 pixels.
Select the Remove Object check box, then click Remove Object.
or
To preserve the object,
select the Preserve Object check
box, then click Preserve Object.
The Choose Color dialog will
open.
Select a color that does not exist in the original image. (This sets the COLORREF value.)
Click Apply Downscale.
If results are not satisfactory, to return to the original image, click Reset. Adjust Width/Height settings as needed, and try again.
Coached Upscale (Intelligent Upscale with Applied Mask)
Follow Intelligent Downscale steps 1-3 above
Select the Mask check box. This will enable the Freehand Draw tool.
Using the Freehand Draw tool, select the area to be protected or removed.
To remove the object:
In
the Upscale section of the dialog,
be sure that the Width or Height property is reduced enough to eliminate
the object.
For example, if you wish to remove an object that is approximately
100 pixels wide on the original image, you must reduce the width by at
least 100 pixels.
Select the Remove Object check box, then click Remove Object.
or
To
preserve the object, select the Preserve
Object check box, then click Preserve
Object.
The Choose Color dialog will
open.
Select a color that does not exist in the original image. (This sets the COLORREF value.)
Click Apply Upscale.
If the resulting image is not smooth, click Reset to return to the original image. Then, increase the insertion factor, and repeat.
For more information, refer to:
Image Processing: Intelligent Rescale