Installing and Configuring the Web Service
Installing and Configuring the Web Service
Overview
The Web Service site is responsible for providing services to the LEADTOOLS Medical Web Viewer Demo. It is composed of 3 groups of components: Web Services, add-ins, and Data Access Layers. The Web Services authenticate and authorize all requests before passing them to any add-ins. The add-ins use the Data Access Layers to access the database as needed. Therefore the Web Service site needs to be able to access the SQL Server.
Also, the Data Access Layers used by the add-ins need to access the GlobalPacs.config file as well the advanced.config file. Both config files are in locations outside the Web Service's website directory and are shared by the PACS Server Framework. Some add-ins and Data Access Layer files are shared by the PACS Server Framework as well. These shared files will be identified in the next section.
Folder Structure
The entire web service’s site folder structure is contained in the folder: C:\LEADTOOLS23\Examples\Viewers\DotNet\MedicalWebViewer\Medical.WebViewer.WCF.
The following files are required for the Web Service website to service the LEADTOOLS Medical Web Viewer Demo. This list depicts the folder structure required as well:
Root directory (Leadtools.Medical.WebViewer.WCF - This folder name can be renamed)
-
Bin
- atl100.dll
- EsuApiLib.dll
- Ionic.Zip.dll
- Leadtools.Annotations.Automation.dll
- Leadtools.Annotations.Engine.dll
- Leadtools.Annotations.dll
- Leadtools.Annotations.Rendering.WinForms.dll
- Leadtools.Annotations.WinForms.dll
- Leadtools.Codecs.Bmp.dll
- Leadtools.Codecs.Cmp.dll
- Leadtools.Codecs.dll
- Leadtools.Codecs.J2k.dll
- Leadtools.Codecs.Png.dll
- Leadtools.Codecs.Raw.dll
- Leadtools.Codecs.Tif.dll
- Leadtools.DataAccessLayers.Core.dll
- Leadtools.DataAccessLayers.dll
- Leadtools.Dicom.AddIn.dll
- Leadtools.Dicom.Annotations.dll
- Leadtools.Dicom.Common.dll
- Leadtools.Dicom.dll
- Leadtools.Dicom.Imaging.dll
- Leadtools.Dicom.Scp.dll
- Leadtools.Dicom.Scu.dll
- Leadtools.Dicom.Tables.dll
- Leadtools.dll
- Leadtools.Drawing.dll
- Leadtools.Document.Writer.dll
- Leadtools.ImageProcessing.Color.dll
- Leadtools.ImageProcessing.Core.dll
- Leadtools.ImageProcessing.Effects.dll
- Leadtools.ImageProcessing.Utilities.dll
- Leadtools.Logging.dll (shared)
- Leadtools.Logging.Medical.dll (shared)
- Leadtools.Medical.DataAccessLayer.dll (shared)
- Leadtools.Medical.ExternalStore.DataAccessLayer.dll
- Leadtools.Medical.Logging.DataAccessLayer.dll
- Leadtools.Medical.Options.DataAccessLayer.dll (shared)
- Leadtools.Medical.PermissionsManagement.DataAccessLayer.dll (shared)
- Leadtools.Medical.Storage.AddIns.dll (shared)
- Leadtools.Medical.Storage.DataAccessLayer.dll (shared)
- Leadtools.Medical.UserManagementDataAccessLayer.dll (shared)
- Leadtools.Medical.WebViewer.AddIns.dll
- Leadtools.Medical.WebViewer.Annotations.DataAccessLayer.dll
- Leadtools.Medical.WebViewer.Core.dll
- Leadtools.Medical.WebViewer.ImageDownloadAddin.dll
- Leadtools.Medical.WebViewer.Jobs.DataAccessLayer.dll
- Leadtools.Medical.WebViewer.Jobs.dll
- Leadtools.Medical.WebViewer.PatientAccessRights.DataAccessAgent.dll
- Leadtools.Medical.WebViewer.WCF.dll
- Leadtools.Medical.Winforms.dll
- Leadtools.Medical.Worklist.DataAccessLayer.dll
- Leadtools.Medical.Workstation.DataAccessLayer.dll
- Leadtools.MedicalViewer.dll
- Leadtools.Pdf.dll
- Leadtools.Tasks.ServerProcess.exe
- Leadtools.Wcf.WebHttpCorsBehavior.dll
- mfc100.dll
- mfc100u.dll
- mfcm100.dll
- mfcm100u.dll
- Microsoft.Practices.EnterpriseLibrary.Common.dll
- Microsoft.Practices.EnterpriseLibrary.Data.dll
- Microsoft.Practices.EnterpriseLibrary.Data.SqlCe.dll
- Microsoft.Practices.EnterpriseLibrary.Logging.dll
- Microsoft.Practices.ObjectBuilder2.dll
- Microsoft.Practices.Unity.dll
- Microsoft.WindowsAzure.Storage.dll
- msvcp100.dll
- msvcr100.dll
- AnnotationsService.svc
- AuthenticationService.svc
- ObjectQueryService.svc
- ObjectRetrieveService.svc
- PacsQueryService.svc
- PACSRetrieveService.svc
- PatientAccessRightsService.svc
- StoreService.svc
- web.config
Application Pool

Using the Internet Information Services (IIS) Manager, add an application pool specifically for use with the Web Service using its default settings, except for the following:
- When adding the application pool, be sure to select the version of the .NET framework you intend to use.
- Once added, be sure to set the “Enable 32-Bit Application” setting to “true” if you are using the 32-bit versions of the LEADTOOLS .NET DLLs.
- If you are using a Service Account, you will need to modify the “Identity” setting, setting it to use your User Service Account. Otherwise, adjust the “Identity” setting to use “LocalSystem”.
Add Application

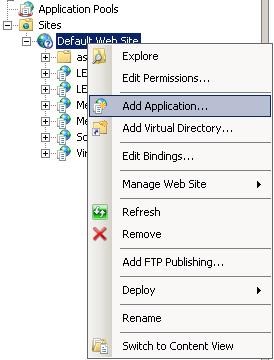
Using the Internet Information Services (IIS) Manager, add a Web Application site, specifying the root directory for the Web Service as the physical path (the default root directory name is Leadtools.Medical.WebViewer.WCF.)
Also specify that the Web Application site will use the Application Pool you created specifically for the Web Service Site.
Web.config
The Web Service site contains a web.config file which contains application-specific information the Web Service needs to know in order to function properly. The following listing describes the application-specific contents of the web.config file that will need to be configured on each deployed machine.
appSettings
- license - Our software will use the file specified (full path to the file must be specified) for unlocking the features of the toolkit in this application. More information about this feature can be located on our web site.
- key - Our software will use the alpha-numeric key specified for unlocking the features of the toolkit in this application. More information about this feature can be located on our web site.
- ClientAe - When querying a remote PACS, this value will be used as the calling AE title in the CFind request. This value is initially set by the CSPACSConfigDemo_Original.exe application under “Main Client”.
- ClientIP - When querying a remote PACS, this value will be used as the calling AE title’s IP Address in the CFind request. This value is initially set by the CSPACSConfigDemo_Original.exe application, although it cannot be explicitly set in the demo. The value is obtained automatically using Windows API functions.
- ClientPort - When querying a remote PACS, this value will be used as the calling AE title’s port in the CFind request. This value is initially set by the CSPACSConfigDemo_Original.exe application under “Main Client”.
- ServerAe - When retrieving from a remote PACS, this value will be used as the destination AE title in the CMove request. This value is initially set by the CSPACSConfigDemo_Original.exe application under “Storage Server”.
- ServerIP - When retrieving from a remote PACS, this value will be used as the destination AE title’s IP address in the CMove request. This value is initially set by the CSPACSConfigDemo_Original.exe application although it cannot be explicitly set in the demo. The value is obtained automatically using Windows API functions. o ServerPort - When retrieving from a remote PACS, this value will be used as the destination AE title’s port in the CMove request. This value is initially set by the CSPACSConfigDemo_Original.exe application under “Storage Server”.
- globalConfigPath - This is the full path (path + filename) to the GlobalPacs.config file. The location of this file is necessary in order for the Web Service and AddIns to obtain the connection strings to database providers and configuration information for particular database access agents. It is used in the AddInsFactory constructor during the creation of each of the Data Access Agents, in the AddInsFactory.cs file.
- storageServerServicePath - This is the full directory path to the Storage Server’s Service directory. This directory contains the “advanced.config” file which holds all the settings for the Leadtools.Medical.Storage.AddIns.dll classes. The settings are used during a store operation by the Web Addin’s Store Addin (Leadtools.Medical.WebViewer.Addins.dll).
An example of a time when a store would occur would be when a user saves a Secondary Capture image or Presentation State (Annotations) from the web client to the server.
LEADTOOLS Licensing
You need to add your license file and developer key information to the web service site in order for it to function in release mode.
(There are two methods in which the license file information can be specified for the web service. The simplest method is to create a Leadtools.dll.config file that will reside in the same directory as the Leadtools.dll. Whenever the LEADTOOLS (kernel) DLL is loaded, it will automatically look for this configuration file. If it is present, it will attempt to load the license information and internally call the RasterSupport.SetLicense function for setting a license file. If the configuration file is not present or contains invalid license information, the SDK will run in evaluation mode. In evaluation mode, it will run for a period of 60-days with a licensing dialog. After this period, the SDK will generate exceptions and no longer function.
There is a starter configuration file in the "C:\LEADTOOLS23\Bin\DotNet4\Win32" and x64 directories. You can copy it, or use the following listing (they are the same). In the configuration file, specify the license information in the LeadtoolsLicenses element:
<?xml version="1.0" encoding="utf-8"?><configuration><configSections><section name="LeadtoolsLicenses" type="System.Configuration.NameValueFileSectionHandler" /></configSections><LeadtoolsLicenses><add key=" value=" /></LeadtoolsLicenses></configuration>
Here is a mock example of a modified config file:
<?xml version="1.0" encoding="utf-8"?><configuration><configSections><section name="LeadtoolsLicenses" type="System.Configuration.NameValueFileSectionHandler" /></configSections><LeadtoolsLicenses><add key="C:\LEADTOOLS23\License\MyLicFile.lic" value="abc123xyz" /></LeadtoolsLicenses></configuration>
**Note that the value attribute contains the contents of the KEY file, but not a path to the file itself.
Verify that the service has been set up correctly
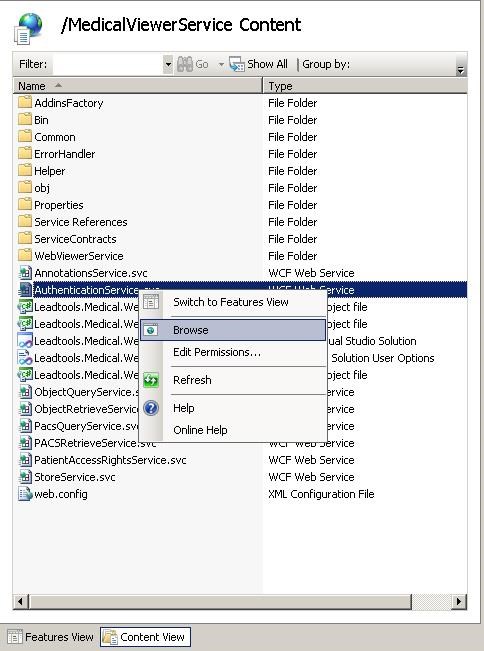
You can quickly verify that the service is working by browsing to the Web Application in the IIS Manager, selecting the web service site, selecting the content view tab at the bottom, then right-clicking on a *.svc file and selecting “Browse…” from the context menu. The following figure shows the context menu.

Selecting Browse in the context menu opens the browser, as shown below:

