Implementing Annotations
Note: This topic is for Document/Medical only.
LEADTOOLS maintains annotations separately from bitmaps. Annotations, which are based on vectored drawing functions, are associated with a bitmap only as an overlay of the displayed image. Ordinarily, your application code is responsible for maintaining the relationships between images and annotations. For example, the annotation example that ships with LEADTOOLS, creates an annotation file that has the same name as its associated image file, but with a different extension. When the image file is loaded, the program looks for an associated annotation file and loads it as well.
Database operations are an exception. When binding to a data control in Visual Basic, if a LEAD control has annotations, they are automatically stored with the bitmap. With ODBC operations, annotations are not supported.
The LEAD control implements annotations by turning on automated features. You can set the following property to let a user add annotations (in design mode) or view annotations (in run mode). You can also use this property to make the annotations invisible.
The following property lets you automatically rotate annotations to match the bitmap's rotation:
The following property lets you automatically resize annotations to match the bitmap, after the bitmap has been resized:
In design mode, the following property lets you select an annotation tool:
Run mode activation of a hot spot or button annotation generates the following event where you can add your own code:
If your application requires you to uniquely identify an annotation object, you can use the following methods to maintain numeric tags, and retrieve an object based on that tag:
The following method lets you identify the type of the specified annotation object:
To determine the number of items present in an object, use the following:
The following events let you add code to adapt your application to the automated annotation features:
The following methods let you flip, reverse, rotate, or move annotations programmatically:
The following properties and methods let you create, manipulate, and remove annotation objects:
The following properties let you get the boundaries of the bounding rectangle of the specified annotation object:
AnnBoundingRectHeight property
The following methods let you handle a region:
The following methods let you work with the Ruler object:
The following methods let you handle the annotation object characterstics:
AnnGetPredefinedMetafile method
AnnSetPredefinedMetafile method
AnnGetFontStrikeThrough method
AnnSetFontStrikeThrough method
The following methods let you use ROP2:
The following methods let you handle the bitmap:
When painting annotations on a bitmap, normally, the image is painted first, and then the annotations are rendered. This can cause flicker, and, it allows the portion under the annotation objects, for example a Redact object, to be visible. To avoid this flicker, enable double buffer image display by setting the DoubleBuffer property to TRUE.
The following methods and properties let you select annotation objects relative to a window:
The following methods let you group or ungroup annotations:
For more information on grouping and ungrouping annotations, refer to Grouping and Ungrouping Annotation Objects.
You can manipulate the mouse when working with annotations using the following:
The following method lets you apply annotations to the bitmap, itself.
The following method lets you restore the background of redact objects.
The following methods let you load annotations from a file or save them to a file:
The following method lets you save annotations in a Wang compatible TIFF tag:
The following methods and property support Windows clipboard operations:
The following property and methods let you control and customize the menus and other text strings that appear in automation mode:
AnnAutoDialogFontSize property
AnnGetAutoMenuItemEnable method
AnnSetAutoMenuItemEnable method
For information on modifying the annotation automation menu through the AnnMenu object, refer to Annotation Menu.
To undo changes made to objects or automation operations, use the following methods and properties:
For more information on undoing operations, refer to Undoing Automation Operations.
You can use LEADTOOLS DLL functions to further customize the automated annotation features. Keep in mind, however, that the ActiveX relies on particular ways of identifying, scaling and positioning annotation objects. Modifying the behavior with DLL functions can break the automated features. The following methods, properties, and events can be helpful when using DLL functions:
User Interface for Annotations
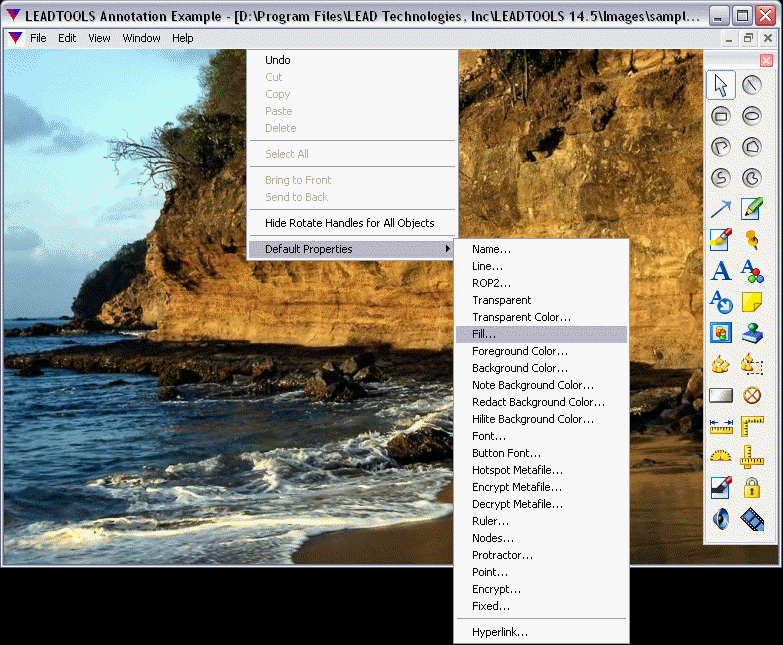
In design mode, you can select tools using the AnnTool property and draw annotation objects over the image in the window. You can then use the right mouse button to get a pop-up menu that is tailored to each object type. You can include the Annotation Toolbar to make tool selection easier. The toolbar and the pop-up menu appear as shown in the following example:

The popup menu is context sensitive. It lists only the properties that can be changed on the selected object or objects. If you use the popup menu to change a property, the value that you specify is applied to the current selection, and it becomes the default for the next object.
The following topics describe the automated annotation features for particular objects and tools:
See Also