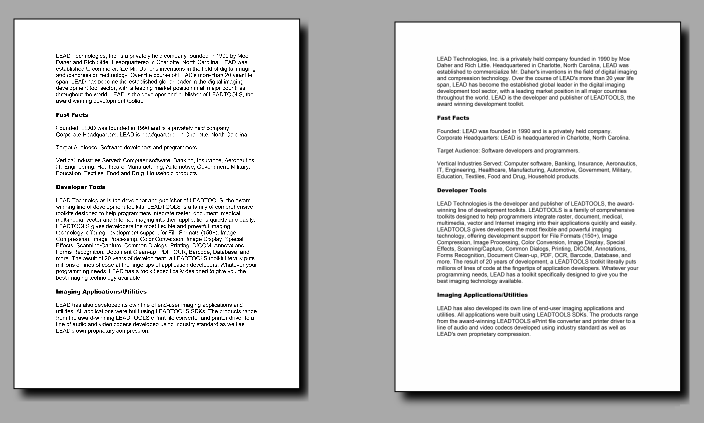
Image Viewer Interpolation
This illustration shows an image viewer running in a browser showing two items with the same image. The image is a typical 8.5- by 11-inch document scanned at 300 DPI. The image on the left is how the ImageViewer would show it using the browser's built-in interpolation. The image on the right is displayed using LEADTOOLS scale-to-gray interpolation:

Interpolating the image data may not be an instant operation. A typical 8.5- by 11-inch document at 300 DPI (2550 by 3300 pixels) would take anywhere between 100 milliseconds and 1 second, depending on the browser and device. Thus, ImageViewer uses JavaScript Web Workers (when supported, and a JavaScript timeout workaround otherwise) to perform the interpolation in a separate thread and update the surface with the interpolated image when needed. All of this is performed automatically and the application only needs to set the ImageViewer.InterpolationMode property to the desired value.
Interpolation Data
The JavaScript MaximumInterpolationSize property takes an integer value to specify how much data should be used for interpolation. If either the width or height is larger than this value (the default being 4096 pixels), the page is scaled down until that dimension matches the MaximumInterpolationSize value. In this way, less input data is provided to the interpolator. This size change can speed up interpolation time and reduce memory consumption - but also provides weakened interpolation results. For another way to manage interpolation memory consumption, see InterpolationRunMode, discussed below.
Interpolation Run Modes
The JavaScript InterpolationRunMode property takes a value of InterpolationRunMode to specify whether interpolation occurs sequentially or in parallel. Refer to InterpolationRunMode for more information.
Interpolation Modes
Refer to InterpolationMode for a description of the interpolation modes supported by ImageViewer.
Using Interpolation
Perform the following steps to use interpolation in your application:
-
The interpolation is performed using LEADTOOLS Image Processing support. The JavaScript library that contains the interpolation code is
Leadtools.ImageProcessing.Core.js. Make sure this file is included in your application with the rest of the LEADTOOLS JavaScript libraries. -
Set the static ImageViewer.ImageProcessingLibrariesPath property to the path where the
Leadtools.ImageProcessing.Core.jsfile is relative to page. For example, if the .js files are in a folder called "lib", then use the following code before using interpolation in ImageViewer:
lt.Controls.ImageViewer.ImageProcessingLibrariesPath = "lib";
-
Create the ImageViewer instance as usual, for example this code from Using Image Viewer:
// Get the parent div for the image viewervar div = document.getElementById("imageViewerContainer");// Create a new image viewer instancevar createOptions = new lt.Controls.ImageViewerCreateOptions(div);var imageViewer = new lt.Controls.ImageViewer(createOptions);// Load an image into itimageViewer.imageUrl = "http://localhost/images/ocr1.png";// Set Pan/Zoom as the interactive mode. Click (touch) and drag to pan, CTRL-Click (pinch) and drag to zoom -
Set the value of ImageViewer.InterpolationMode to the desired value. We set a black and white image in the viewer that can be interpolated with InterpolationMode.Resample:
imageViewer.InterpolationMode = lt.Controls.InterpolationMode.resample; -
This is it. Run the demo and notice that when you zoom the image out (make it smaller), the interpolation will run to enhance the quality. The interpolation is applied as you zoom in and out and the user interface stays responsive since the image viewer is using a web worker.
Note that using InterpolationMode.ScaleToGray may produce better results if the original image was bitonal (1 bit/pixel black and white image). However, in most cases InterpolationMode.Resample can work for both black/white and color images without any noticable difference in appearance or speed and it is recommended to use it at all times.
Interpolation happens when the result of the transformation on the image results in a display size that is smaller than the original image size. When this transformation results in the same or larger display size, then the viewer will not use interpolation.
The ImageViewer starts and stops the interpolation as needed (within the bounds of InterpolationRunMode) and the ImageViewer.Interpolation event occurs with information on when this process started, completed or was aborted as follows:
-
When InterpolationMode is not InterpolationMode.None, the viewer will monitor the size of the displayed image (or images for each item). When the display size becomes smaller than the original image size, the Interpolation event is fired with Status equals to InterpolationStatus.Started to indicate that the viewer has started this process. The application can manually abort interpolation at any time if desired by setting the value of IsCanceled to true.
-
When the process is finished and the data is ready, the viewer renders this data on the surface of each image and the Interpolation event is fired again with Status equals to InterpolationStatus.Completed.
-
If during the period between Started and Completed the user zooms the viewer in or out or adds/remove images or any other operation that would cause ImageViewer.UpdateTransform to be called, the Interpolation event is fired with Status equals to InterpolationStatus.Aborted and the data is disregarded. The operation will start again after UpdateTransform has finished working to use the up to date image data and transformation
-
If an error occurs during interpolation, then Interpolation event is fired with Status set to InterpolationStatus.Error and the error object in Error.
