Is this page helpful?
Configuring the LEADTOOLS Storage Server Application using the Control Panel:DICOM Server
The DICOM Server button on the Control Panel of the LEADTOOLS Storage Server main window opens the Server Settings dialog with the DICOM Server branch selected in the tree view. The settings determine how the DICOM Server is set up and operates.
The image below shows Storage Server DICOM Server button:

The DICOM Server branch can be expanded to show the following pages:
Settings Page
Displays the settings controlling the listening service for the LEADTOOLS Storage Server.
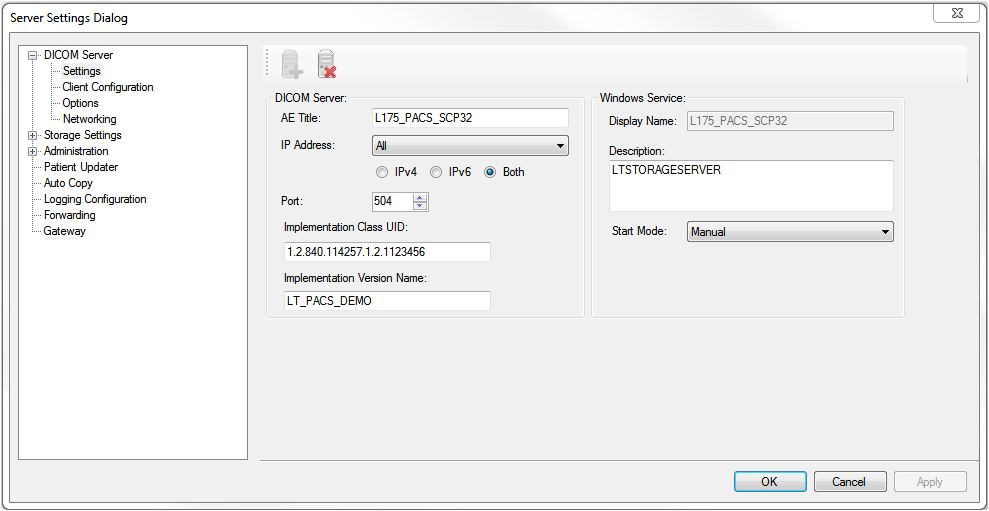
Settings Page Fields
-
AE Title entry field The AE Title for the server. The default is MI_SERVER. All Client applications must be configured to this AE Title to connect to the server. Maximum length is 16 characters.
-
IP Address drop-down edit box The network IP address used to communicate with the clients. Radio buttons allow choice among IPv4, IPv6 or Both address specifications.
-
Port Number spin box The port to which the server listens for connections. The default is 504.
All Client applications must be pointed to the displayed AE title, IP address and Port number
-
Implementation Class UID entry field Uniquely identifies the implementation that wrote this file and its content. It provides an unambiguous identification of the type of implementation that last wrote the file in the event of interchange problems. Usually this is the company name.
-
Implementation Version Name Identifies a version for the Implementation Class UID.
-
Display Name text field Displays the name of the windows service under which the LEADTOOLS Storage Server runs.
-
Description text field Displays the description used in the Windows Service list for quick identification of services.
-
Start Mode drop-down list Determines which method Windows uses to start the service after it is stopped.
-
Automatic allows Windows to automatically start the service. Normally set to “Automatic”.
-
Manual requires the end user to start the service.
-
Disabled requires the end user to re-enable the service before it can be manually or automatically started.
-
Client Configuration Page
The Client Configuration page displays settings for client communications. It is a list view of the clients that are allowed to communicate with the DICOM server.
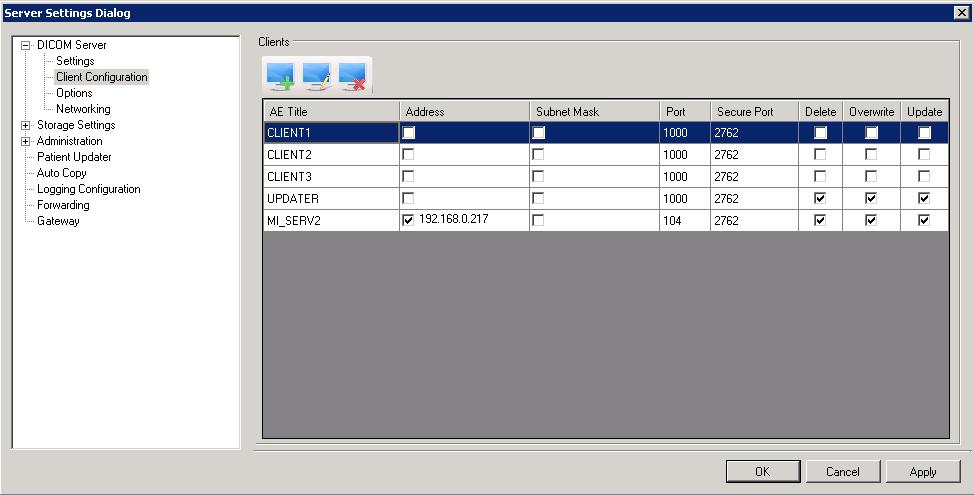
The following fields are on the Client Configuration page:
-
Add Client button

-
Modify Client button

-
Delete Client button

-
Client list view
Displays the following information about the clients:
- AE Title
- Address
- Subnet Mask
- Port
- Secure Port
- Delete
- Overwrite
- Update
Add Client Dialog
Use the Add Client dialog to add clients that can communicate with the server
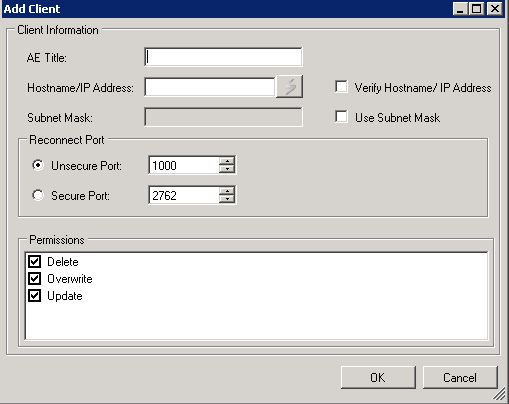
The following fields are on the dialog
Client Information group
-
AE Title entry field The AE title for the client, and select Access Level items. This should match the AE title for each client. The default is the local client host name.
-
Host Name / IP Address entry field Host name or IP Address used for verification. Select the verify check box to enable this action. Clients must use this validation to be available under the forwarding server drop down list.
-
Subnet Mask entry field Client subnet verification. Select the Use Subnet Mask check box to enable the Subnet Mask.
Reconnect Port group
-
Unsecure Port spin box The port number for communications to the client. This must match the port specified on each client under the DICOM tab.
-
Secured Port spin box The port number for secure communications between servers. This is mainly used during image forwarding.
Permissions list view
All Patient Updater clients should have Delete and Update permissions if the application is to be fully functional.
-
Delete check box Select this check box to grant the client delete permission rights. Use this with caution! Only limited and protected stations should have this right.
-
Overwrite check box Select this check box to grant the client permission to overwrite images previously stored to the server. Once again, use this with caution.
-
Update check box Select this check box to grant the client permission to use the Patient Updater to update images stored to the DICOM Server.
Options Page
The Options page displays settings to manage connections, timeout settings and to specify the Temp directory.
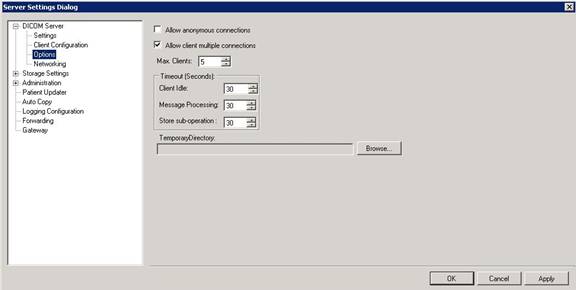
The following fields are on the LEADTOOLS Storage Server Options page:
-
Allow Anonymous Connections check box Select the check box to allow any client to query and upload to this server. When clear (default), clients must be listed in the clients connect and client verification databases.
-
Allow Client Multiple Connections check box Select the check box to enable multiple connections from the same client.
-
Max. Clients spin box The maximum number of clients that can be connected to the server at any time.
-
Timeout(Seconds) group The time (in seconds) that the server waits for a response from a connected client. If no response has been received within that time period, the client is disconnected. There are 3 types of timeouts:
-
Client Idle: Time allowed for a client to be idle when initiating contact.
-
Messaging Processing: Time allowed for a client to be idle once contact has been initiated and before a store operation.
-
Store sub-operation: Time allowed for a client to be idle once a store of images has been initiated.
-
-
Temp Directory Location of the working directory. It is best to put it on a physically different local drive. To set this directory, click the Browse button and navigate to the appropriate directory.
Networking Page
The Networking page displays networking settings.
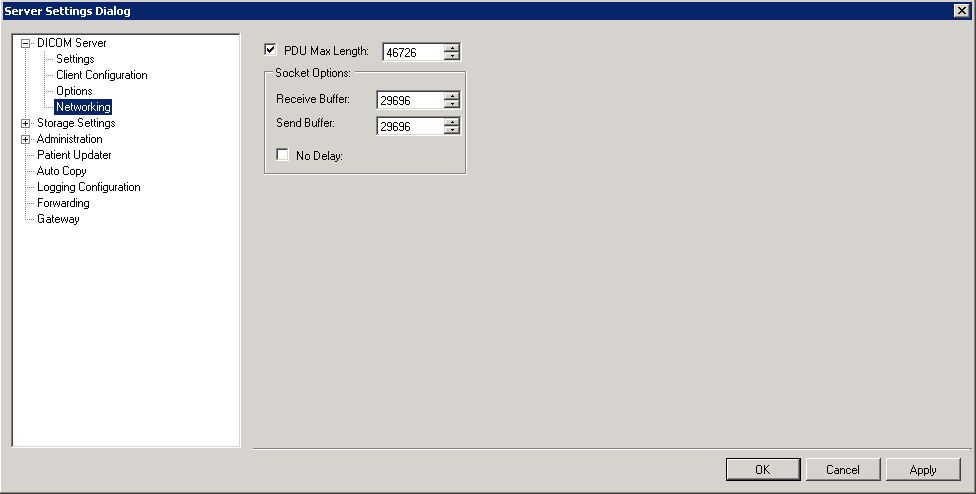
The following fields are on the Networking page:
-
PDU Max Length check box and spin box Maximum length in bytes of the PDU (Protocol Data Unit)
-
Receive Buffer spin box A manual setting for specifying the total per-socket buffer space reserved for receives.
-
Send Buffer spin box A manual setting for specifying the total per-socket buffer space reserved for sends.
-
No Delay check box Disables the Nagle algorithm for send coalescing. This socket option is included for backward compatibility with Windows Sockets 1.1.
