LEAD MPEG2 Transport Multiplexer User Interface
The property page for the LEAD MPEG2 Transport Multiplexer provides a user interface for changing the way the output stream is generated.
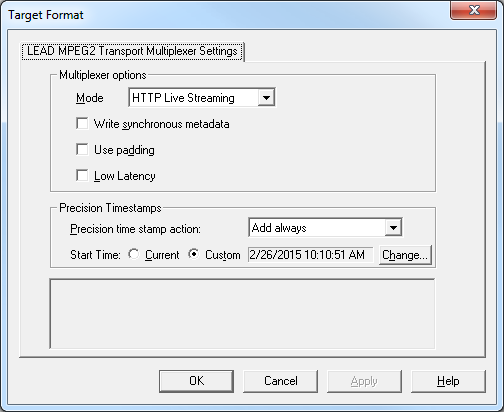
Changes are applied only when the filter is in the stopped state. These settings can be set permanently by clicking Apply or OK, or abandoned by clicking Cancel. Positioning the mouse pointer over a control displays the general information for that control. The property page is shown in the following figure:

The following table lists the controls and their descriptions:
| Control | Description |
|---|---|
| Mode drop-down list | If Broadcast mode is selected, the output files are compatible with the requirements of the broadcast industry. See "CableLabs Video-On-Demand Content Encoding Profiles Specification" for more details.The default value is non-broadcast mode. The output files are saved as in earlier versions of the multiplexer, and they resemble MPEG-2 Transport files created by UAV encoders. |
| Write synchronous metadata check box | This check box is used only when metadata streams (KLV) are written into the file. If no metadata streams are written, this check box is ignored.If this check box is selected, the metadata is written synchronously (newer method).If this check box is clear, the metadata is written asynchronously (older method).See "MISB Standard 0604.1" for more information on the differences between these two methods of writing the metadata.The default is clear (asynchronous metadata). |
| Use Padding check box | If this check box is selected, padding packets are added to the output stream to achieve a constant bitrate. Use this option if you are generating a stream for a hardware decoder that has problems decoding the stream. Keep in mind, however, that this will generate larger video files (as much as 3 times larger than when without padding).If this check box is clear, no padding packets are added to the stream.The default is clear (no padding is used). |
| Low Latency check box | If this box is selected, the multiplexer writes each sample individually. This is useful when streaming or the output needs to be written as soon as possible.If this check box is clear, the data is buffered and is written when the output buffer is full. This mode offers the best performance. The default is clear (data is buffered). |
| Precision Time stamps action drop-down list box | Specifies the action to take regarding precision time stamps. The default value is Ignore. Possible values are: |
| • Ignore - no action. Write them if they are present, but do not do anything if they are absent. | |
| • Remove existing time stamps - Remove them even if they are present in the compressed stream. | |
| • Add if missing - Add them only if they are not present in the compressed stream. | |
| • Add always - Overwrite any time stamps that might be present in the compressed stream. | |
| Current radio button | If this button is selected, the start value for the precision time will be the current time when the compression starts. This is equivalent to setting the precision time stamp start value to -1 (this is the default).The Precision time stamp's value is in microseconds since Jan 1, 1970 and is relative to Coordinates Universal Time (UTC). This property is only available if the Precision Time stamps action value is "Add if missing" or "Add always". |
| Custom radio button | If this button is selected, the start value for the precision time will be a custom value presented as a date-time value, and can be changed using the Change button.The Precision time stamp's value is microseconds since Jan 1, 1970 and is relative to Coordinates Universal Time (UTC).This property is only available if the Precision Time stamp's action value is "Add if missing" or "Add always". |
| Change Button | Click this button to display a date-time selection dialog. The custom precision time will be viewed in the dialog and the value can be changed.This property is only available if the Precision Time stamp's action value is "Add if missing" or "Add always", and the custom radio button is selected.The Custom Date-Time note below includes a figure that displays an example dialog. |
Custom Date-Time
To change the custom start value of the precision time stamp, click the Change button to open a Date and Time Selector dialog (shown in the following figure):

The Date format must be M:D:Y. The values can be changed using the spin edit boxes: M (Month) is between 1 and 12, D(day) is between 1 and 31, and Y(Year) must be above 1970.
The Time format must be H:M:S. The values can be changed using spin edit boxes: H (Hour) is between 1 and 12, M(Minute) is between 0 and 59, and S(Second) is between 0 and 59. Also, PM or AM must be selected using the combo box.
