Get Started with the LEADTOOLS Videoconferencing Client Application
This tutorial shows how to use the LEADTOOLS Videoconferencing Client application to receive audio, video and text from LEADTOOLS Videoconferencing Servers. The Client can connect to multiple LEADTOOLS Videoconferencing Servers simultaneously. Each connection will open a new child window.
Note
The C++ source code of the application is installed with the main LEADTOOLS SDK setup.
| Overview | |
|---|---|
| Summary | This tutorial shows how to use the LEAD Videoconferencing Client application. |
| Completion Time | 15 minutes |
| Platform | Windows C++ Application |
| Development License | Download LEADTOOLS |
Required Knowledge
Download and install the LEADTOOLS SDK and make sure that the license and key files are located in the <INSTALL_DIR>\LEADTOOLS23\Support\Common\License directory. For more details about setting the license, refer to the Add References and Set a License tutorial.
A LEADTOOLS product that supports videoconferencing is needed, such as LEADTOOLS Streaming Module.
Configure the LEAD Videoconferencing Client
Prepare to Run the Application
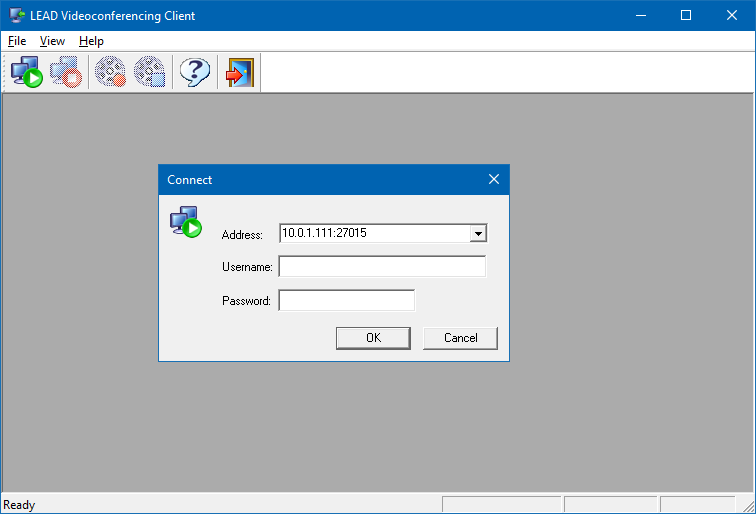
In order to connect to a specific server, three pieces of information should be obtained from that server:
- The IP address of the server. The easiest IP address to use is the server's default IP address. When the LEADTOOLS Videoconferencing Server is running, the Default IP address is displayed in the Connection field.
- The Username, if one is configured at the server side.
- The Password, if one is configured at the server side.
If the server allows anonymous connections, then only the IP address is required. The LEADTOOLS Videoconferencing Server application manages the usernames and passwords used for video conferencing sessions. If desired, multiple clients can connect using the same username and password.
In addition to supplying the correct connection information, the server must be actively streaming in order for the client to complete a connection.
Start the Client Application
Run the LEADTOOLS Videoconferencing Client demo which is located in <INSTALL_DIR>\LEADTOOLS23\Bin\CDLL\x64\ltmmNetClient.exe

To connect to a server click the Connect icon in the toolbar at the top of the application's window, or from the menu choose File -> Connect. A dialog box will appear to allow entering the server's IP address, a username and a password. If the server is set to allow anonymous connections, then a username and a password are not needed. After entering this information, click OK to close the dialog box and connect.
Note that the server can disable or disconnect a client. If the server disables a client, streaming freezes to display the last frame streamed. When the server enables the client, streaming will begin again. If the server disconnects a client, the streaming window closes and the client will have to make a new connection in order to obtain streamed material. Also note that the server can place IP addresses on a Restrictions list that prevents any connections to the server from being made from IP addresses on that list. If a client's IP address is on the Restrictions list, it must be removed from the server's list before a connection can be made to the server.
Use the Application's Features
Start and Stop Recording
To make a recording of what the client is receiving, click the Start Record icon in the toolbar, or choose File->Start Record... from the main menu. A Windows Save As dialog box appears to allow selecting the path and filename to use for the recording. Click Save in the dialog box to begin recording to the filename that was selected.
To stop recording, click the Stop Record icon, or choose File->Stop Record from the main menu.
The file will be saved in an .lts format (LEAD Network Streaming Format). The file can be viewed using a DirectShow application like Windows Media Player. Before playing the recording, be sure to stop the LEAD Videoconferencing Client application.
The file can also be converted to other formats such as AVI, ASF, or OGG using a DirectShow multimedia conversion application or by creating a program that utilizes the LEADTOOLS Convert Control.
Receive Text Messages
If the server sends a text message, it will appear in the text area of the client application located at the bottom of the screen. If the client is running in Full Screen mode, the message is overlaid on the video for 5 seconds, unless a new message is received during that time period.
Change Video Display Mode
To view the video in Full Screen mode, choose View->Full Screen from the main menu.
To size the window to the video content, choose View->Size To Content from the main menu. The window will be resized to fit the video, leaving enough room for a line of text messaging.
Open Help
To open the application's help, click the Help Contents icon or press F1.
Close the Connection
To close the connection at any time, click the Close icon or choose File->Close from the main menu.
Automatically Connect at Application Startup
The client can be set to automatically connect to a specific server when the application is started. To do that, pass the username, password and IP address as parameters after the EXE's name using the format username:password@ipaddress. If connecting to a server that allows anonymous connections, then only the IPaddress of that server is required
As an example, to automatically connect to IP address 10.1.1.224, modify the Target of the application's shortcut so it reads as follows:
<Application's Full Path>\ltmmNetClient.exe username:password@10.1.1.224
The next time the application is started, it will attempt to connect to 10.1.1.224 with the specified username and password as soon as it loads.
Wrap-up
This tutorial showed how to configure and use the LEAD Videoconferencing Client Application demo.
