Burn Annotations to an Image - Windows C DLL
This tutorial shows how to burn annotations loaded from disk to an image in a Windows C DLL application using the LEADTOOLS SDK.
| Overview | |
|---|---|
| Summary | This tutorial covers how to burn annotations to an image in a Windows C DLL Application. |
| Completion Time | 30 minutes |
| Visual Studio Project | Download tutorial project (18 KB) |
| Platform | Windows C DLL Application |
| IDE | Visual Studio 2017, 2019, 2022 |
| Development License | Download LEADTOOLS |
| Try it in another language |
|
Required Knowledge
Get familiar with the basic steps of creating a project and loading/displaying an image by reviewing the Add References and Set a License and Load, Display, and Save Images tutorials, before working on the Burn Annotations to an Image - Windows C DLL tutorial.
Create the Project and Add LEADTOOLS References
Start with a copy of the project created in the Load, Display, and Save Images tutorial. If the project is not available, create it by following the steps in that tutorial.
To load and burn annotations using LEADTOOLS, add the required library file. Open the pre-compiled header file (either pch.h or stdafx.h, depending on the version of Visual Studio used) and add the following line:
#pragma comment (lib, "C:\\LEADTOOLS23\\Lib\\CDLL\\x64\\Ltann_x.lib") // Annotations support Note: For a complete list of DLLs that are required for your application, refer to Files to be Included with your Application - C API.
Set the License File
The License unlocks the features needed for the project. It must be set before any toolkit functionality is called. For details, including tutorials for different platforms, refer to Setting a Runtime License.
There are two types of runtime licenses:
- Evaluation license, obtained at the time the evaluation toolkit is downloaded. It allows the toolkit to be evaluated.
- Deployment license. If a Deployment license file and developer key are needed, refer to Obtaining a License.
Note: Adding LEADTOOLS references and setting a license are covered in more detail in the Add References and Set a License tutorial.
Add the Burn Annotations Code
With the project created, the references added, the license set, and the save image code added, coding can begin.
The steps below are for Visual Studio 2019 and above; they could be different for other versions of Visual Studio.
In the Solution Explorer, double-click the resources file (.rc).
Add a new &Annotations drop down menu next to the File menu. In the newly-added &Annotations menu, add a &Burn Annotations menu item. The new item's ID should be ID_ANNOTATIONS_BURNANNOTATIONS.
Go to the WndProc function, and under the switch (wmId) statement that is below the WM_COMMAND case, add the new case below.
switch (wmId){case ID_ANNOTATIONS_BURNANNOTATIONS:if(LoadAndBurnAnn(hWnd))MessageBox(hWnd, TEXT("Image loaded and annotations burned successfully."), TEXT("Annotations Demo"), MB_ICONINFORMATION);elseMessageBox(hWnd, TEXT("Error loading image or burning annotations."), TEXT("Annotations Demo"), MB_ICONERROR);break;// Keep rest of the code as is
Add a new LoadAndBurnAnn function, which can be placed above the WndProc function. Add the code above to load an annotations ANN file, load an image file, and burn the annotations to the image.
L_BOOL LoadAndBurnAnn(HWND hwnd){L_TCHAR const* pszFile = TEXT("C:\\LEADTOOLS23\\Resources\\Images\\cannon.jpg");L_TCHAR const* pszAnnFile = TEXT("C:\\LEADTOOLS23\\Resources\\Images\\cannon.ann");BITMAPHANDLE tempBmp = { 0 };if (SUCCESS != L_LoadBitmap((L_TCHAR*)pszFile, &tempBmp, sizeof tempBmp, 24, ORDER_BGR, NULL, NULL))return FALSE;if (LEADBmp.Flags.Allocated)L_FreeBitmap(&LEADBmp);LEADBmp = tempBmp; // Copies structure, not bitmap dataInvalidateRect(hwnd, NULL, TRUE);HANNOBJECT container = 0;if (SUCCESS != L_AnnLoad((L_TCHAR*)pszAnnFile, &container, NULL))return FALSE;if (SUCCESS != L_AnnRealize(&LEADBmp, NULL, container, false))return FALSE;L_AnnDestroy(container, ANNFLAG_RECURSE);InvalidateRect(hwnd, NULL, TRUE);return TRUE;}
Run the Project
Run the project by pressing F5, or by selecting Debug -> Start Debugging.
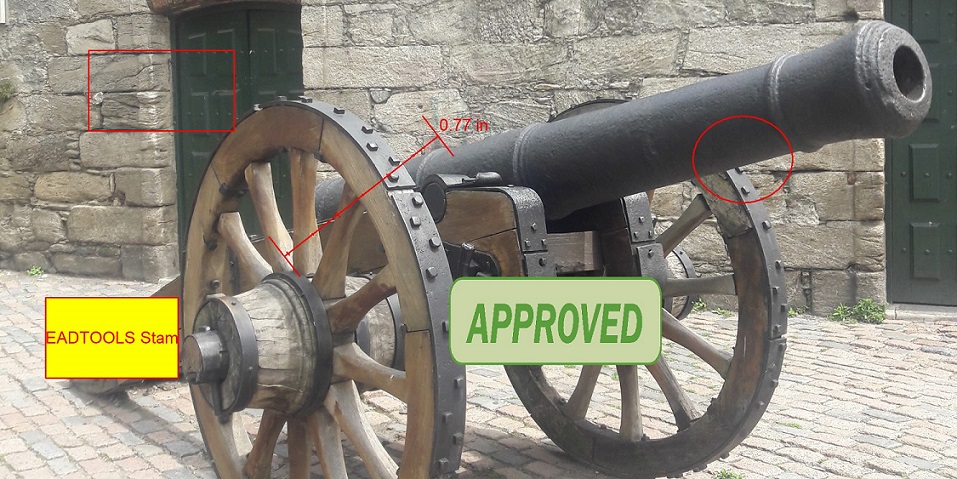
If the steps were followed correctly, the application should run. Select Annotations -> Burn Annotations to load the image and annotations file, then burn the annotation objects onto the image.
The code uses the image file cannon.jpg and the annotations file cannon.ann, both shipped with the toolkit, but any valid image and annotations ANN file can be used.

Wrap-up
This tutorial covered how to load annotations from a file and burn (realize) them onto an image.
