Create, Edit, and Save a new Workbook - C# .NET 6+
This tutorial shows how to create, edit, and save a new LEADTOOLS Workbook in a C# .NET 6 application.
| Overview | |
|---|---|
| Summary | This tutorial covers how to create, edit, and save a new Workbook in a C# .NET 6+ application. |
| Completion Time | 20 minutes |
| Visual Studio Project | Download tutorial project (1 KB) |
| Platform | C# .NET 6 Console Application |
| IDE | Visual Studio 2022 |
| Runtime Target | .NET 6 or Higher |
| Development License | Download LEADTOOLS |
Required Knowledge
Get familiar with the basic steps of creating a project by reviewing the Add References and Set a License tutorial, before working on this tutorial.
Create the Project and Add the LEADTOOLS References
Start with a copy of the project created in the Add References and Set a License tutorial. If you do not have that project, follow the steps in that tutorial to create it.
This tutorial requires the following DLLs:
Leadtools.dllLeadtools.Core.dllLeadtools.Document.LEADOffice.dll
For a complete list of which DLL files are required for your application, refer to Files to be Included With Your Application.
Add the Set License Code
The License unlocks the features needed for the project. It must be set before any toolkit function is called. For details, including tutorials for different platforms, refer to Setting a Runtime License.
There are two types of runtime licenses:
- Evaluation license, obtained at the time the evaluation toolkit is downloaded. It allows the toolkit to be evaluated.
- Deployment license. If a Deployment license file and developer key are required, refer to Obtaining a License.
Create the 2D Array
In the Solution Explorer, open Program.cs. Add the following to the using block at the top of the Program.cs file:
using Leadtools;using Leadtools.Document.LEADOffice.Sheet;
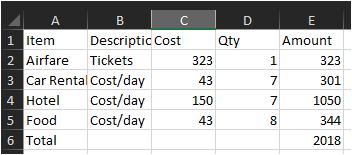
For the purposes of this tutorial, we will create a 2D array of objects to use for the creation of the Workbook. Add the following below as a global variable:
static object[,] data = {{"Item", "Description", "Cost", "Qty", "Amount"} ,{"Airfare", "Tickets", 323, 1, "C2*D2"} ,{"Car Rental", "Cost/day", 43, 7, "C3*D3"} ,{"Hotel", "Cost/day", 150, 7, "C4*D4"} ,{"Food", "Cost/day", 43, 8, "C5*D5"}};
Add the Create Workbook Code
Add the method CreateWorkbook() and call it inside of the Main method under the InitLEAD() method. This method will be used to parse the 2D array created above then create and fill cells for each of the values.
static LEADWorkbook CreateWorkbook(){LEADWorkbook workbook = LEADWorkbookFactory.Create();Sheet sheet = workbook.CreateSheet("Sheet1");Row row;for (int i = 0; i < data.GetLength(0); i++){row = sheet.CreateRow(i);for (int j = 0; j < data.GetLength(1); j++){row.CreateCell(j);Console.WriteLine(data[i, j].ToString());if (i == 0){row.GetCellAt(j).SetCellValue(data[i, j].ToString());}else{switch (j){case 0:case 1:row.GetCellAt(j).SetCellValue(data[i, j].ToString());break;case 2:case 3:row.GetCellAt(j).SetCellValue(Double.Parse(data[i, j].ToString()));break;case 4:row.GetCellAt(j).SetCellFormula(data[i, j].ToString());break;default: break;}}}}// Add a total to the costs columnrow = sheet.CreateRow(data.GetLength(0));row.CreateCell(0).SetCellValue("Total");row.CreateCell(data.GetLength(1) - 1).SetCellFormula("SUM(E2:E5)");return workbook;}
Save the Workbook
Add the following code to the main method below the CreateWorkbook() call in order to create the appropriate memory stream and save the Workbook to a new file.
static void Main(string[] args){InitLEAD();LEADWorkbook workbook = CreateWorkbook();using MemoryStream ms = new();workbook.Save(ms);using FileStream fileStream = new(@"C:\LEADTOOLS23\Resources\Images\created_workbook.xlsx", FileMode.Create);ms.WriteTo(fileStream);}
Run the Project
Run the project by pressing F5, or by selecting Debug -> Start Debugging.
If the steps were followed correctly, the application creates and saves a Workbook to the specified location.

Wrap-up
This tutorial showed how to create a new LEADTOOLS Workbook based off a 2D array, including text, numbers, and formulas then save it through a memory stream.
