Burn Annotations to an Image Client-Side with Document Viewer - HTML5 JavaScript
This tutorial shows how to burn annotations to an image on the client-side, with the HTML5/JS Document Viewer in a JavaScript application.
| Overview | |
|---|---|
| Summary | This tutorial covers how to burn annotations client-side with HTML5/JS DocumentViewer in a JavaScript application. |
| Completion Time | 30 minutes |
| Visual Studio Project | Download tutorial project (4 KB) |
| Platform | JS Web Application |
| IDE | Visual Studio Code - Client |
| Development License | Download LEADTOOLS |
Required Knowledge
Get familiar with the basic steps of creating a project and loading files into the Document Viewer by reviewing the Add References and Set a License - HTML5 JavaScript and Display Files in the Document Viewer tutorials, before working on the Burn Annotations to an Image Client-Side with Document Viewer - HTML5 JavaScript tutorial.
This tutorial makes use of http-server, a console command for running a static file server. To install http-server first install Node.js and then install http-server.
Create the Project and Add LEADTOOLS References
Start with a copy of the project created in the Display Files in the Document Viewer tutorial. If that project is unavailable, follow the steps in that tutorial to create it.
The references needed depend upon the purpose of the project. References can be added by .js files located at <INSTALL_DIR>\LEADTOOLS23\Bin\JS.
For this project, the following references are needed:
Leadtools.jsLeadtools.Annotations.Automation.jsLeadtools.Annotations.Designer.jsLeadtools.Annotations.Engine.jsLeadtools.Annotations.Rendering.JavaScript.jsLeadtools.Controls.jsLeadtools.Document.jsLeadtools.Document.Viewer.jsLeadtools.ImageProcessing.Main.jsLeadtools.ImageProcessing.Color.jsLeadtools.ImageProcessing.Core.jsLeadtools.ImageProcessing.Effects.js
Make sure to copy these files to the project's lib folder.
For a complete list of which JS files are required for your application, refer to Files to be Included with your Application
Set the License File
The License unlocks the features needed for the project. It must be set before any toolkit function is called. For details including tutorials for different platforms, refer to Setting a Runtime License.
There are two types of runtime licenses:
- Evaluation license, obtained at the time the evaluation toolkit is downloaded. It allows the toolkit to be evaluated.
- Deployment license. If a Deployment license file and developer key are needed, refer to Obtaining a License.
Note
Adding LEADTOOLS references and setting a license are covered in more detail in the Add References and Set a License - HTML5 JavaScript tutorial.
Edit the HTML
With the project created, dependencies added, the license set, and the load files code added, coding can begin.
Open the index.html file located in the project folder and add the following line in the .toolbar div:
<button type="button" id="burnAnnotations" class="vcenter push-right">Burn Annotations</button> Adding this button will allow the user to burn the annotations in the Document Viewer to the load file.
Add the Burn Annotations Code to the JS File
Open the app.js file located in the project folder.
Be sure to move the line of code below to below the set license code so that the documentViewer object can be accessed.
let documentViewer = null; Add the code below to initialize the DocumentViewer object and initialize automated annotations support.
createDocumentViewer = () => {// Initialize the user interfaceconst interactiveSelect = document.getElementById("interactiveSelect");const panZoomOption = document.createElement("option");panZoomOption.innerHTML = "Pan / Zoom";panZoomOption.value = lt.Document.Viewer.DocumentViewerCommands.interactivePanZoom;interactiveSelect.appendChild(panZoomOption);const textOption = document.createElement("option");textOption.value = lt.Document.Viewer.DocumentViewerCommands.interactiveSelectText;textOption.innerHTML = "Select Text";interactiveSelect.appendChild(textOption);interactiveSelect.onchange = (e) => documentViewer.commands.run(e.target.value, null);const annotationsSelect = document.getElementById("annotationsSelect");const annSelectOption = document.createElement("option");annSelectOption.innerHTML = "Select Annotations";annSelectOption.value = lt.Annotations.Engine.AnnObject.selectObjectId.toString();annotationsSelect.appendChild(annSelectOption);const annLineOption = document.createElement("option");annLineOption.innerHTML = "Line Object";annLineOption.value = lt.Annotations.Engine.AnnObject.lineObjectId.toString();annotationsSelect.appendChild(annLineOption);const annRectOption = document.createElement("option");annRectOption.innerHTML = "Rectangle Object";annRectOption.value = lt.Annotations.Engine.AnnObject.rectangleObjectId.toString();annotationsSelect.appendChild(annRectOption);annotationsSelect.onchange = (e) => {const value = +e.currentTarget.value;documentViewer.annotations.automationManager.currentObjectId = value;}// Init the document viewer, pass along the panelsconst createOptions = new lt.Document.Viewer.DocumentViewerCreateOptions();// We are not going to use elements mode in this examplecreateOptions.viewCreateOptions.useElements = false;createOptions.thumbnailsCreateOptions.useElements = false;// The middle panel for the viewcreateOptions.viewContainer = document.getElementById("viewer");// The left panel for the thumbnailscreateOptions.thumbnailsContainer = document.getElementById("thumbnails");// The right panel for the bookmarkscreateOptions.bookmarksContainer = document.getElementById("bookmarks");createOptions.useAnnotations = true;// Create the document viewerdocumentViewer = lt.Document.Viewer.DocumentViewerFactory.createDocumentViewer(createOptions);// We prefer SVG viewingdocumentViewer.view.preferredItemType = lt.Document.Viewer.DocumentViewerItemType.svg;// TODO: Enable AutoCreateCanvasdocumentViewer.view.imageViewer.autoCreateCanvas = true;// Create html5 rendering enginedocumentViewer.annotations.automationManager.renderingEngine = new lt.Annotations.Rendering.AnnHtml5RenderingEngine();// Initialize documentViewer annotationsdocumentViewer.annotations.initialize();documentViewer.annotations.automationManager.currentObjectIdChanged.add(function (sender, e) {// When done drawing, the manager will return to the select object; so we need to force the annotationsSelect element to return to the select object optionannotationsSelect.value = sender.currentObjectId;});this.loadDefaultDoc(documentViewer, interactiveSelect)}
Outside of the ViewerInitializer class, link to the button tag's onClick functionality by adding the following code:
$("#burnAnnotations").click(function(){const imageCanvas = documentViewer.view.imageViewer.activeItem.canvas;const context = imageCanvas.getContext('2d');const renderingEngine = new lt.Annotations.Rendering.AnnHtml5RenderingEngine();renderingEngine.resources = documentViewer.annotations.automationManager.resources;renderingEngine.renderers = documentViewer.annotations.automationManager.renderingEngine.renderers;renderingEngine.attach(documentViewer.annotations.automationManager.automations.get_item(0).container, context);if (renderingEngine != null) {const imageRes = documentViewer.view.imageViewer.imageResolution;renderingEngine.burnToRectWithDpi(lt.LeadRectD.empty, imageRes.width, imageRes.height, imageRes.width, imageRes.width, imageRes.height);documentViewer.annotations.automation.selectObjects(documentViewer.annotations.automation.container.children); //select annotations in containerdocumentViewer.annotations.automation.deleteSelectedObjects(); //delete annotationsdocumentViewer.annotations.automation.invalidate(lt.LeadRectD.empty); //only burned (rasterzied) pixels remain}});
Run the Project
Before running the front end HTML5/JS Document Viewer, run the Document Service. The LEADTOOLS SDK installation provides three examples of the Document Service for the following platforms:
- .NET Framework
- .NET Core
- Java
For instructions on how to set up and configure the Document Service, in the three platforms previously listed, refer to the steps in the Get Started with the Document Viewer Demo - HTML5 JavaScript tutorial.
For the purposes of this tutorial, the .NET Framework Document Service is used and it can be found here: <INSTALL_DIR>\LEADTOOLS23\Examples\Document\JS\DocumentServiceDotNet\fx.
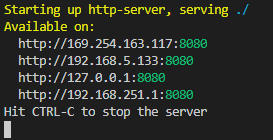
Once you have the back-end Document Service running, open the Command Line and cd into the project folder. Use the following command to run a static file server: http-server
The server should start and run on http://localhost:8080. A message should appear in the console indicating all the ports that the server is available on.

To test, follow the steps below:
- Open a browser and enter the url above. Once you enter the url, the HTML5/JS Document Viewer will appear with a sample PDF pre-loaded.
- Select an annotation from the drop-down menu and draw the annotation on the page.
- Select Burn Annotations to burn the drawn annotations to the image in the HTML5/JS Document Viewer's client-side.
Wrap-up
This tutorial showed how to burn annotations on the client-side of the HTML5/JS Document Viewer. It also covered how to use the AnnHtml5RenderingEngine object.
