DirectShow Capture from a Video Source to File - WinForms C# .NET 6
This tutorial shows how to use the CaptureCtrl to capture video from a video source, such as a webcam, and store it to a disk file in a C# .NET 6 WinForms application using the LEADTOOLS Multimedia SDK.
The LEADTOOLS Multimedia Capture Control contains many advanced features that simplify the process of capturing video from devices and cameras. The toolkit is shipped with various demos that make use of these features, such as the Capture Demo: <INSTALL_DIR>\LEADTOOLS23\Examples\Multimedia\DirectShow\DotNet\CaptureDemo\net.
| Overview | |
|---|---|
| Summary | This tutorial covers how to capture a video file in a C# WinForms .NET 6 application. |
| Completion Time | 20 minutes |
| Visual Studio Project | Download tutorial project (4 KB) |
| Platform | .NET 6 C# Windows WinForms Application |
| IDE | Visual Studio 2022 |
| Development License | Download LEADTOOLS |
Required Knowledge
Get familiar with the basic steps of creating a project by reviewing the Add References and Set a License tutorial, before working on the DirectShow Capture from a Video Source to File - WinForms C# .NET 6 tutorial.
Create the Project and Add the LEADTOOLS References
Start with a copy of the project created in the Display Images in an Image Viewer tutorial. If you do not have that project, follow the steps in that tutorial to create it.
The references needed depend upon the purpose of the project. This tutorial requires the following local DLLs, which are located at <INSTALL_DIR>\LEADTOOLS23\Bin\net:
Leadtools.dllLeadtools.Core.dllLeadtools.Multimedia.dll
For a complete list of which Codec DLLs are required for specific formats, refer to File Format Support.
Note: For a complete list of which Multimedia files are required for your application, refer to Multimedia Files You Must Include With Your Application. In addition to this, the COM DLLs need to be registered on the deployment machine before they can be used.
Set the License File
The License unlocks needed features, and must be set before any toolkit function is called. For details, including tutorials for different platforms, refer to Setting a Runtime License.
There are two types of runtime licenses:
- Evaluation license, obtained at the time the evaluation toolkit is downloaded, allows the toolkit to be evaluated.
- Deployment license, if a Deployment license file and developer key are required, refer to Obtaining a License.
Create the Form Controls
With the project created, the references added, and the license set, coding can begin.
In Solution Explorer, double-click on Form1.cs to open the Designer.
Add the following controls to the form:
-
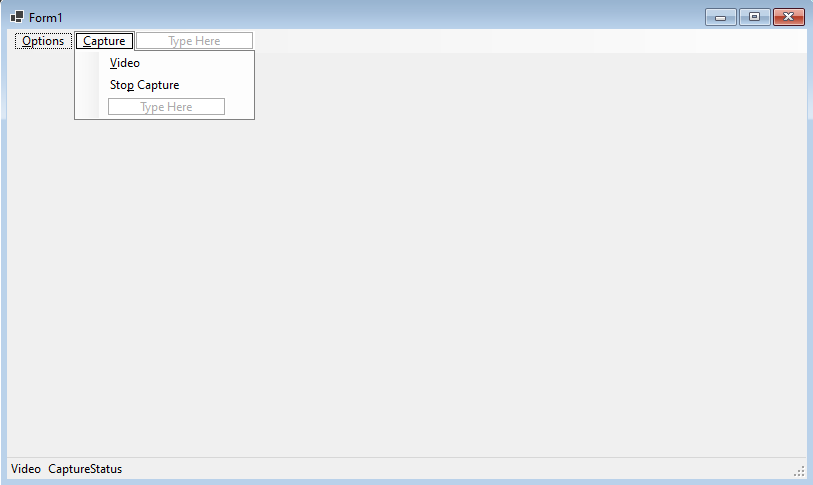
A menu strip control, menuStrip1, containing the following tool-strip menu items and sub-items:
- &Options:
- &Video Devices
- &Capture:
- &Video
- &Stop Capture
-
A status strip control, statusStrip1, containing the following status label items:
- Video
-
CaptureStatus

Change the text values for the status label items to be as follows:
- toolStripStatusLabelVideo: "No Video Source"
- toolStripStatusLabelCaptureStatus: " (Blank)
Initialize the Capture Control
In Solution Explorer, right-click on Form1.cs and select View Code to display the code-behind of the form. Add the following statements to the using block at the top.
using Leadtools;using Leadtools.Multimedia;
Add the below global variable.
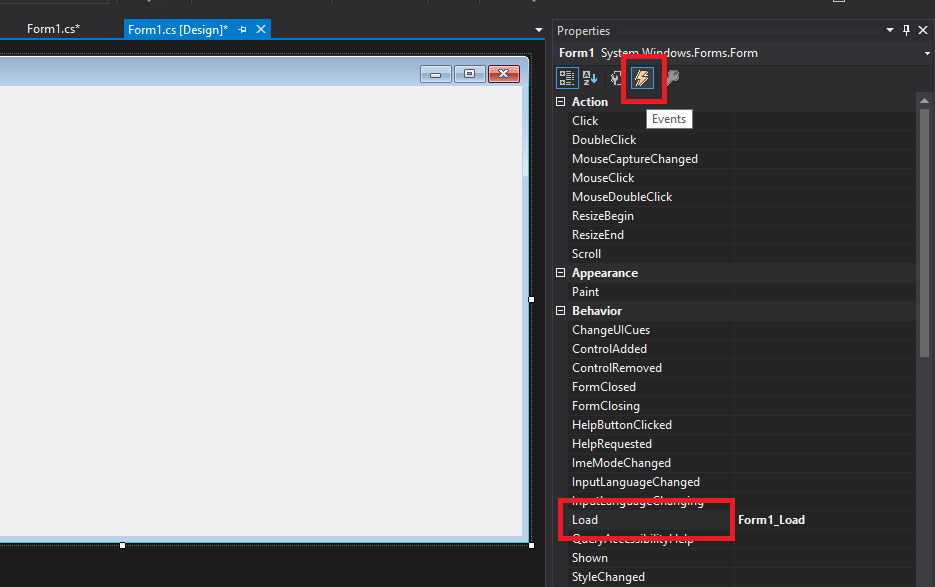
private CaptureCtrl? captureCtrl; In Solution Explorer, go back to the Form1.cs Designer. Click the Events icon in the Properties Windows. Then, double-click the Load event to create a form load event handler.

Add the following code inside the Form1_Load event handler.
private void Form1_Load(object sender, EventArgs e){try{captureCtrl = new CaptureCtrl();// Configure capture control display propertiescaptureCtrl.Dock = DockStyle.Fill;captureCtrl.Progress += new ProgressEventHandler(this.captureCtrl_Progress);captureCtrl.VideoWindowSizeMode = SizeMode.Normal;captureCtrl.Preview = true;// Add to FormControls.Add(captureCtrl);BuildDeviceMenu();// Configure capture propertiescaptureCtrl.TargetFile = @"C:\LEADTOOLS23\Resources\Media\captured.avi";captureCtrl.TargetFormat = TargetFormatType.AVI;captureCtrl.VideoCompressors.MJpeg.Selected = true;}catch{MessageBox.Show("Unable to configure capture control", "Error");}}
Add a DropDownOpening event to the captureToolStripMenuItem and use the following code to enable the start and stop capture menu items depending on the state of the capture control.
private void captureToolStripMenuItem_DropDownOpening(object sender, EventArgs e){if (captureCtrl != null){bool stateNotRunning = (captureCtrl.State != CaptureState.Running);videoToolStripMenuItem.Enabled = captureCtrl.IsModeAvailable(CaptureMode.VideoOrAudio) & stateNotRunning;stopCaptureToolStripMenuItem.Enabled = !stateNotRunning;}else{videoDevicesToolStripMenuItem.Enabled = false;stopCaptureToolStripMenuItem.Enabled = false;}}
Add the Video Device Menu Code
Add the code below for BuildDeviceMenu() that will populate the &Video Devices menu item with available video device sources along with a None option.
private void BuildDeviceMenu(){// Adding the 'None' menu Item.ToolStripMenuItem menuItem1 = new("None");videoDevicesToolStripMenuItem.DropDownItems.Add(menuItem1);menuItem1.Checked = true;menuItem1.Click += VideoDeviceClick;// Adding the Video Devices to the Video Device menu item.if (captureCtrl != null && captureCtrl.VideoDevices.Count > 0){foreach (Device device in captureCtrl.VideoDevices){// Create the Menu Item.ToolStripMenuItem menuItem2 = new(device.FriendlyName);videoDevicesToolStripMenuItem.DropDownItems.Add(menuItem2);menuItem2.Click += VideoDeviceClick;}}}
Use the following to handle the click event when selecting a video device from the drop-down menu.
private void VideoDeviceClick(object? sender, EventArgs e){try{if (sender != null && captureCtrl != null){// Set video capture device to selected item in the menuToolStripMenuItem objCurMenuItem = (ToolStripMenuItem)sender;captureCtrl.EnterEdit();if (objCurMenuItem != null){int index = ((ToolStripMenuItem)objCurMenuItem.OwnerItem).DropDownItems.IndexOf(objCurMenuItem);captureCtrl.VideoDevices.Selection = index - 1;}captureCtrl.LeaveEdit();// Update menu item checked in the drop-down menubool stateNotCapturing = ((captureCtrl.State != CaptureState.Running) & (captureCtrl.State != CaptureState.Paused));for (int i = 0; i <= captureCtrl.VideoDevices.Count; i++){videoDevicesToolStripMenuItem.DropDownItems[i].Enabled = stateNotCapturing;if (i == captureCtrl.VideoDevices.Selection + 1)((ToolStripMenuItem)videoDevicesToolStripMenuItem.DropDownItems[i]).Checked = true;else((ToolStripMenuItem)videoDevicesToolStripMenuItem.DropDownItems[i]).Checked = false;}// Update status barif (captureCtrl.VideoDevices.Selection >= 0)statusStrip1.Items[0].Text = captureCtrl.VideoDevices[captureCtrl.VideoDevices.Selection].FriendlyName;elsestatusStrip1.Items[0].Text = "No Video Source";}}catch{MessageBox.Show("This video capture device is not available. Make sure no other program is using the device or try changing the display resolution", "Error");}}
Add the Capture Start, Stop, and Progress Code
Add the following to the Click event of the videoToolStripMenuItem.
private void videoToolStripMenuItem_Click(object sender, EventArgs e){if (captureCtrl != null)captureCtrl.StartCapture(CaptureMode.Video);}
Add the following to the Click event of the stopCaptureToolStripMenuItem
private void stopCaptureToolStripMenuItem_Click(object sender, EventArgs e){if (captureCtrl != null)captureCtrl.StopCapture();}
Use the following code to update the status bar with the capture control's progress when capturing.
private void captureCtrl_Progress(object sender, ProgressEventArgs e){if (captureCtrl != null){string captureStatus ="Captured " + Convert.ToString(captureCtrl.DeliveredFrames) + " frames "+ "in " + captureCtrl.CaptureTime.ToString("0.000") + " sec "+ "(" + Convert.ToString(captureCtrl.DroppedFrames) + " dropped)";statusStrip1.Items[1].Text = captureStatus;}}
Run the Project
Run the project by pressing F5, or by selecting Debug -> Start Debugging.
If the steps were followed correctly, the application runs and allows the user to select a video device and start recording to the file specified in the code until the capture is stopped.
Wrap-up
This tutorial showed how to playback a video file using the CaptureCtrl class.
