Display Files in the Document Viewer - Xamarin C#
This tutorial shows how to load and display a document in the Document Viewer in a C# Xamarin application using the LEADTOOLS SDK.
Xamarin Framework Deprecation
As of LEADTOOLS v23, the cross-platform Xamarin framework has been deprecated and replaced with LEADTOOLS .NET MAUI framework.
For any LEADTOOLS Xamarin apps you have already built, we recommend you migrate to the LEADTOOLS .NET MAUI framework. To help you with the migration, review the LEADTOOLS .NET MAUI tutorials to get you started.
This change is driven by Microsoft's announcement to end Xamarin support.
| Overview | |
|---|---|
| Summary | This tutorial covers how to display files in a Document Viewer in a C# Xamarin application. |
| Completion Time | 45 minutes |
| Visual Studio Project | Download tutorial project (512 KB) |
| Platform | C# Xamarin Cross-Platform Application |
| IDE | Visual Studio 2019, 2022 |
| Development License | Download LEADTOOLS |
| Try it in another language |
|
Required Knowledge
Get familiar with the basic steps of creating a project by reviewing the Add References and Set a License tutorial, before working on the Display Files in the Document Viewer - Xamarin C# tutorial.
Create the Project and Add LEADTOOLS References
Start with a copy of the project created in the Add References and Set a License tutorial. If you do not have that project, follow the steps in that tutorial to create it.
References for Xamarin projects can be added through NuGet packages.
This tutorial requires the following NuGet packages:
Leadtools.Annotations.NETStandardLeadtools.Document.SdkLeadtools.Document.Viewer.XamarinLeadtools.Viewer.Controls.XamarinNewtonsoft.Json
For a complete list of which DLL files are required for your application, refer to Files to be Included in your Application.
Set the License File
The License unlocks the features needed for the project. It must be set before any toolkit function is called. For details including tutorials for different platforms, refer to Setting a Runtime License.
There are two types of runtime licenses:
- Evaluation license, obtained at the time the evaluation toolkit is downloaded. It allows the toolkit to be evaluated.
- Deployment license. If a Deployment license file and developer key are needed, refer to Obtaining a License.
Note
How to properly add LEADTOOLS NuGet and local references is covered in the Add References and Set a License tutorial.
Add Code to Check and Ask for Storage Read Permission
With the project created, the references added, and the license set, coding can begin.
In the Solution Explorer, open the MainPage.xaml.cs and ensure that the following is added to the using area at the top of the code:
using Xamarin.Essentials; Add a MainPage_Appearing() event handler to the MainPage class.
public MainPage(){// Keep previous existing code as isInitializeComponent();Appearing += MainPage_Appearing;}
Use the code below to check the Storage Read permission for the application and prompt the user to enable them before loading the ContentPage with the Document Viewer control.
private async void MainPage_Appearing(object sender, EventArgs e){if (await VerifyPermissions() == false)return;elseApp.Current.MainPage = new DocumentViewerPage();}private async Task<bool> VerifyPermissions(){try{PermissionStatus status = PermissionStatus.Unknown;// Storage Read permissionstatus = await Permissions.CheckStatusAsync<Permissions.StorageRead>();if (status != PermissionStatus.Granted){await DisplayAlert("Storage Read Permission Required", "This app will load images from storage for display", "OK");status = await Permissions.RequestAsync<Permissions.StorageRead>();if (status != PermissionStatus.Granted)return false;}// All needed permissions grantedreturn true;}catch (Exception ex){await DisplayAlert("Error", ex.ToString(), "OK");return false;}}
Initialize the Document Viewer
In the Solution Explorer, right-Click on the base C# project and select Add -> New Item. Select the Content Page option and name the class DocumentViewerPage.xaml
Use the following code to add two grids, one for the DocumentViewer and one for the thumbnails, and add a Load button.
<ContentPage.Content><Grid x:Name="documentViewerContainer" HorizontalOptions="FillAndExpand" VerticalOptions="FillAndExpand" BackgroundColor="Black"><Grid.RowDefinitions><RowDefinition x:Name="viewGridRow" Height="6*"/><RowDefinition x:Name="thumbGridRow" Height="2*"/><RowDefinition x:Name="loadButtonRow" Height="Auto" /></Grid.RowDefinitions><Grid Grid.Row="0" x:Name="viewGrid" HorizontalOptions="FillAndExpand" VerticalOptions="FillAndExpand"><Grid.ColumnDefinitions><ColumnDefinition Width="*"/></Grid.ColumnDefinitions></Grid><Grid Grid.Row="1" x:Name="thumbnailsGrid" HorizontalOptions="FillAndExpand" VerticalOptions="FillAndExpand"><Grid.ColumnDefinitions><ColumnDefinition Width="*"/></Grid.ColumnDefinitions></Grid><Grid Margin="10,5" Grid.Row="2" HorizontalOptions="FillAndExpand" VerticalOptions="FillAndExpand"><Grid.ColumnDefinitions><ColumnDefinition Width="*"/></Grid.ColumnDefinitions><Button x:Name="_loadDocument" Text="Load" BorderColor="LightCoral" Clicked="_loadDocument_Clicked" HorizontalOptions="FillAndExpand"/></Grid></Grid></ContentPage.Content>
Right-click on the page and select View Code to bring up the code behind MainPage.xaml. Make sure that the following statements are added to the using block at the top.
// Using block at the topusing System;using System.IO;using System.ComponentModel;using System.Text;using System.Threading.Tasks;using Xamarin.Forms;using Xamarin.Forms.Xaml;using Leadtools;using Leadtools.Document;using Leadtools.Caching;using Leadtools.Document.Viewer;using Leadtools.Controls;using DataService;
Add the variables below to the DocumentViewerPage class.
private LEADDocument virtualDocument;private FileCache cache;private DocumentViewer documentViewer;
Add the code below to initialize the Document Viewer then call the InitDocumentViewer() method inside the DocumentViewerPage() method after the InitializeComponent() call. Add the below code to initialize the DocumentViewer containers.
public DocumentViewerPage(){InitializeComponent();InitDocumentViewer();}private void InitDocumentViewer(){var createOptions = new DocumentViewerCreateOptions();// Set the UI part where the Document Viewer is displayedcreateOptions.ViewContainer = viewGrid;// Set the UI part where the Thumbnails are displayedcreateOptions.ThumbnailsContainer = thumbnailsGrid;// Not using annotations for nowcreateOptions.UseAnnotations = false;// Now create the viewerdocumentViewer = DocumentViewerFactory.CreateDocumentViewer(createOptions);documentViewer.View.ImageViewer.Zoom(ControlSizeMode.FitAlways, 1.0, documentViewer.View.ImageViewer.DefaultZoomOrigin);documentViewer.View.ImageViewer.ViewLayout = new ImageViewerSingleViewLayout();ImageViewerPanZoomInteractiveMode _mode = new ImageViewerPanZoomInteractiveMode();documentViewer.View.ImageViewer.InteractiveModes.Add(_mode);documentViewer.Thumbnails.ImageViewer.ViewLayout = new ImageViewerHorizontalViewLayout();cache = new FileCache{CacheDirectory = DependencyService.Get<IGetPaths>().GetCachePath()};virtualDocument = DocumentFactory.Create(new CreateDocumentOptions() { Cache = cache, UseCache = true });}
Add a new namespace to the bottom of DocumentViewerPage.xaml.cs called DataService. This namespace will be the dependency service for the methods that have different implementations for Android and iOS.
// Dependency servicenamespace DataService{public interface IGetPaths{String GetAppPath();String GetCachePath();}public interface IDocumentPicker{Task<Stream> GetDocumentStreamAsync();}}
Add the DocumentPicker Implementation Class (Android)
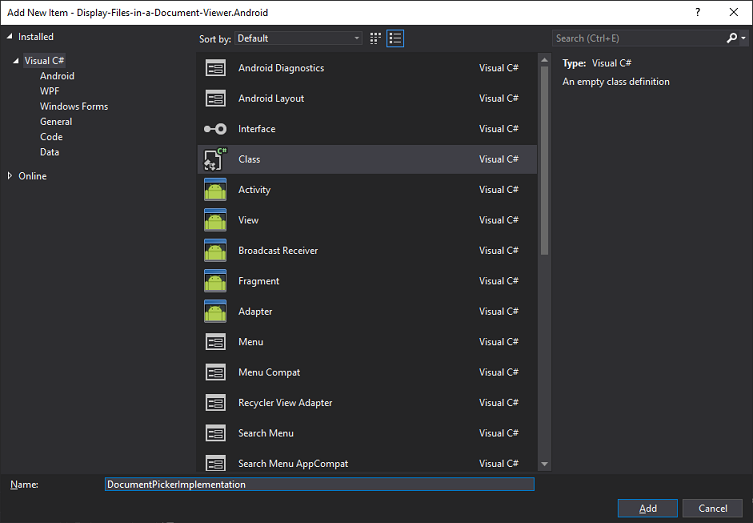
Right-click on <Project>.Android and select Add -> New Item. Select the Class option and name the class DocumentPickerImplementation.cs, then click Add.

Add the below using statements to the new class:
using Android.App;using Android.Content;using Android.OS;using Android.Runtime;using Android.Views;using Android.Widget;using System;using System.Collections.Generic;using System.Linq;using System.Text;using System.IO;using System.Threading.Tasks;using Xamarin.Forms;using DataService;using <Project>.Droid; // Replace with project name to refer to the Xamarin Forms Android project
Add a method to the DocumentPickerImplementation class called GetDocumentStreamAsync() that returns a Task<Stream>. Use the code below to implement the DocumentPicker on an Android device.
[assembly: Dependency(typeof(DocumentPickerImplementation))]namespace <Project>.Droid // Replace with project name to refer to the Xamarin Forms Android project{internal class DocumentPickerImplementation : IDocumentPicker{public Task<Stream> GetDocumentStreamAsync(){String[] supportedMimeTypes ={"application/pdf"};Intent intent = new Intent();intent.SetType(supportedMimeTypes.Length == 1 ? supportedMimeTypes[0] : "*/*");if (supportedMimeTypes.Length > 0){intent.PutExtra(Intent.ExtraMimeTypes, supportedMimeTypes);}intent.SetAction(Intent.ActionOpenDocument);intent.AddFlags(ActivityFlags.GrantReadUriPermission);MainActivity activity = MainActivity.MainInstance;if (activity.PickDocumentTaskCompletionSource == null || activity.PickDocumentTaskCompletionSource.Task.IsCompleted || activity.PickDocumentTaskCompletionSource.Task.IsCanceled){activity.StartActivityForResult(Intent.CreateChooser(intent, "Select Document"), MainActivity.PickDocumentId);activity.PickDocumentTaskCompletionSource = new TaskCompletionSource<Stream>();return activity.PickDocumentTaskCompletionSource.Task;}else{return activity.PickDocumentTaskCompletionSource.Task;}}}}
In the Solution Explorer, open MainActivity.cs. Make sure that the below using statements are added.
using System;using System.IO;using System.Threading.Tasks;using Android.App;using Android.Content.PM;using Android.Runtime;using Android.Views;using Android.Widget;using Android.OS;using Android.Content;
Add a MainActivity variable MainInstance and use MainInstance = this; in the OnCreate method to allow the code to call the MainActivity's instance.
// Add this variable used in `OnCreate()`internal static MainActivity MainInstance { get; private set; }protected override void OnCreate(Bundle savedInstanceState){TabLayoutResource = Resource.Layout.Tabbar;ToolbarResource = Resource.Layout.Toolbar;base.OnCreate(savedInstanceState);Xamarin.Essentials.Platform.Init(this, savedInstanceState);global::Xamarin.Forms.Forms.Init(this, savedInstanceState);MainInstance = this;LoadApplication(new App());}
Add the code below for the OnActivityResult method which will handle the file selected with the DocumentPicker, gather the stream, and hand the stream to the task completion source.
public TaskCompletionSource<Stream> PickDocumentTaskCompletionSource { set; get; }public static readonly int PickDocumentId = 1000;protected override void OnActivityResult(int requestCode, Result resultCode, Intent data){base.OnActivityResult(requestCode, resultCode, data);if (requestCode == PickDocumentId){if (resultCode == Result.Ok && data != null){Android.Net.Uri uri = data.Data;Stream stream = ContentResolver.OpenInputStream(uri);PickDocumentTaskCompletionSource.SetResult(stream);}else{PickDocumentTaskCompletionSource.SetResult(null);}}}
Add the GetPaths Implementation Class (Android)
Right-click on <Project>.Android and select Add -> New Item. Select the Class option and name the class GetPathsImplementation.cs, then click Add.
Add the below using statements to the new class:
using Android.App;using Android.Content;using Android.OS;using Android.Runtime;using Android.Views;using Android.Widget;using System;using System.Collections.Generic;using System.Linq;using System.Text;using System.IO;using System.Threading.Tasks;using Xamarin.Forms;using DataService;using <Project>.Droid; // Replace with project name to refer to the Xamarin Forms Android project
Add two methods to the GetPathsImplementation class named GetAppPath() and GetCachePath(). Add the code below to return the local paths used by the application and used for the cache, respectively.
[assembly: Dependency(typeof(GetPathsImplementation))]namespace <Project>.Droid; // Replace with project name to refer to the Xamarin Forms Android project{class GetPathsImplementation : IGetPaths{public String GetAppPath(){Context context = Android.App.Application.Context;Java.IO.File basedir = context.GetExternalFilesDir(null);Java.IO.File leadDir = new Java.IO.File($"{basedir}/Leadtools");if (!leadDir.Exists()) leadDir.Mkdir();Java.IO.File appDir = new Java.IO.File($"{leadDir}/DocumentViewerDemo");if (!appDir.Exists()) appDir.Mkdir();return appDir.AbsolutePath;}public String GetCachePath(){Java.IO.File droidCacheDir = new Java.IO.File($@"{GetAppPath()}/Cache");if (!droidCacheDir.Exists()) droidCacheDir.Mkdir();return droidCacheDir.AbsolutePath;}}}
Add the DocumentPicker Implementation Class (iOS)
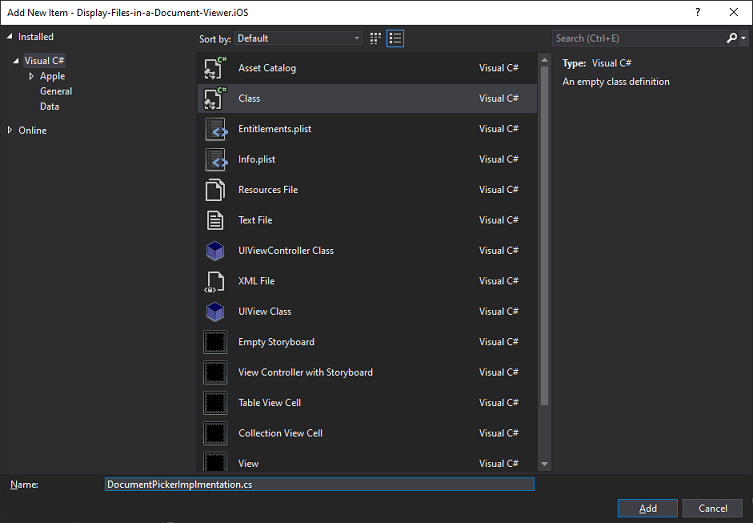
Right-click on <Project>.iOS and select Add -> New Item. Select the Class option and name the class DocumentPickerImplementation.cs, then click Add.

Add the below using statements to the new class:
using Foundation;using System;using System.Collections.Generic;using System.Linq;using System.Text;using System.IO;using System.Threading.Tasks;using UIKit;using MobileCoreServices;using Xamarin.Forms;using DataService;using <Project>.iOS; // Replace with project name to refer to the Xamarin Forms iOS project
Add a new method to the DocumentPickerImplementation class called GetDocumentStreamAsync() that returns a Task<Stream>. Add the below code to implement the DocumentPicker on an iOS device.
[assembly: Dependency(typeof(DocumentPickerImplementation))]namespace <Project>.iOS; // Replace with project name to refer to the Xamarin Forms iOS project{[Xamarin.Forms.Internals.Preserve(AllMembers = true)]internal class DocumentPickerImplementation : IDocumentPicker{TaskCompletionSource<Stream> taskCompletionSource;UIDocumentPickerViewController documentPicker;public Task<Stream> GetDocumentStreamAsync(){try{var allowedUTIs = new string[]{UTType.PDF};// Create and define UIDocumentPickerViewControllerdocumentPicker = new UIDocumentPickerViewController(allowedUTIs, UIDocumentPickerMode.Import);// Set event handlersdocumentPicker.WasCancelled += DocumentPicker_WasCancelled;documentPicker.DidPickDocumentAtUrls += DocumentPicker_DidPickDocumentAtUrls;// Present UIImagePickerController;UIWindow window = UIApplication.SharedApplication.KeyWindow;var viewController = window.RootViewController;viewController.PresentModalViewController(documentPicker, true);// Return Task objecttaskCompletionSource = new TaskCompletionSource<Stream>();return taskCompletionSource.Task;}catch (Exception ex) { Console.WriteLine(ex.Message); return null; }}private void DocumentPicker_DidPickDocumentAtUrls(object sender, UIDocumentPickedAtUrlsEventArgs e){string filename = e.Urls[0].LastPathComponent;if (filename != null){NSData data = NSData.FromUrl(e.Urls[0]);Stream stream = data.AsStream();taskCompletionSource.SetResult(stream);}else{taskCompletionSource.SetResult(null);}documentPicker.DismissModalViewController(true);}private void DocumentPicker_WasCancelled(object sender, EventArgs e){taskCompletionSource.SetResult(null);documentPicker.DismissModalViewController(true);}}}
In the Solution Explorer, open AppDelegate.cs. Add the code below to the FinishedLaunching() method:
public override bool FinishedLaunching(UIApplication app, NSDictionary options){global::Xamarin.Forms.Forms.Init();Leadtools.Controls.iOS.Assembly.Use();Leadtools.Document.Pdf.Assembly.Use();LoadApplication(new App());return base.FinishedLaunching(app, options);}
Add the GetPaths Implementation Class (iOS)
Right-click on <Project>.iOS and select Add -> New Item. Select the Class option and name the class GetPathsImplementation.cs, then click Add.
Add the below using statements to the new class:
using Foundation;using System;using System.Collections.Generic;using System.Linq;using System.Text;using System.IO;using System.Threading.Tasks;using UIKit;using MobileCoreServices;using Xamarin.Forms;using DataService;using <Project>.iOS; // Replace with project name to refer to the Xamarin Forms iOS project
Add two methods to the GetPathsImplementation class named GetAppPath() and GetCachePath(). Add the code below to return the local paths used by the application and used for the cache, respectively.
[assembly: Dependency(typeof(GetPathsImplementation))]namespace <Project>.iOS; // Replace with project name to refer to the Xamarin Forms iOS project{[Xamarin.Forms.Internals.Preserve(AllMembers = true)]internal class GetPathsImplementation : IGetPaths{public String GetAppPath(){var documents = Environment.GetFolderPath(Environment.SpecialFolder.MyDocuments);var appDir = System.IO.Path.Combine(documents, "DocViewer");if (!Directory.Exists(appDir)) Directory.CreateDirectory(appDir);return appDir;}public String GetCachePath(){var cacheDir = System.IO.Path.Combine(GetAppPath(), "Cache");if (!Directory.Exists(cacheDir)) Directory.CreateDirectory(cacheDir);return cacheDir;}}}
Add the Load Document Code
In the Solution Explorer, navigate to DocumentViewerPage.xaml.cs. Add the below code inside the _loadDocument_Clicked handler, created in MainPage.xaml, to load the document from the device's gallery and set the document in the viewer.
private async void _loadDocument_Clicked(object sender, EventArgs e){try{Stream documentStream = await DependencyService.Get<IDocumentPicker>().GetDocumentStreamAsync();if (documentStream != null){LEADDocument leadDocument = DocumentFactory.LoadFromStream(documentStream,new LoadDocumentOptions{UseCache = true,Cache = cache,LoadEmbeddedAnnotations = true});virtualDocument.Pages.Clear();virtualDocument.Pages.AddRange(leadDocument.Pages);virtualDocument.SaveToCache();}documentViewer.BeginUpdate();documentViewer.SetDocument(virtualDocument);documentViewer.View.Invalidate();if (documentViewer.Thumbnails != null)documentViewer.Thumbnails.Invalidate();documentViewer.EndUpdate();}catch (Exception ex){await DisplayAlert("Error", ex.ToString(), "OK");}}
Run the Project
Select the desired project (iOS or Android) and run the project by pressing F5, or by selecting Debug -> Start Debugging.
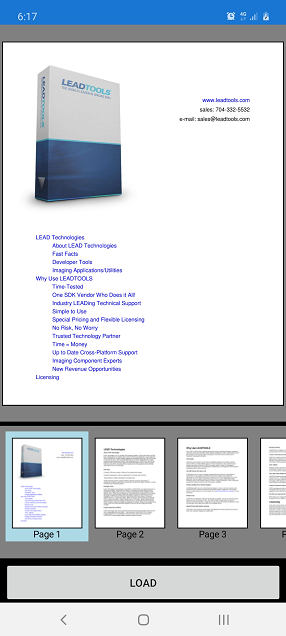
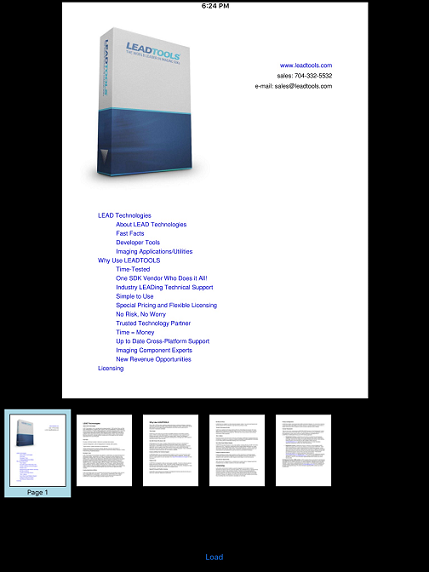
If the steps were followed correctly, the application will run, displaying that the license was set properly. To test, click on the Load button to bring up the DocumentPicker implemented for the selected platform. Select a PDF to load and the document will appear in the viewer.
Android Document Viewer Display

iOS Document Viewer Display

Wrap-up
This tutorial showed how to initialize the Xamarin Document Viewer, load a document, and set the document into the viewer. It also covered how to use the DocumentViewer and LEADDocument classes.
