Add References and Set a License - Vue JS
This tutorial shows how to add the LEADTOOLS references and set the LEADTOOLS runtime license in a Vue.JS application. Before any functionality from the SDK can be leveraged, a valid runtime license will have to be set. For instructions on how to obtain a runtime license refer to Obtaining a License.
| Overview | |
|---|---|
| Summary | This tutorial demonstrates how to set up a Vue.JS project and use the LEADTOOLS SDK to set your LEADTOOLS Runtime License. |
| Completion Time | 15 minutes |
| Visual Studio Project | Download tutorial project (17 KB) |
| Platform | Vue JS Web Application |
| IDE | Visual Studio Code - Client |
| Development License | Download LEADTOOLS |
| Try it in another language |
|
Required Knowledge
This tutorial makes use of Visual Studio Code and Node.js, so be sure to have these installed on your machine.
Create the Project
If working on Windows, then open PowerShell or CommandPrompt. If working on a Unix based system, then open a new Terminal. Change the directory using cd to the location where the project is to be created. Run the following command to create a new Vue.JS application:
npm init vue@latest leadtools-getting-started
Add the License Files
Navigate into the public folder inside the newly-created leadtools-getting-started folder, and create a LEADTOOLS folder. This folder will hold the two JavaScript license files that were sent via email: LEADTOOLS.lic.txt and LEADTOOLS.lic.key.txt.
Add LEADTOOLS Dependencies
In order to utilize the LEADTOOLS components, the LEADTOOLS JavaScript libraries need to be added to the application. Create a new folder named Common in the public folder.
Navigate to the JS library path in the SDK installation <InstallDir>\LEADTOOLS23\Bin\JS\ and copy Leadtools.js to the Common folder.
Add the set License Code
Create a JS file in the Common folder created in the above step, and name it app.js. This is where the LEADTOOLS set license call will be added. Open this file in a text-editor, such as Visual Studio Code, and add the code below.
window.onload = function () {const licenseUrl = "./Leadtools/LEADTOOLS.lic.txt";const developerKey = "ADD THE CONTENTS OF YOUR LEADTOOLS.lic.key.txt FILE";/* Use these two lines instead if you are just evaluatingconst licenseUrl = "https://demo.leadtools.com/licenses/js/LEADTOOLSEVAL.txt";const developerKey = "EVAL";*/lt.RasterSupport.setLicenseUri(licenseUrl, developerKey, function (setLicenseResult) {// Check the status of the licenseif (setLicenseResult.result) {console.log("LEADTOOLS client license set successfully");} else {const msg = "LEADTOOLS License is missing, invalid or expired\nError:\n";console.log(msg);alert(msg);}});};
Note: Make sure to replace the value of the
developerKeystring with the contents of the license key TXT file.
Import LEADTOOLS Dependencies
Open index.html in the public folder. Add the below necessary script tags inside the <head> to import LEADTOOLS dependencies.
Also import the JS file we created.
<script src="public/Common/Leadtools.js"></script><script src="public/Common/app.js"></script>
Run the project
Open the command line application used to create the Vue.JS application in the root of the Vue.JS project. Run the npm install command to install the needed dependencies.
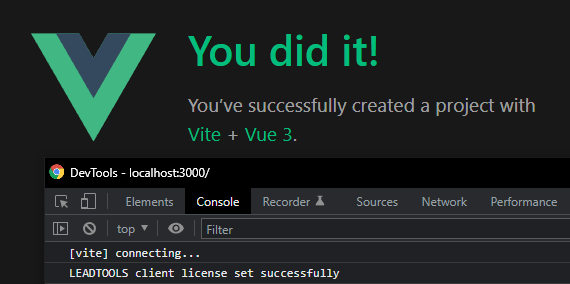
Next, run the npm run dev command to run the application on local host. Open the local host link and then press F12 to bring up the console and see that the LEADTOOLS license has been set.

Wrap-Up
This tutorial showed how to set a client-side LEADTOOLS license in a Vue.JS application.
