Create an Image Gallery - ASP.NET
This tutorial shows how to create an ASP.NET MVC project to display images in a gallery using the LEADTOOLS JavaScript Library. In addition, the gallery will use thumbnails generated by the .NET LEADTOOLS Library.
The image gallery will be two ImageViewer objects. One viewer will display multiple thumbnails in a vertical layout. When a thumbnail is selected, the full resolution image will be loaded as a single image in the other viewer, for panning and zooming interaction.
| Overview | |
|---|---|
| Summary | This tutorial covers how to display an image gallery in an ASP.NET project. |
| Completion Time | 30 minutes |
| Visual Studio Project | Download tutorial project (5 KB) |
| Platform | ASP.NET Web Application |
| IDE | Visual Studio 2022 |
| Runtime Target | .NET 6 or higher |
| Development License | Download LEADTOOLS |
Required Knowledge
Get familiar with the basic steps of creating a project before working on the Create an Image Gallery - ASP.NET tutorial, by reviewing the following tutorials:
- Add References and Set a License - HTML5 JavaScript tutorial
- Add References and Set a License - .NET C# tutorial
Create the Project
In Visual Studio, create a new empty ASP.NET Web Application project.
The references needed depend upon the purposes of the project. References can be added by NuGet reference.
For this project, the following NuGet package is needed:
Leadtools.Formats.Raster.Common
Set up MVC Project Structure
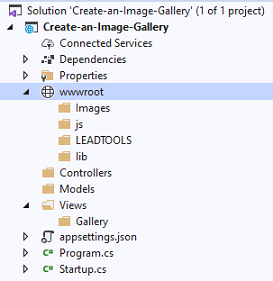
In the Solution Explorer, Create the project's MVC structure folders by right-clicking on the project, then selecting Add -> New Folder. Create the following folders and sub-folders:
-
wwwroot
- css
- Images
- js
- LEADTOOLS
- lib
- Controllers
- Models
-
Views
-
Gallery

-
Add LEADTOOLS JavaScript Libraries
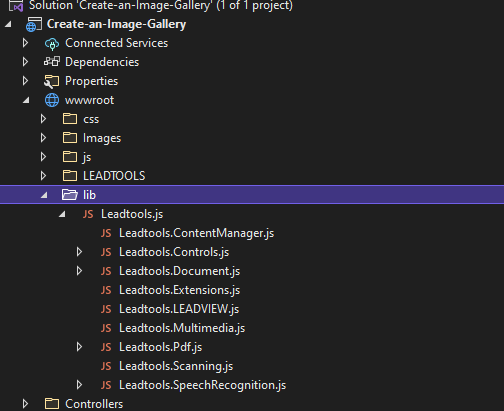
Right-click the lib sub-folder in the wwwroot directory and select Add -> Existing Item. Navigate to the <INSTALL_DIR>\LEADTOOLS23\Bin\JS path and select the Leadtools.js file.
This will add Leadtools.js and all other JS files dependent on it.

The following JS libraries are required, the rest can be removed:
Leadtools.jsLeadtools.Controls.js
Create GalleryController.cs
In the Solution Explorer, right-click on the Controllers folder and select Add -> Controller. Select the MVC Controller - Empty option and name the controller GalleryController.cs, then click Add.
Configure Program.cs
In the Solution Explorer, open Program.cs and use the code below to configure the project to use the MVC structure, use Static files, and set the default entry point to the Gallery view.
var builder = WebApplication.CreateBuilder(args);builder.Services.AddControllersWithViews();var app = builder.Build();if (app.Environment.IsDevelopment()){app.UseDeveloperExceptionPage();}app.UseStaticFiles();app.UseRouting();app.UseEndpoints(endpoints =>{endpoints.MapControllerRoute(name: "default",pattern: "{controller=Gallery}/{action=Index}/{id?}");});app.Run();
Set the License File
The License unlocks the features needed for the project. It must be set before any toolkit function is called. For details including tutorials for different platforms, refer to Setting a Runtime License.
There are two types of runtime licenses:
- Evaluation license, obtained at the time the evaluation toolkit is downloaded. It allows the toolkit to be evaluated.
- Deployment license. If a Deployment license file and developer key are needed, refer to Obtaining a License.
Since both .NET and JavaScript libraries are used in this tutorial, the LEADTOOLS Desktop license (LEADTOOLS.LIC) and LEADTOOLS JavaScript license (LEADTOOLS.lic.txt) needs to be set.
In addition, the JavaScript license file Leadtools.lic.txt needs to be placed in the wwwroot/LEADTOOLS directory so that it is available to the web application.
Add the GalleryImage Model
In the Solution Explorer, right-click on the Models folder and select Add -> New Item. Select the Class option and name the class GalleryImage.cs, then click Add.
This model will hold the paths for an image and its thumbnail. This is used in the gallery to load the appropriate image from the wwwroots/images folder.
using System;namespace Create_an_Image_Gallery.Models{public class GalleryImage{public string ImagePath { get; set; }public string ThumbPath { get; set; }}}
Add the Gallery Controller
In the Solution Explorer, open GalleryController.cs. The below sections will show how to generate the thumbnail for each image in the wwwroot/Images folder for use with the gallery in the web application.
Make sure that the following statements are added to the using block at the top.
using Microsoft.AspNetCore.Mvc;using Microsoft.AspNetCore.Hosting;using System;using System.Collections.Generic;using System.Diagnostics;using System.IO;using System.Linq;using System.Text;using System.Threading.Tasks;using Leadtools;using Leadtools.Codecs;using Create_an_Image_Gallery.Models;
SetLicense() Method
The SetLicense() method will set the license file and key as mentioned above before using the LEADTOOLS classes when generating the thumbnails.
private void SetLicense(){string license = @"C:\LEADTOOLS23\Support\Common\License\LEADTOOLS.LIC";string key = System.IO.File.ReadAllText(@"C:\LEADTOOLS23\Support\Common\License\LEADTOOLS.LIC.KEY");RasterSupport.SetLicense(license, key);}
IWebHostEnvironment Dependency Injection
Use dependency injection to inject an instance of the IWebHostEnvironment interface which will allow the controller to load the pictures in the wwwroot/images folder by using the IWebHostEnvironment.WebRootPath in the GenerateThumbnails method below.
private IWebHostEnvironment _hostingEnvironment;public GalleryController(IWebHostEnvironment environment){_hostingEnvironment = environment;}
Index Default Action
The default Index action will set the license, generate the thumbnail images, and then set the view in the web page.
In addition, a list collection of the GalleryImage model is added to the ViewData, which will be later passed from the View to the JavaScript code.
public IActionResult Index(){try{SetLicense();ViewData["GalleryImages"] = GenerateThumbnails();return View();}catch (Exception ex){return StatusCode(500, ex.Message);}}
Add the GenerateThumbnails Method
The GenerateThumbnails method will generate a thumbnail image for use in the gallery on the web page. The paths for each image and thumbnail are stored in a GalleryImage model, which are collected in a list, then passed to the ViewData as mentioned above.
private List<GalleryImage> GenerateThumbnails(){IEnumerable<string> srcImages;var srcImagesPath = Path.Combine(_hostingEnvironment.WebRootPath, "Images");srcImages = Directory.GetFiles(srcImagesPath, "*.*").Where(s => (!s.EndsWith("_thumb.jpg")));List<GalleryImage> GalleryImages = new List<GalleryImage>();using (RasterCodecs codecs = new RasterCodecs()){foreach (string imagePath in srcImages){using (RasterImage image = codecs.Load(imagePath)){RasterImage thumbnail = image.CreateThumbnail(300, 300, image.BitsPerPixel, RasterViewPerspective.TopLeft, RasterSizeFlags.Bicubic);string[] pathParts = imagePath.Split('\\');string fileName = pathParts[pathParts.Length - 1];string[] fileNameParts = fileName.Split('.');string thumbnailName = fileNameParts[0] + "_thumb.jpg";codecs.Save(thumbnail, Path.Combine(srcImagesPath, thumbnailName), image.OriginalFormat, image.BitsPerPixel, 1, -1, 1, CodecsSavePageMode.Overwrite);GalleryImages.Add(new GalleryImage { ImagePath = Path.Combine("/Images", fileName), ThumbPath = Path.Combine("/Images", thumbnailName) });}}}return GalleryImages;}
Add the Gallery View Code
In the Solution Explorer, right-click on the Gallery sub-folder of the Views directory and select Add -> View. Select the Razor View - Empty option and name the view Index.cshtml, then click Add.
The view will contain a header that displays a title and a Back button. The body will contain a div element used as a viewer container that will initially hold the thumbnail viewer.
The GalleryImages modal list is strongly typed, serialized, and assigned to a JS variable used by the JavaScript code in site.js to load and set the images in the appropriate viewer.
<!DOCTYPE html><html lang="en" style="height: 100%;"><head><meta charset="utf-8" /><meta name="viewport" content="width=device-width, initial-scale=1.0" /><title>@ViewData["Title"] - LEADTOOLS Photo Gallery</title><link rel="stylesheet" href="~/css/site.css"/></head><body><div class="wrapper"><header id="header"><button class="btn btn-default" type="button" id="btnBack">BACK</button><h2>LEADTOOLS Photo Gallery</h2></header><div class="container"><main role="main" class="pb-3"><div id="viewerContainer"><div id="thumbnailDiv" class="main"></div></div></main></div></div>@model List<Create_an_Image_Gallery.Models.GalleryImage><script> var galleryImages = @Html.Raw(Json.Serialize(@ViewData["GalleryImages"]));</script><script src="~/lib/Leadtools.js"></script><script src="~/lib/Leadtools.Controls.js"></script><script src="~/js/site.js" asp-append-version="true"></script></body></html>
Add CSS Styling
In the Solution Explorer, right-click on the cs sub-folder of the wwwroot folder and select Add -> New Item. Select the Style Sheet option and name the file site.cs, then click Add.
Add the following code to style the viewer.
body {margin: 0;min-height: 100%;display: grid;}#btnBack {margin-top: 20px;padding: 4px;background-color: #D9D9D9;font-weight: bold;visibility: hidden}h2 {margin-left: 16px;}.container {height: 100%;}.pb-3 {height: 100%;}#viewerContainer {height: 100%;}#thumbnailDiv {height: 100%;}
Add the site.js Code
In the Solution Explorer, right-click on the js sub-folder of the wwwroot folder and select Add -> New Item. Select the JavaScript File option and name the JS file site.js, then click Add.
Add the following code to set the global variables for the JS code.
// Viewers and Div elements as global variableslet _thumbnailViewer;let _mainViewer;let thumbnailDiv;let mainDiv;
Configure Window.onload Function
Configure the window.onload function to set the license, initialize the viewers, load the images into their respective viewers, and assign the Back button's click event.
window.onload = function () {setLicense();initThumbViewer();initMainViewer();addImages();document.getElementById("btnBack").addEventListener("click", back);}
Set the JavaScript License
Set the license before using any of the JavaScript LEADTOOLS API.
function setLicense() {const licenseUrl = "/Leadtools/LEADTOOLS.lic.txt";const developerKey = "ADD THE CONTENTS OF THE LEADTOOLS.lic.key.txt FILE";lt.RasterSupport.setLicenseUri(licenseUrl, developerKey, function (setLicenseResult) {// Check the status of the licenseif (!setLicenseResult.result) {alert("LEADTOOLS License is missing, invalid or expired\nError:\n");}});};
Note
The JavaScript license file
Leadtools.lic.txtneeds to be placed in thewwwroot/LEADTOOLSpath so that it is available to the web application.
Initialize the Thumbnail Viewer
Initialize the _thumbnailViewer control and set the options to show the gallery thumbnails in a vertical layout.
function initThumbViewer() {// Create the ImageViewer JS control in the Div elementthumbnailDiv = document.getElementById("thumbnailDiv");const thumbnailCreateOptions = new lt.Controls.ImageViewerCreateOptions(thumbnailDiv);_thumbnailViewer = new lt.Controls.ImageViewer(thumbnailCreateOptions);// Set vertical and horizontal alignment, hide the scroll bars_thumbnailViewer.set_itemHorizontalAlignment(lt.Controls.ControlAlignment.center);_thumbnailViewer.set_viewHorizontalAlignment(lt.Controls.ControlAlignment.center);_thumbnailViewer.set_scrollMode(lt.Controls.ControlScrollMode.hidden);// Set vertical view layoutconst layout = new lt.Controls.ImageViewerVerticalViewLayout();layout.columns = 0;_thumbnailViewer.viewLayout = layout;// Set PanZoom interactive mode, this will allow panning of the thumbnailsconst panZoomMode = new lt.Controls.ImageViewerPanZoomInteractiveMode();panZoomMode.set_enableZoom(false);panZoomMode.set_mouseButtons(lt.Controls.MouseButtons.none);_thumbnailViewer.interactiveModes.add(panZoomMode);// Set Selection interactive mode, this will allow the selection of the thumbnails and executing a selection handlerconst selectItemsMode = new lt.Controls.ImageViewerSelectItemsInteractiveMode();selectItemsMode.set_isEnabled(true);selectItemsMode.set_selectionMode(lt.Controls.ImageViewerSelectionMode.single);_thumbnailViewer.interactiveModes.add(selectItemsMode);_thumbnailViewer.add_selectedItemsChanged(handleSelection);// Invalidate_thumbnailViewer.updateTransform();_thumbnailViewer.invalidate(lt.LeadRectD.empty);}
Initialize the Main Viewer
Use the following code to create the div element that will hold the _mainViewer control to display the full resolution image in the gallery.
function initMainViewer() {// Create the Div element for the Image ViewermainDiv = document.createElement('div');mainDiv.setAttribute("id", "mainDiv");mainDiv.setAttribute("style", "height: 100%");// Append to ViewerContainer Div, configure options, then remove.const viewerContainer = document.getElementById("viewerContainer");viewerContainer.appendChild(mainDiv);const viewerCreateOptions = new lt.Controls.ImageViewerCreateOptions(mainDiv);_mainViewer = new lt.Controls.ImageViewer(viewerCreateOptions);_mainViewer.set_viewHorizontalAlignment(lt.Controls.ControlAlignment.center);_mainViewer.interactiveModes.add(new lt.Controls.ImageViewerPanZoomInteractiveMode());viewerContainer.removeChild(mainDiv);}
Add the Gallery Images
Load the gallery image thumbnails into the thumbnail viewer as ImageViewerItem objects. The URL to the full resolution image is stored in the ImageViewerItem.Tag property.
function addImages() {_thumbnailViewer.items.clear();_thumbnailViewer.beginTransform();for (let i = 0; i < galleryImages.length; i++) {// Create an itemlet item = new lt.Controls.ImageViewerItem();// Set the URLitem.url = galleryImages[i].thumbPath;// Save a path to the full resolution image in the item's tagitem.tag = galleryImages[i].imagePath;// Add it to the viewer_thumbnailViewer.items.add(item);}_thumbnailViewer.endTransform();_thumbnailViewer.invalidate(lt.LeadRectD.empty);}
Add the Selection Handler Code
Use the following code for the handleSelection() function that will handle when an item is selected in the thumbnail viewer. The handler will remove the thumbnail viewer's div element, append the main viewer's div element, and display the full resolution image.
function handleSelection(sender, e) {let fullResolutionImageFile;let item;// Get the selected itemslet items = this.items.getSelected();for (let i = 0; i < items.length; i++) {item = items[i];fullResolutionImageFile = item.tag;break;}// Remove the thumbnmail div from container div and add the viewer divconst viewerContainer = document.getElementById("viewerContainer");const thumbnailDiv = document.getElementById("thumbnailDiv");viewerContainer.removeChild(thumbnailDiv);viewerContainer.appendChild(mainDiv);// Set the image in the viewer_mainViewer.imageUrl = fullResolutionImageFile;setBackButtonVisibility(true);_thumbnailViewer.remove_selectedItemsChanged(handleSelection);}
Add the Back Button Code
The code for the Back button will do the reverse by removing the main viewer and appending the thumbnail viewer.
function back() {// Remove the viewer div and add back the thumbnail divconst viewerContainer = document.getElementById("viewerContainer");viewerContainer.removeChild(mainDiv);viewerContainer.appendChild(thumbnailDiv);// Unselect the selected item so we can reselect itfor (let i = 0; i < _thumbnailViewer.items.count; i++) {_thumbnailViewer.items.item(i).isSelected = false;}_thumbnailViewer.add_selectedItemsChanged(handleSelection);_thumbnailViewer.invalidate(lt.LeadRectD.empty);setBackButtonVisibility(false);}function setBackButtonVisibility(visible) {const backButton = document.getElementById("btnBack");if (visible) {backButton.style.visibility = "visible";}else {backButton.style.visibility = "hidden";}}
Run the Project
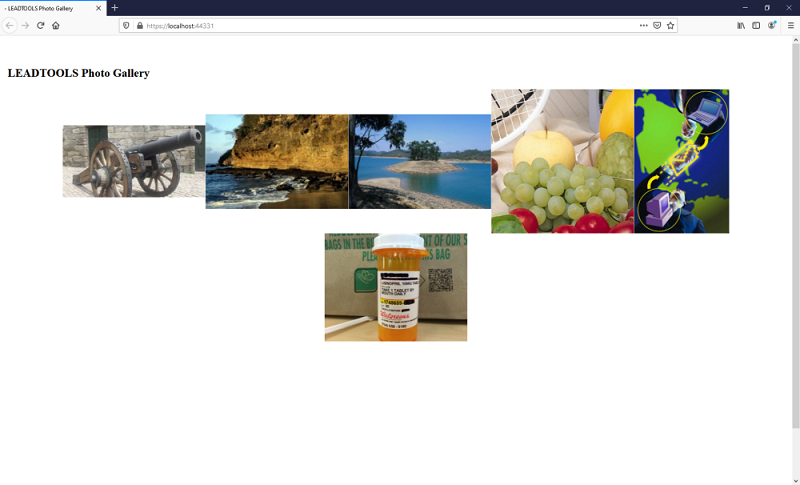
Add your desired gallery images to the wwwroot/Images folder. Run the project by pressing F5, or by selecting Debug -> Start Debugging.
If the steps were followed correctly, the web application will run in the browser. The thumbnails will be generated for the added images and displayed in the thumbnail viewer in a vertical layout.

Click on any of the items to load the full resolution image in the main ImageViewer control that allows panning and zooming.

To select another image from the gallery, press Back.
Wrap-up
This tutorial showed how to create an image gallery using the LEADTOOLS SDK in an ASP.NET project. In addition, it showed how to use the .NET CreateThumbnail() method, the JS ImageViewer object, and the JS ImageViewerItem object.
