Filters, Codecs, and Interfaces > Audio Filters > Detection Filter > LEAD Audio Detection Filter User Interface (2.0)
LEAD Audio Detection Filter User Interface (2.0)
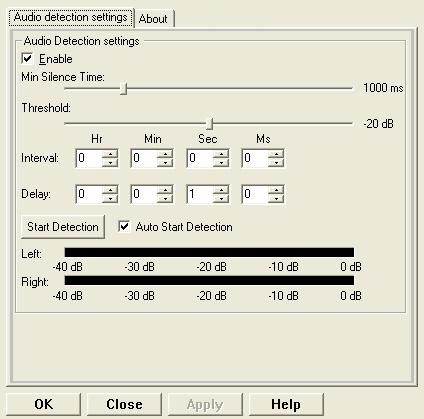
The Audio Detection property page provides a user interface for changing the filter's attributes. The property page is shown in the following figure:

Changes will be applied directly to the streaming media with the ability to set them permanently by clicking Apply or OK, or to abandon changes by clicking Cancel. Positioning the mouse pointer over a control displays general information for that control. The following table shows the controls and their descriptions:
| Control | Description |
|---|---|
| Enable check box | Determines whether the audio detection filter is enabled (checked) or not (cleared). When the filter is enabled, the filter will fire callbacks notifications (for silence and sound). |
| Min Silence Time slider | The minimum duration of silence (in milliseconds) needed for a lack of sound to be considered silence. Silences shorter than the Minimum Silence Time will be considered part of the sound. You want to set this value so short pauses do not trigger false silences. Most conversations contain short silences while the people talking draw their breath or pause while they are thinking. |
| Threshold slider | The signal level below which the signal is considered silence (all levels above this value are considered sound, and all levels below this value are considered silence). You set this value to the maximum volume of the background noise. This will depend on the microphones (some microphones are noisier than others).You would typically do something like this:a. Speak into the microphone and notice the lowest level reached by the green bar for sound you would want to record.b. Be silent and notice if there is any movement of the green bars.After that, you would set the threshold between the limits noticed in the steps above. |
| Interval edit and spin controls | The time interval at which the filter will check the stream for audio data. In most cases, this should be as small as possible. If the interval is small enough, then every sample will be checked for sound data. When it is not necessary to check every sample for sound, the user can use a larger value; however, the length of the interval depends on the event the user wants to detect, in any case, the interval should not exceed the length of the event to be detected. |
| Delay edit and spin controls | The amount of time the filter waits before it starts checking the stream for sound data (sound detection). This is the time between pressing the Start Detection button (or starting streaming if the Auto Start Detection is checked) and the time at which the filter actually starts checking for sound data. The Delay may be beneficial when hardware components must be initialized. Sound detection can be delayed until the initialization process has completed. |
| Start Detection button | Starts (or stops) sound detection. If the Delay property has been set, sound detection will not start until the delay period has elapsed. |
| Auto Start Detection check box | If checked, sound detection will begin immediately after the filter is set in the running state (streaming started). If the Delay property has been set, sound detection will not start until the delay period has elapsed. |
| Left and Right level indicators | The Left and Right indicators show the power level of the audio samples currently passing through the filter. |
See Also
- LEAD Audio Detection Filter
- ILMADet Interface
- ILMADetUserCallback Interface
- ILMADetUserCallback2 Interface
Help Version 23.0.2025.1.11
Products | Support | Contact Us | Intellectual Property Notices © 1991-2025 Apryse Sofware Corp. All Rights Reserved.
LEADTOOLS Filters C API Help
