LEAD Screen Capture Filter User Interface (2.0)
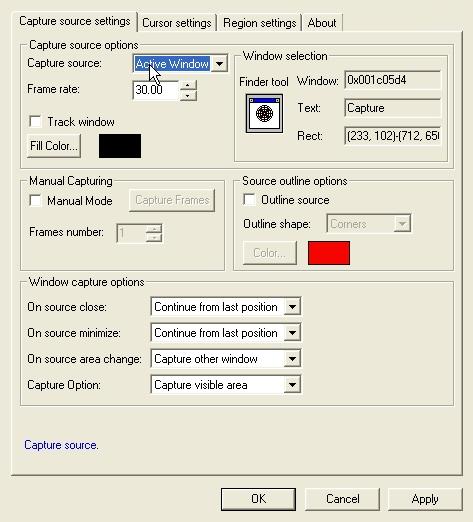
The Screen capture property pages provide a user interface for changing the filter's attributes. Changes will be applied when Apply or OK is clicked. Positioning the mouse pointer over a control displays general information for that control. The Capture source settings tab is shown in the following figure:

The following table shows the controls and their descriptions:
| Control | Description |
|---|---|
| Capture source drop-down list box | Select the capture source type |
| Frame rate edit box | Set the capture frame rate in frames per second. Values range from 0.1 to 30.0 frames per second. |
| Track window check box | Check this to track the window and capture the contents of the window at its original position, even if the window is moved. |
| Fill color button | Select the fill color that used to fill areas of the video under certain conditions. |
| Finder tool control | Drag the finder control to select a window as the capture source. |
| Manual mode check box | Check this to Enable the manual-capturing mode. |
| Capture frames button | Start the manual mode capturing process. |
| Frames number edit box | Number of frames that needs to be captured in manual mode. |
| Outline source check box | Check this to enable the outline shape option. |
| Outline shape combo box | Select the outline shape region type. |
| Color button | Select the outline shape region color. |
| On source close combo box | Select the action if the capture source is closed. |
| On source minimize combo box | Select the action if the capture source is minimized. |
| On source area change combo box | Select the action if the capture source area is changed. |
| Capture option combo box | Select the option that determines what to capture from the window. |
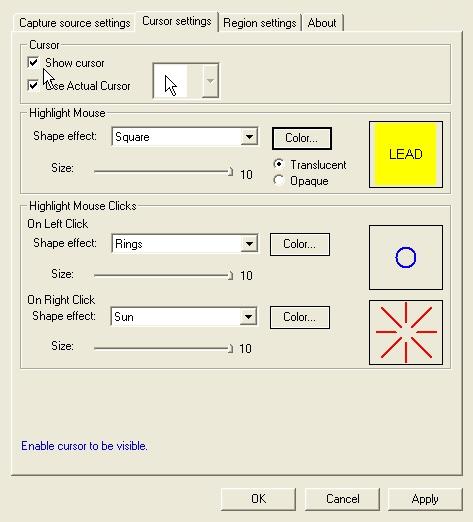
The Cursor settings tab is shown in the following figure:

The following table shows the controls and their descriptions:
| Control | Description |
|---|---|
| Show cursor check box | Check this to display the cursor in the capture stream. |
| Use actual cursor check box | Check this to display the actual cursor icon in the capture stream. Or uncheck it to display the selected cursor from the combo box. |
| Cursors combo box | Select a cursor icon to be displayed in the capture stream. |
| Shape effect combo box | Select the highlight mouse shape effect. |
| Size slider bar | Specify the highlight mouse shape size. |
| Color button | Specify the highlight mouse shape color. |
| Translucent radio button | Make the mouse highlight is translucent. |
| Opaque radio button | Make the mouse highlight is opaque. |
| On left click shape effect combo box | Select the effect shape when the left button click. |
| On left click size slider bar | Set the effect shape size when the left button click. |
| On left click color button | Select the effect shape color when the left button click. |
| On right click shape effect combo box | Select the effect shape when the right button click. |
| On right click size slider bar | Set the effect shape size when the right button click. |
| On right click color button | Select the effect shape color when the right button click. |
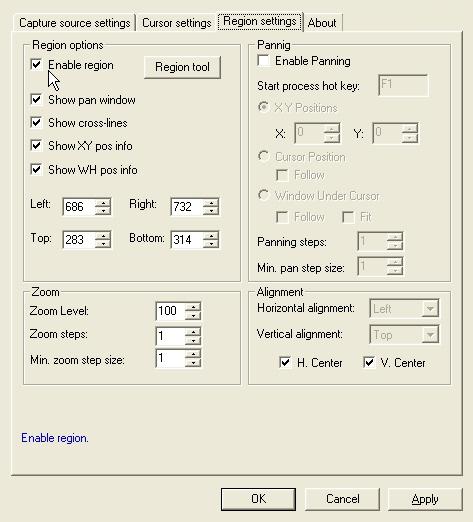
The Region settings tab is shown in the following figure:

The following table shows the controls and their descriptions:
| Control | Description |
|---|---|
| Enable region check box | Check this to enable the region options. |
| Region tool button | To display the region selection tool to specify the capture region. |
| Show pan window check box | Check this to display the pan window when the selection process begins. |
| Show cross-line check box | Check this to display the cross-line when the selection process begins. |
| Show XY pos info check box | Check this to display the XY position window when the selection process begins. |
| Show WH pos info check box | Check this to display the width/height window when the selection process begins. |
| Left edit box | Specify the left boundary of the region. |
| Top edit box | Specify the top boundary of the region. |
| Right edit box | Specify the right boundary of the region. |
| Bottom edit box | Specify the bottom boundary of the region. |
| Zoom level edit box | Specify the zoom level factor. |
| Zoom steps edit box | Specify the zoom steps. |
| Min. zoom step size | Specify the minimum zoom steps. |
| Enable panning check box | Check this to enable the panning options. |
| Start process hot key edit box | Specify a hot key to start the panning process. |
| X Y positions radio button | Select this to pan the region to the specified X Y positions. |
| X edit box | Specify the X position. |
| Y edit box | Specify the Y position. |
| Cursor position radio button | Select this to pan the region to the cursor position. |
| Cursor position Follow check box | Check this to track the cursor when it is move. |
| Window under cursor check box | Select this to pan the region to the window that is under the cursor. |
| Window under cursor Follow check box | Check this to track the captured window when it is move. |
| Fit check box | Check this to fit the region to the captured window. This will change the zoom level. |
| Panning steps edit box | Specify the panning steps. |
| Min. pan step size edit box | Specify the minimum panning steps. |
| Horizontal alignment combo box | Select the horizontal alignment option for the region. |
| Vertical alignment combo box | Select the vertical alignment option for the region. |
| H. Center check box | Check this to make a horizontal-center alignment for the region. |
| V. Center check box | Check this to make a vertical-center alignment for the region. |
