Create a Custom Annotation with the Document Viewer - WinForms C#
LEADTOOLS includes more than 30 built-in annotation objects that can be extended to create custom annotation objects. This tutorial demonstrates how to create a custom circle annotation derived from the AnnEllipseObject class in a C# WinForms application using the Document Viewer.
| Overview | |
|---|---|
| Summary | This tutorial covers both the automated and custom annotation features in a C# WinForms application using the Document Viewer. |
| Completion Time | 45 minutes |
| Visual Studio Project | Download tutorial project (13 KB) |
| Platform | WinForms C# Application |
| IDE | Visual Studio 2022 |
| Development License | Download LEADTOOLS |
Required Knowledge
Get familiar with the basic steps of creating a project, initializing the Document Viewer, and adding annotations to the Document Viewer by reviewing the tutorials below, before working on the Create a Custom Annotation with the Document Viewer - WinForms C# tutorial.
- Add References and Set a License
- Display Files in the Document Viewer
- Draw and Edit Annotation on Documents
Create the Project and Add LEADTOOLS References
Start with a copy of the project created in the Draw and Edit Annotation on Documents tutorial. If the project is not available, follow the steps in that tutorial to create it.
The references needed depend upon the purpose of the project. References can be added by one or the other of the following two methods (but not both). For this project, the references below are needed.
If using NuGet references, this tutorial requires the following NuGet packages and their dependencies:
Leadtools.Annotations.WinFormsLeadtools.Document.SdkLeadtools.Document.Viewer.WinForms
If local DLL references are used, the following DLLs are needed. The DLLs are located at <INSTALL_DIR>\LEADTOOLS23\Bin\net:
Leadtools.dllLeadtools.Annotations.Automation.dllLeadtools.Annotations.DesignersLeadtools.Annotations.Engine.dllLeadtools.Annotations.Rendering.WinForms.dllLeadtools.Annotations.WinForms.dllLeadtools.Caching.dllLeadtools.Controls.WinForms.dllLeadtools.Core.dllLeadtools.Document.dllLeadtools.Document.Viewer.WinForms.dll
For a complete list of which DLL files are required for your application, refer to Files to be Included in your Application.
Set the License File
The License unlocks the features needed for the project. It must be set before any toolkit function is called. For details, including tutorials for different platforms, refer to the Setting a Runtime License tutorial.
There are two types of runtime licenses:
- Evaluation license, obtained at the time the evaluation toolkit is downloaded. It allows the toolkit to be evaluated.
- Deployment license. If you need a Deployment license file and developer key, refer to Obtaining a License.
Add the Custom Annotation to the Annotations Toolbar Panel
With the references added, the license set, and the Document Viewer initialized, coding can begin.
Go to Form1.cs in the Solution Explorer. Right-click on the Design Window and select View Code or press F7 to bring up the code behind the Form.
Add the following statements to the using block at the top:
using Leadtools;using Leadtools.Controls;using Leadtools.Caching;using Leadtools.Annotations.WinForms;using Leadtools.Annotations.Automation;using Leadtools.Annotations.Designers;using Leadtools.Document;using Leadtools.Document.Viewer;
Add Toolbar Icon Resource
First download the Circle icon PNG image. Extract it and re-name the PNG file to Create-a-Custom-Annotation-Circle-Icon.png.
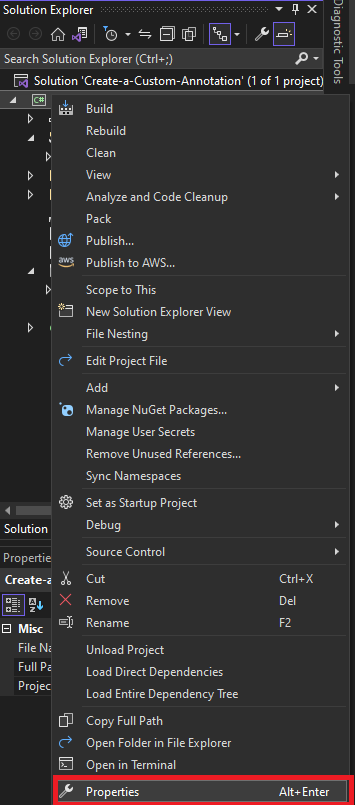
In the Solution Explorer, right-click the project file -> Properties
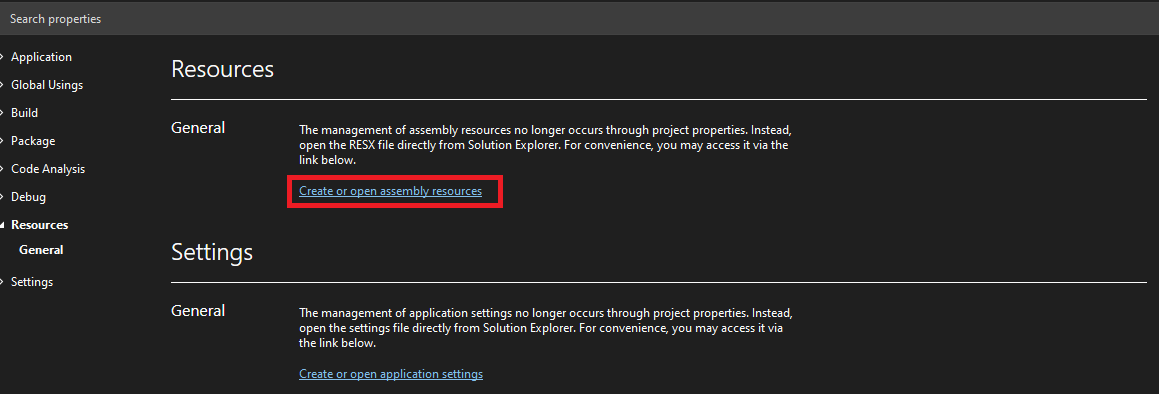
In the properties menu go to Resources -> Create or open assembly sources
Click Add Resource and then click Add Existing File....
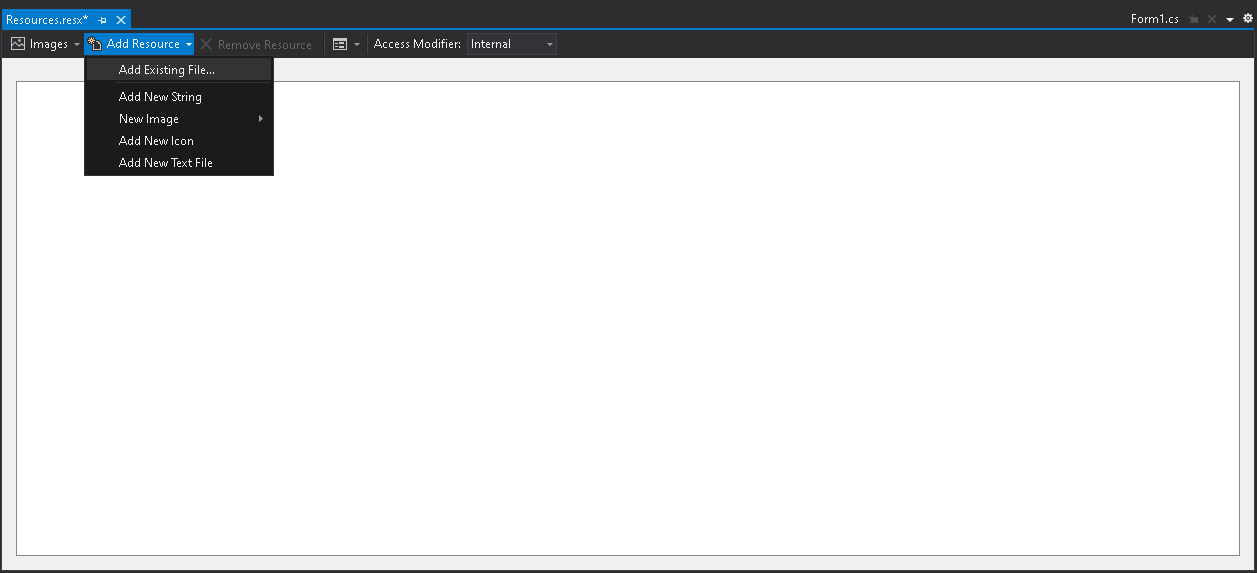
Download the Circle Icon PNG image below and browse to the location and click Open.
After the resource has been imported, the project will create a Resources folder.
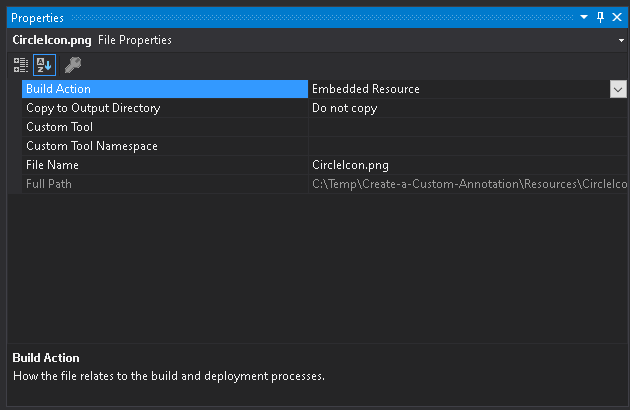
This image needs to be embedded into the project. To do so, navigate to Solution Explorer, drop down the Resources folder, and click on Create-a-Custom-Annotation-Circle-Icon.png. In the properties, change Build Action to embedded resource.
Create Custom Circle Annotation Object Classes
In the Solution Explorer, right-click the Project, highlight Add, and click Create Folder. Rename the folder to be AnnCircleObject.
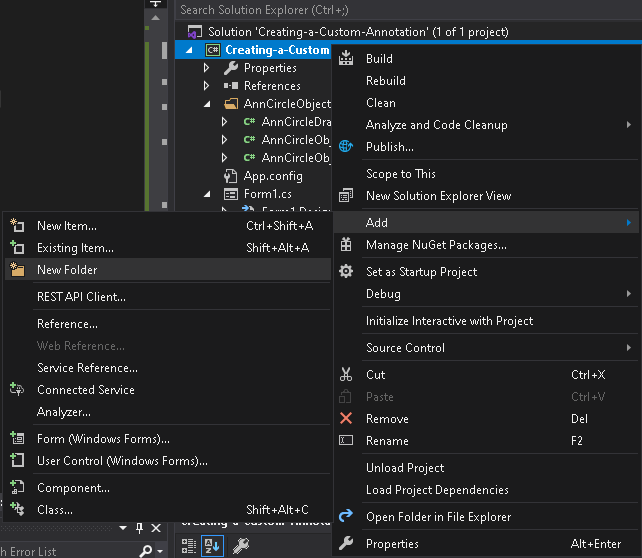
In the Solution Explorer, right-click the AnnCircleObject folder, highlight Add, and click Class....
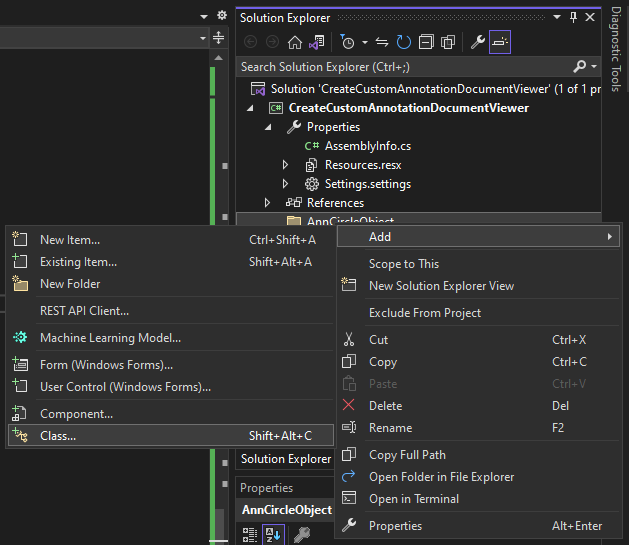
Add three new classes:
AnnCircleDrawDesigner.csAnnCircleObject.csAnnCircleObjectRenderer.cs
Note: Be sure to change the namespace for each of these classes to match the namespace in Form1.cs.
Add the below code to the AnnCircleDrawDesigner class:
using System;using Leadtools;using Leadtools.Annotations.Engine;using Leadtools.Annotations.Designers;namespace Create_a_Custom_Annotation{class AnnCircleDrawDesigner : AnnRectangleDrawDesigner{//We need 2 points, a beginning and an ending pointprivate LeadPointD begin = LeadPointD.Empty;private LeadPointD end = LeadPointD.Empty;/// <summary>/// Constructor for the AnnCircleDrawDesigner/// </summary>public AnnCircleDrawDesigner(IAnnAutomationControl automationControl, AnnContainer container, AnnCircleObject annObject): base(automationControl, container, annObject) { }/// <summary>/// override the pointer down event/// set the beginning and ending points to the location of the first click/// </summary>public override bool OnPointerDown(AnnContainer sender, AnnPointerEventArgs e){begin = e.Location;end = begin;return base.OnPointerDown(sender, e);}/// <summary>/// override the pointer move event/// set the new mouse point to the end variable/// do some math to create a circle object (width/height stay equal)/// </summary>public override bool OnPointerMove(AnnContainer sender, AnnPointerEventArgs e){end = e.Location;AnnCircleObject circle = (AnnCircleObject)TargetObject;double x = (end.X - begin.X);double y = Math.Abs(end.Y - begin.Y);double scaleX = 1;double scaleY = 1;if (x < y)scaleX = y / x;elsescaleY = x / y;circle.Rect = LeadRectD.Create(begin.X, begin.Y, Math.Abs(end.X - begin.X) * Math.Abs(scaleX), Math.Abs(end.Y - begin.Y) * Math.Abs(scaleY));Invalidate(LeadRectD.Empty);return true;}}}
Add the below code to the AnnCircleObject class:
using Leadtools.Annotations.Engine;namespace Create_a_Custom_Annotation{class AnnCircleObject : AnnEllipseObject{//set the id to the UserObjectIDpublic const int CircleObjectId = UserObjectId;/// <summary>/// Constructor for the object/// set the id of the object to the circle object ID/// </summary>public AnnCircleObject(): base(){SetId(CircleObjectId);Tag = null;}protected override AnnObject Create(){return new AnnCircleObject();}}}
Add the below code to the AnnCircleObjectRenderer class:
using System.Collections.Generic;using Leadtools.Annotations.Rendering;using Leadtools.Annotations.Automation;using Leadtools.Annotations.Engine;using Leadtools;namespace Create_a_Custom_Annotation{class AnnCircleObjectRenderer : AnnEllipseObjectRenderer{/// <summary>/// Constructor for the renderer/// get the ellipse object renderer and use the same styles for the circle/// </summary>public AnnCircleObjectRenderer(AnnAutomationManager manager): base(){IAnnObjectRenderer annEllipseObjRenderer = manager.RenderingEngine.Renderers[AnnObject.EllipseObjectId];LabelRenderer = annEllipseObjRenderer.LabelRenderer;LocationsThumbStyle = annEllipseObjRenderer.LocationsThumbStyle;RotateCenterThumbStyle = annEllipseObjRenderer.RotateCenterThumbStyle;RotateGripperThumbStyle = annEllipseObjRenderer.RotateGripperThumbStyle;// The below snippet changes the annotation's thumbnail size//LeadSizeD newThumbSize = LeadSizeD.Create(300, 300); // New size of the thumbnails, change as necessary//LocationsThumbStyle.Size = newThumbSize;//RotateCenterThumbStyle.Size = newThumbSize;//RotateGripperThumbStyle.Size = newThumbSize;}/// <summary>/// override the RenderThumbs method/// go through the thumbs and remove the top bottom left and right thumbs so it cannot be changed from a circle/// </summary>public override void RenderThumbs(AnnContainerMapper mapper, LeadPointD[] thumbLocations, AnnFixedStateOperations operations){List<LeadPointD> newThumbs = new List<LeadPointD>();for (int i = 0; i < thumbLocations.Length; i += 2)newThumbs.Add(thumbLocations[i]);base.RenderThumbs(mapper, newThumbs.ToArray(), operations);}}}
Initialize Annotations and Create Custom Annotation Code
Right-click on Form1.cs in the Solution Explorer and select View Code to bring up the code behind the form.
Add inside the InitAnnotations() method the CreateCustomObject(automationManager); code, below var automationManagerHelper = new AutomationManagerHelper(automationManager); as follows:
var automationManagerHelper = new AutomationManagerHelper(automationManager);CreateCustomObject(automationManager);
Add a new method inside the Form1 class named CreateCustomObject(AnnAutomationManager annManager). This method is called inside the InitAnnotations() method as shown above. Add the below code to the new method:
private void CreateCustomObject(AnnAutomationManager annManager){// Create the circle object, assign the designers, set the toolbar image, and then add it to the manager and rendering engineAnnAutomationObject circleAutomationObject = new AnnAutomationObject();circleAutomationObject.Id = AnnCircleObject.CircleObjectId;circleAutomationObject.Name = "Circle";circleAutomationObject.ToolBarToolTipText = circleAutomationObject.Name;circleAutomationObject.DrawDesignerType = typeof(AnnCircleDrawDesigner);circleAutomationObject.EditDesignerType = typeof(AnnRectangleEditDesigner);circleAutomationObject.RunDesignerType = typeof(AnnRunDesigner);circleAutomationObject.ObjectTemplate = new AnnCircleObject();circleAutomationObject.ToolBarImage = new Bitmap(typeof(Form1), "Resources.Create-a-Custom-Annotation-Circle-Icon.png");circleAutomationObject.ContextMenu = new ObjectContextMenu();annManager.Objects.Add(circleAutomationObject);annManager.RenderingEngine.Renderers.Add(AnnCircleObject.CircleObjectId, new AnnCircleObjectRenderer(annManager));}
Run the Project
Run the project by pressing F5, or by selecting Debug -> Start Debugging.
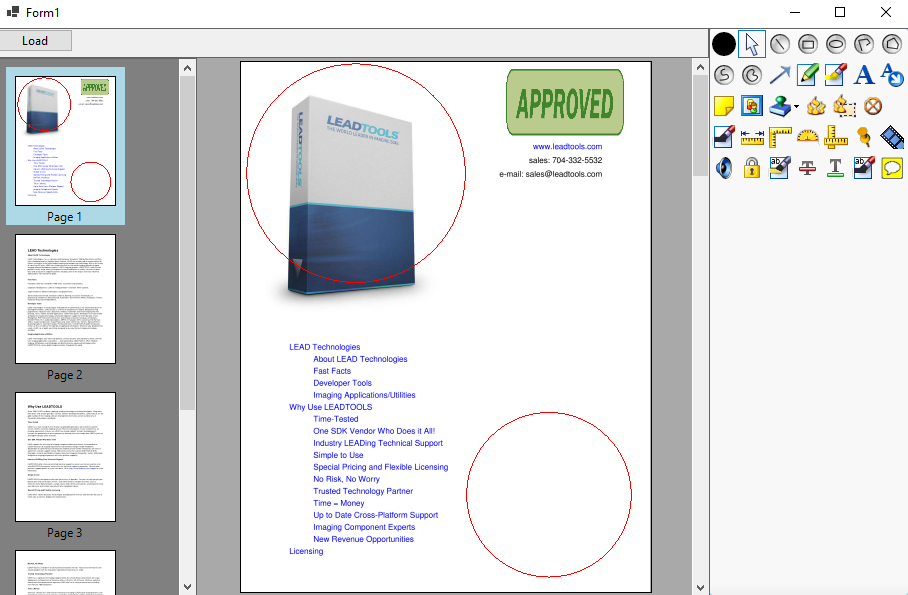
If the steps were followed correctly, the application runs and any of the annotations on the toolbar can be selected to draw on the loaded document. Select the black circle icon, click and drag on the document to add the custom circle annotation. The following image shows the Document Viewer with the annotation toolbar on the right of the viewer.
Wrap-up
This tutorial showed how to use the AutomationManager,AutomationManagerHelper, AnnAutomation, and AnnAutomationObject classes with the DocumentViewer control to draw and edit automated and custom annotations.
