Integrate Live Capture with Xamarin Camera Control - Xamarin C#
This tutorial shows how to access the video frames being captured live from a device's camera in a C# Xamarin application using the Xamarin Camera Control.
Xamarin Framework Deprecation
As of LEADTOOLS v23, the cross-platform Xamarin framework has been deprecated and replaced with LEADTOOLS .NET MAUI framework.
For any LEADTOOLS Xamarin apps you have already built, we recommend you migrate to the LEADTOOLS .NET MAUI framework. To help you with the migration, review the LEADTOOLS .NET MAUI tutorials to get you started.
This change is driven by Microsoft's announcement to end Xamarin support.
| Overview | |
|---|---|
| Summary | This tutorial covers how to access live capture video frames in a C# Xamarin application. |
| Completion Time | 30 minutes |
| Visual Studio Project | Download tutorial project (509 KB) |
| Platform | C# Xamarin Cross-Platform Application |
| IDE | Visual Studio 2019, 2022 |
| Development License | Download LEADTOOLS |
Required Knowledge
Get familiar with the basic steps of creating a Xamarin project by reviewing the Add References and Set a License tutorial, before working on the Integrate Live Capture with Xamarin Camera Control tutorial.
Create the Project and Add the LEADTOOLS References
Start with a copy of the project created in the Add References and Set a License tutorial. If you do not have the project, follow the steps in the tutorial to create it.
The references needed depend upon the purpose of the project. For this project, the following NuGet package are needed:
Leadtools.Camera.Xamarin
Set the License File
The License unlocks the features needed for the project. It must be set before any toolkit function is called. For details, including tutorials for different platforms, refer to Setting a Runtime License.
There are two types of runtime licenses:
- Evaluation license, obtained at the time the evaluation toolkit is downloaded. It allows the toolkit to be evaluated.
- Deployment license. If a Deployment license file and developer key are needed, refer to Obtaining a License.
Add Code to Check and Ask for Camera Permission
With the project created, the references added, and the license set, coding can begin.
In the Solution Explorer, open the MainPage.xaml.cs and ensure that the following are added to the using area at the top of the code:
using Xamarin.Essentials; Add the following global variable:
bool PermissionsGranted; Add a MainPage_Appearing() event handler to the MainPage class.
public MainPage(){// Keep rest of code as isInitializeComponent();Appearing += MainPage_Appearing;}
Use the code below to check the Camera permission for the application and prompt the user to enable them before loading the ContentPage with the live capture camera control.
private async void MainPage_Appearing(object sender, EventArgs e){PermissionsGranted = await VerifyPermissions();if (PermissionsGranted == false)return;elseApp.Current.MainPage = new LiveCapturePage();}private async Task<bool> VerifyPermissions(){try{PermissionStatus status = PermissionStatus.Unknown;// Camera permission - NOTE: Requires adding Permission to the Android Manifest and iOS pListstatus = await Permissions.CheckStatusAsync<Permissions.Camera>();if (status != PermissionStatus.Granted){await DisplayAlert("Camera Permission Required", "This app will proccess frames taken live from the device's camera", "OK");status = await Permissions.RequestAsync<Permissions.Camera>();if (status != PermissionStatus.Granted)return false;}// All needed permissions grantedreturn true;}catch (Exception ex){await DisplayAlert("Error", ex.ToString(), "OK");return false;}}
Add Application Permissions (Android)
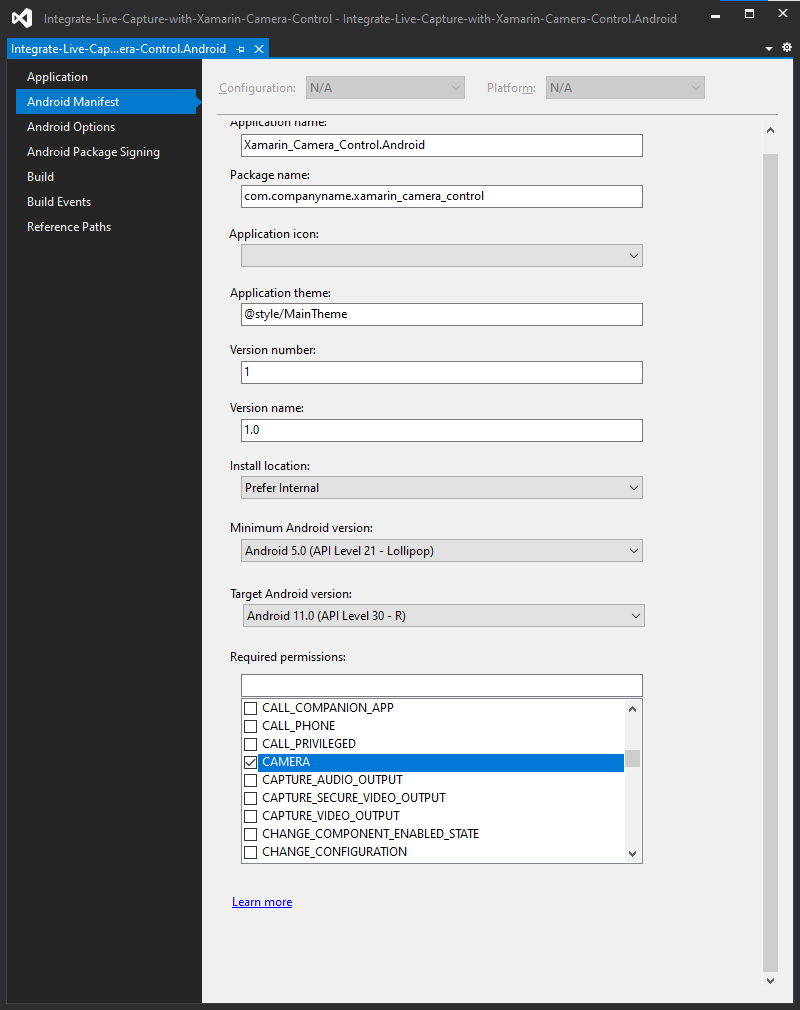
In the Solution Explorer, right-click on <Project>.Droid project. Click Properties. In the Android Manifest tab, go to the Required Permissions section and enable the CAMERA permission.

Add Application Permissions (iOS)
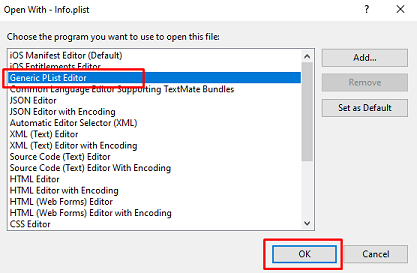
In the Solution Explorer, right-click on Info.plist. Click Open With.... Select Generic PList Editor, then click OK.

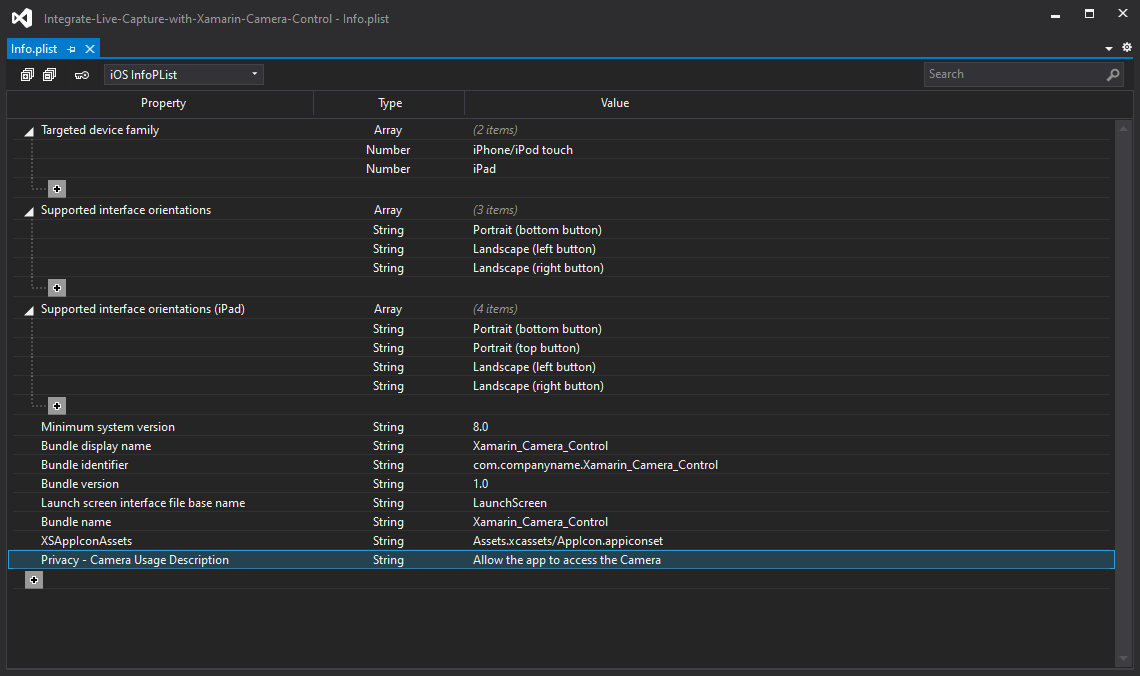
Click the + button on the last row in the editor. This will be called Custom Property, with the Type set to String and an empty value. Click on the Property name and the dropdown will appear. From that dropdown select the Privacy - Photo Library Usage Description. Then enter a description into the Value column for why the application wants to access that given feature.

Initialize the Camera Control
With the project created, the references added, and the license set, coding can begin.
In Solution Explorer, right-Click on the base C# project and select Add -> New Item. Select the Content Page option and name the class LiveCapturePage.xaml
Open LiveCapturePage.xaml and add the following code inside the ContentPage to add the CameraView control, a Live Capture button, and a label to illustrate how many frames have been processed.
<ContentPage.Content><StackLayout><!--main grid container for everything--><Grid x:Name="mainGrid" HorizontalOptions="FillAndExpand" VerticalOptions="FillAndExpand"><Grid.ColumnDefinitions><ColumnDefinition x:Name="c0" Width="*"/><ColumnDefinition x:Name="c1" Width="*"/><ColumnDefinition x:Name="c2" Width="*"/></Grid.ColumnDefinitions><Grid.RowDefinitions><RowDefinition x:Name="r0" Height="*"/><RowDefinition x:Name="r1" Height="*"/><RowDefinition x:Name="r2" Height="*"/><RowDefinition x:Name="r3" Height="*"/><RowDefinition x:Name="r4" Height="*"/><RowDefinition x:Name="r5" Height="*"/><RowDefinition x:Name="r6" Height="*"/><RowDefinition x:Name="r7" Height="*"/><RowDefinition x:Name="r8" Height="*"/></Grid.RowDefinitions><Label x:Name="capturedFrames" Text="Frames Captured: 0" TextColor="Blue" Grid.Row="0" Grid.Column="0" Grid.ColumnSpan="3"/><namespace:CameraView x:Name="leadCamera" Grid.Row="1" Grid.Column="0" Grid.ColumnSpan="3" Grid.RowSpan="7" HorizontalOptions="FillAndExpand" VerticalOptions="FillAndExpand"/><Button x:Name="liveCapture" Text="Live Capture" Grid.Row="8" Grid.Column="1" Clicked="liveCapture_Clicked"/></Grid></StackLayout></ContentPage.Content>
Right click on the page and select View Code to bring up the code behind LiveCapturePage.xaml. Add the following statements to the using block at the top of LiveCapturePage.xaml.cs.
// Using block at the topusing System;using Xamarin.Forms;using Xamarin.Forms.Xaml;
// Add this global variableprivate int frameCounter = 0;
Configure the camera control by setting the CameraOptions.AutoRotateImage to true inside the LiveCapturePage() method:
public LiveCapturePage(){InitializeComponent();leadCamera.CameraOptions.AutoRotateImage = true;}
Add the Live Capture Code
In the Solution Explorer, open LiveCapturePage.xaml.cs . Add a new Clicked event handler for liveCapture, if it does not already exist. Add the below code inside the handler to hook the camera control to an event handler that will process every frame taken by the capture and increment the counter by one.
private void liveCapture_Clicked(object sender, EventArgs e){// Tapping the Live Capture button will hook the FrameReceived Event handler, allowing processing each frameif (liveCapture.Text == "Live Capture"){liveCapture.Text = "Stop";leadCamera.FrameReceived += LeadCamera_FrameReceived;}else{liveCapture.Text = "Live Capture";leadCamera.FrameReceived -= LeadCamera_FrameReceived;}}private void LeadCamera_FrameReceived(Leadtools.Camera.Xamarin.FrameHandlerEventArgs e){// Frame Received Handler CodeframeCounter = frameCounter + 1;Device.BeginInvokeOnMainThread(() =>{capturedFrames.Text = $"Frames Processed: {frameCounter}";});}
Run the Project
Select the desired project (iOS or Android) and run the project by pressing F5, or by selecting Debug -> Start Debugging.
If the steps were followed correctly, the application runs and it will ask to allow Camera permissions, which is required. For testing, click the Live Capture button at the bottom of the device's screen. A preview from the device's camera will be displayed in the CameraView and the number of frames processed will increment for every frame processed. Click the Stop button to end the preview.
Wrap-up
This tutorial showed how to use the CameraView class to process frames taken by the device's camera.
