Get Started with the LEADTOOLS Network Virtual Printer
This tutorial shows how to configure and run the LEADTOOLS server and client .NET Framework virtual printer demos.
| Overview | |
|---|---|
| Summary | This tutorial covers how to use the LEADTOOLS network virtual printer client/server communication mechanism. |
| Completion Time | 15 - 20 minutes |
| Platform | .NET Framework |
| Development License | Download LEADTOOLS |
Required Knowledge
Be sure to download and install the LEADTOOLS SDK on the server machine and make sure that the license and key files are located in the <INSTALL_DIR>\LEADTOOLS23\Support\Common\License directory.
The LEADTOOLS Virtual Printer Driver is required to create and use the virtual printers in this tutorial.
Note
The LEADTOOLS Main Installation installs the Virtual Printer Driver during its initial installation process. During the installation, a prompt appears that asks for permission to install the virtual driver. Installing the driver via the main installation is the easiest way to start using the Virtual Printer Driver.
The driver can also be deployed using the Install, Set up, and Deploy the LEADTOOLS Virtual Printer Driver tutorial.
Internet Information Services (IIS), along with all sub-components, are required to be enabled and installed on the server machine.
Set up the Server Machine
IIS Configuration
With the SDK and IIS installed, the server's virtual printer can now be configured.
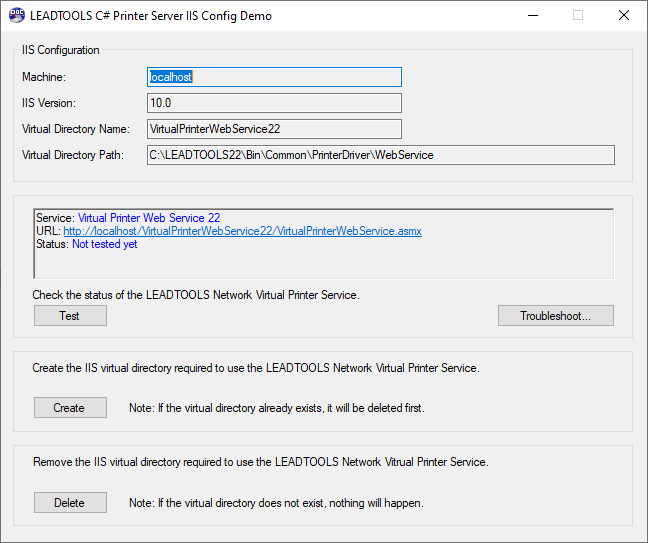
Run the LEADTOOLS Printer Server IIS Config demo which is located in <INSTALL_DIR>\LEADTOOLS23\Bin\DotNet4\x64\PrinterServerIISConfigDemo_Original.exe

Click Create to add the IIS virtual directory needed for the network virtual printer's service.
Printer Server Configuration
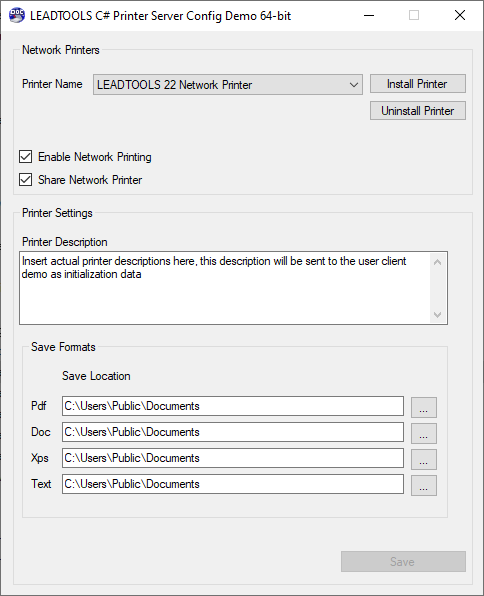
With IIS configured, the Network Virtual Printer can be installed using the demo located in <INSTALL_DIR>\LEADTOOLS23\Bin\Dotnet4\x64\PrinterServerConfigDemo_Original.exe

Click Install Printer to create the server's network printer and make sure that both the Enable Network Printing and Share Network Printer options are checked so that the printer is visible to the client machine.
Set up the Client Machine
Build the client virtual printer's assembly, PrinterClientDemo.dll, using the project located in <INSTALL_DIR>\LEADTOOLS23\Examples\VirtualPrinter\DotNet\PrinterClientDemo.
Once the assembly is created, create the installer executable, PrinterClientInstallerDemo.exe, using the project located in <INSTALL_DIR>\LEADTOOLS23\Examples\VirtualPrinter\DotNet\PrinterClientInstallerDemo
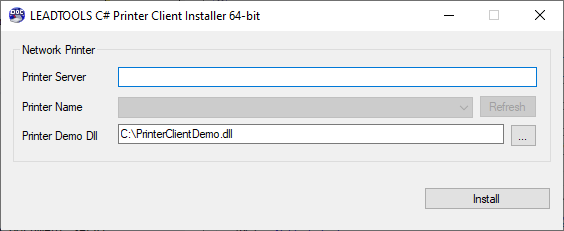
Move both files to the client machine and run the installer.

For the Printer Server field, enter the IP of the server machine configured earlier.
Select the network printer from the drop-down menu.
For the Printer Demo DLL field, enter or browse to the path of the PrinterClientDemo.dll file.
Click Install to add the client virtual printer to the client machine.
Note
Alternatively, the Virtual Printer Stand-alone Client can be obtained from the LEADTOOLS Downloads and can be used to deploy the client virtual printer on a device that does not have the LEADTOOLS SDK installed. The Installer can be found in
<INSTALL_DIR>\LEADTOOLS23\Examples\VirtualPrinter\DotNet\PrinterClientInstallerDemo\net
Test the LEADTOOLS Network Virtual Printer
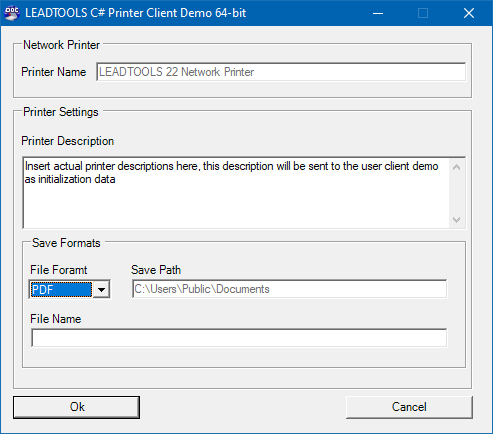
If both server and client machines were configured correctly, the server machine's LEADTOOLS network virtual printer is visible and is installed on the client machine. Printing from the client machine to this printer will produce a dialog to select a save format and output filename.

Clicking OK after entering these fields will produce the output file on the server machine in the designated folder.
Wrap-Up
This tutorial shows how the LEADTOOLS Virtual Printer can be configured and installed as a network server printer. It also shows how the LEADTOOLS Virtual Printer can be configured as a client printer to connect and communicate with the server.
