Detect Image Format and Extension - macOS Swift Console
This tutorial shows how to read an image file and detect the proper format and file extension in a macOS Swift Console application using the LEADTOOLS SDK.
Note
This feature is useful if the file does not have a file extension or if you are reading the file from a stream.
| Overview | |
|---|---|
| Summary | This tutorial covers how to use the RasterCodecs class to detect a file's format and extension in a macOS Swift Console application. |
| Completion Time | 15 minutes |
| Xcode Project | Download tutorial project (5 KB) |
| Platform | macOS Swift Console Application |
| IDE | Xcode |
| Development License | Download LEADTOOLS |
| Try it in another language |
|
Required Knowledge
Get familiar with the basic steps of creating a project by reviewing the Add References and Set a License tutorial, before working on the Detect Image Format and Extension - macOS Swift Console tutorial.
Create the Project and Add LEADTOOLS References
Start with a copy of the project created in the Add References and Set a License tutorial. If you do not have that project, follow the steps in that tutorial to create it.
The references needed depend upon the purpose of the project. This tutorial requires the following Framework references located at <INSTALL_DIR>\LEADTOOLS23\Bin\Xcode\Frameworks\macOS:
Leadtools.Codecs.Bmp.frameworkLeadtools.Codecs.Cmp.frameworkLeadtools.Codecs.Fax.frameworkLeadtools.Codecs.Png.frameworkLeadtools.Codecs.Tif.frameworkLeadtools.Codecs.frameworkLeadtools.framework
You will need the individual file codecs for each file type that you are expecting to work with. The toolkit loads the codecs in a certain order when detecting a file format. The following are loaded first:
Leadtools.Codecs.Bmp.frameworkLeadtools.Codecs.Cmp.frameworkLeadtools.Codecs.Fax.frameworkLeadtools.Codecs.Png.frameworkLeadtools.Codecs.Tif.framework
Note: The individual file codecs do not have to be added to the project directly. They can simply reside in the build folder and will be called at runtime. For more information about loading particular file codecs, including preloading and ignoring codecs, refer to Loading File Codecs.
Edit the Leadtools-Bridging-Header.h file to add the following imports:
#import <Leadtools.Codecs/Leadtools.Codecs.h> For a complete list of which files are required for your application, refer to Files to be Included in your Application.
Set the License File
The License unlocks the features needed for the project. It must be set before any toolkit function is called. For details, including tutorials for different platforms, refer to Setting a Runtime License.
There are two types of runtime licenses:
- Evaluation license, obtained at the time the evaluation toolkit is downloaded. It allows the toolkit to be evaluated.
- Deployment license. If a Deployment license file and developer key are needed, refer to Obtaining a License.
Note: Adding LEADTOOLS references and setting a license are covered in more detail in the Add References and Set a License tutorial.
Add the Detect Image Format Code
With the project created, the references added, and the license set, coding can begin.
Using the Project Navigator, open main.swift. Add the following code below the call to the SetLicense function, which will gather the information on the given file and output the file extension.
SetLicense()let inputFile = "<INSTALL_DIR>/LEADTOOLS23/Resources/Images/ocr1.tif"// Retrieve information on the file without fully loading itlet codecs: LTRasterCodecs = LTRasterCodecs()let info: LTCodecsImageInfo = try codecs.imageInformation(file: inputFile, totalPages: false)// Get the proper RasterImageFormat and the friendly name for itlet format: LTRasterImageFormat = info.formatlet ext: String = LTRasterCodecs.extension(for: format)print("This file has the extension \(ext)")
Note: For the purposes of this tutorial the TIFF image in the following file path is used:
<INSTALL_DIR>/LEADTOOLS23/Resources/Images/ocr1.tif
Run the Project
Clean the project to clear any errors by selecting Product -> Clean Build Folder or Shift + Command + K.
Run the project by selecting Product -> Run or Command + R.
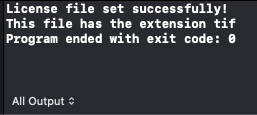
If the steps were followed correctly, the application runs and gathers the image file format and extension and then displays it to the console.

Wrap-Up
This tutorial showed how to gather the image file format and extension using the CodecsImageInfo class and GetExtension() method. We also covered how to use the RasterCodecs class.
