Display Images in an Image Viewer - macOS Swift App
This tutorial shows how to load, display, and save images in a Swift macOS App application using the LEADTOOLS SDK.
| Overview | |
|---|---|
| Summary | This tutorial covers how to Display images in an ImageViewer object in a Swift macOS App Application. |
| Completion Time | 30 minutes |
| Xcode Project | Download tutorial project (15 KB) |
| Platform | Swift macOS App Application |
| IDE | Xcode |
| Runtime License | Download LEADTOOLS |
| Try it in another language |
|
Required Knowledge
Get familiar with the basic steps of creating a project by reviewing the Add References and Set a License tutorial, before working on the Display Images in an Image Viewer - macOS Swift App tutorial.
Create the Project and Add LEADTOOLS References
Start with a copy of the project created in the Add References and Set a License tutorial. If you do not have a copy of that project, follow the steps in that tutorial to create it.
The references needed depend upon the purpose of the project. For this project, the following references are needed:
Framework references are located here: <INSTALL_DIR>/LEADTOOLS23/Bin/Xcode/Frameworks/macOS:
Leadtools.Codecs.Cmp.frameworkLeadtools.Codecs.Fax.frameworkLeadtools.Codecs.Png.frameworkLeadtools.Codecs.Tif.frameworkLeadtools.Codecs.frameworkLeadtools.Controls.frameworkLeadtools.Converters.frameworkLeadtools.ImageProcessing.Core.frameworkLeadtools.ImageProcessing.Utilities.frameworksLeadtools.framework
Edit the Leadtools-Bridging-Header.h file by adding the following imports:
#import <Leadtools.Codecs/Leadtools.Codecs.h>#import <Leadtools.Controls/Leadtools.Controls.h>
For a complete list of which files to include in your application, see Files to be Included in your Application.
Set the License File
The License unlocks the features needed for the project. It must be set before any toolkit function is called. For details, including tutorials for different platforms, refer to Setting a Runtime License.
There are two types of runtime licenses:
- Evaluation license, obtained at the time the evaluation toolkit is downloaded. It allows the toolkit to be evaluated.
- Deployment license. If a Deployment license file and developer key are needed, refer to Obtaining a License.
Note: Adding LEADTOOLS references and setting a license are covered in more detail in the Add References and Set a License tutorial.
Initialize the Image Viewer
With the project created, the references added, and the license set, coding can begin.
Using the Project Navigator, open the Main.storyboard file. Click on the + icon on the top right of the screen. This is your object library.

In the new window shown, search for Image to find the Image View object.
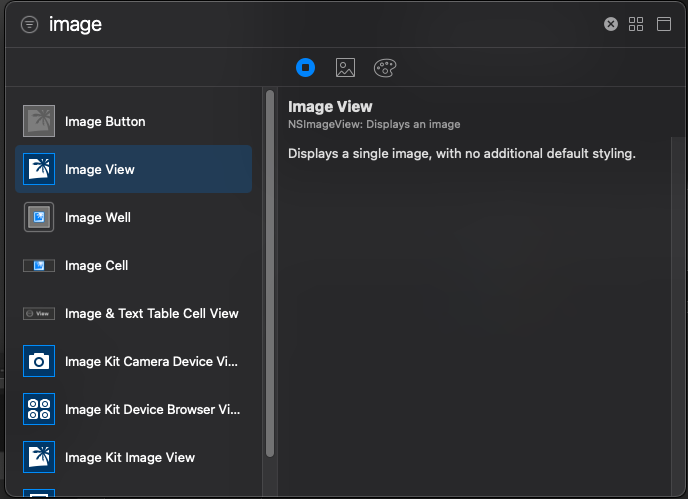
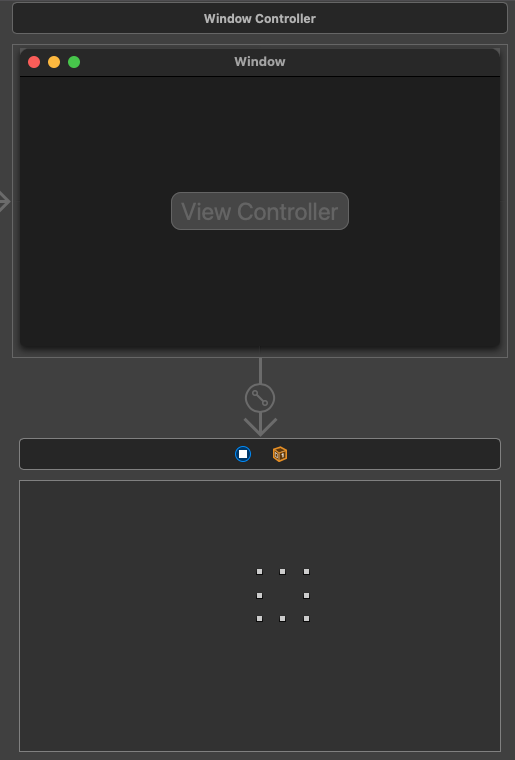
Select Image View and drag it into the blank square below the Window square with the View Controller label on it. It should look like this:
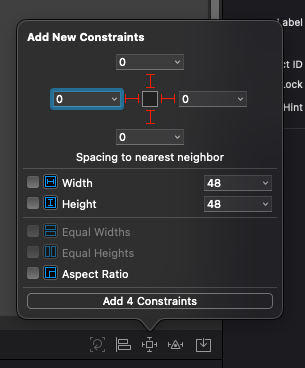
Next, at the bottom right-click on the middle icon that looks like a square with "Ts" on each side. This is the Add Constraints button which is used to constrain the added Image View to the View window we placed it in.

In the new window that is shown put 0 for each side of the square and click Add 4 Constraints as shown below:
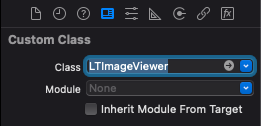
On the right-hand side of the screen select the Identity Inspector and with the Image Viewer selected, change the Class section to LTImageViewer. This changes the default NSImageView into an LTImageViewer.
Go back to the top-right, where the + button is located, and select the uneven horizontal lines icon. This is the Adjust Editor Options icon. In the window that displays, select Assistant.
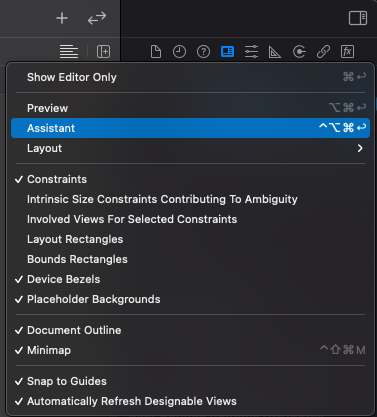
This causes the ViewController.swift file to be displayed along side the Main.storyboard file.
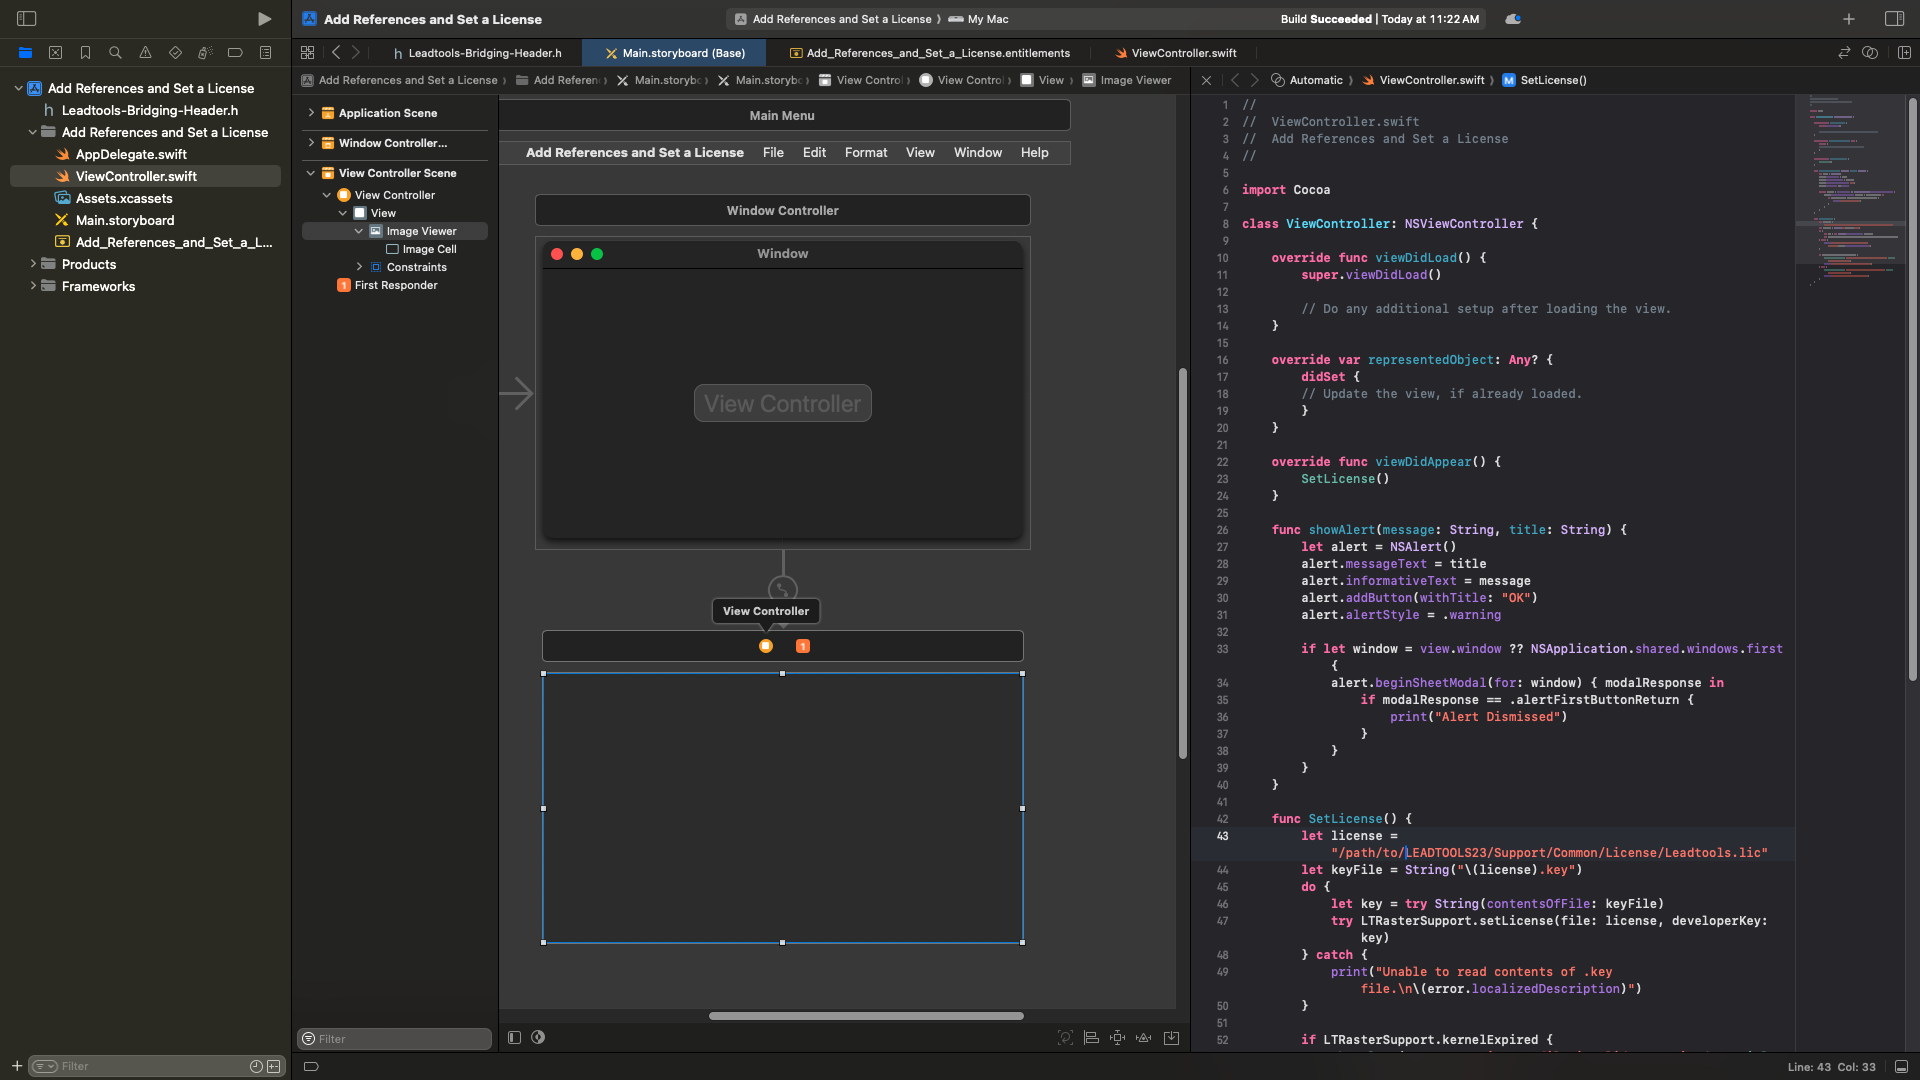
Next, hold down Control and click on the Image Viewer text in the View Controller Scene to the left. Once selected, drag it to just under class ViewController: NSViewController { in the ViewController.swift side of the screen (you will see a blue line from where you clicked to where your mouse is).
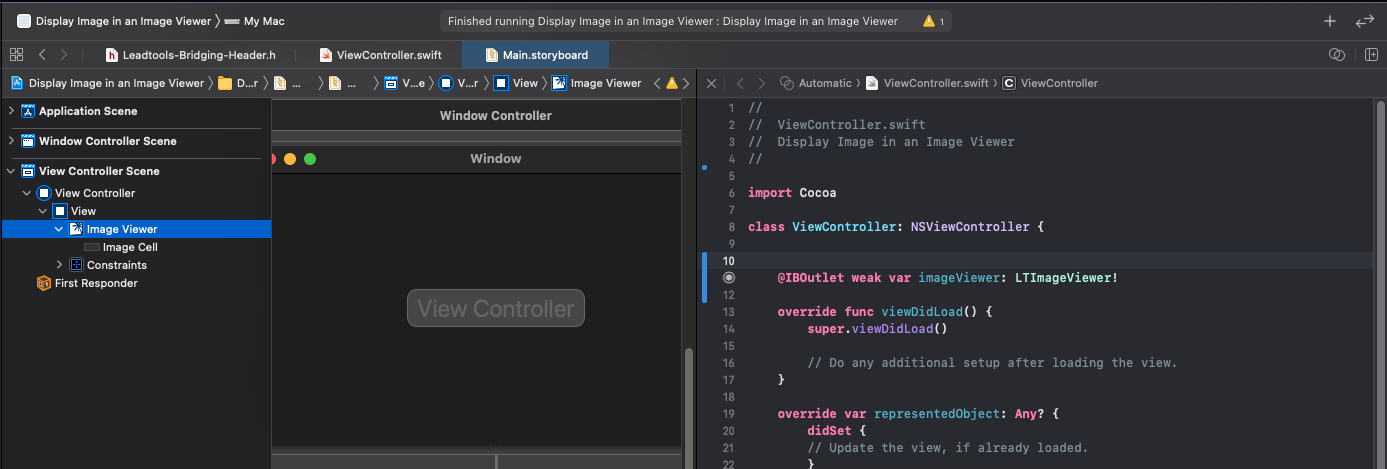
When you are finished, it should look like the below screenshot.

Set the name to imageViewer and click Connect. You should now see some code generated in the ViewController.swift side. This allows you to modify and adjust the Image Viewer via code.
Add the following code to the viewDidLoad() function to finish initializing the Image Viewer.
override func viewDidLoad() {super.viewDidLoad()// Do any additional setup after loading the view.imageViewer.backgroundColor = .darkGray}
Add the Open and Save Image Code
Inside the ViewController.swift file, Create two new IBAction functions named @IBAction func openClicked(_ openMenuItem: NSMenuItem) and @IBAction func saveClicked(_ saveMenuItem: NSMenuItem). Place these functions below the viewDidAppear() function. These IBAction functions will control loading an image into the image viewer and exporting the image to file.
Add the following code to the openClicked() function to load an image from file and add it to the viewer.
@IBAction func openClicked(_ openMenuItem: NSMenuItem) {let openPanel = NSOpenPanel()openPanel.canChooseFiles = trueopenPanel.canChooseDirectories = falselet selectedFile = getImagePath(panelType: openPanel)let codecs = LTRasterCodecs()do {let image = try codecs.load(file: selectedFile)self.imageViewer.rasterImage = imageself.imageViewer.sizeMode = .fit} catch {print(error.localizedDescription)showAlert(message: error.localizedDescription, title: "Error Loading Image")}}
Add the code below to the saveClicked() function to save the image in the viewer to disk.
@IBAction func saveClicked(_ saveMenuItem: NSMenuItem) {if imageViewer.image == nil {showAlert(message: "Unable to save! Load an image first", title: "No Image to Save")}let savePanel = NSSavePanel()let selectedFile = getImagePath(panelType: savePanel)let codecs = LTRasterCodecs()do {try codecs.save(imageViewer.rasterImage!, file: selectedFile, format: LTRasterImageFormat.jpeg, bitsPerPixel: 0)} catch {print(error.localizedDescription)showAlert(message: error.localizedDescription, title: "Error Saving Image")}}
Next, create a new function, below the functions created above, named getImagePath(panelType: NSPanel) -> String. Both IBAction functions will call this function, which is shown above. Add the code below to gather the image file path so that the functions above can access it.
func getImagePath(panelType: NSPanel) -> String {let panelOpen = (panelType as? NSOpenPanel) != nillet panel = panelOpen ? NSOpenPanel() : NSSavePanel()if panelOpen {panel.canCreateDirectories = false} else {panel.canCreateDirectories = truepanel.allowedFileTypes = ["jpg"]}panel.directoryURL = URL(fileURLWithPath: "<INSTALL_DIR>/LEADTOOLS23/Resources/Images", isDirectory: true)let i = panel.runModal()if i == NSApplication.ModalResponse.OK {return panel.url!.path}return ""}
Go back to the Main.storyboard file and expand the Application Scene to the left until you can see Open... and Save As...
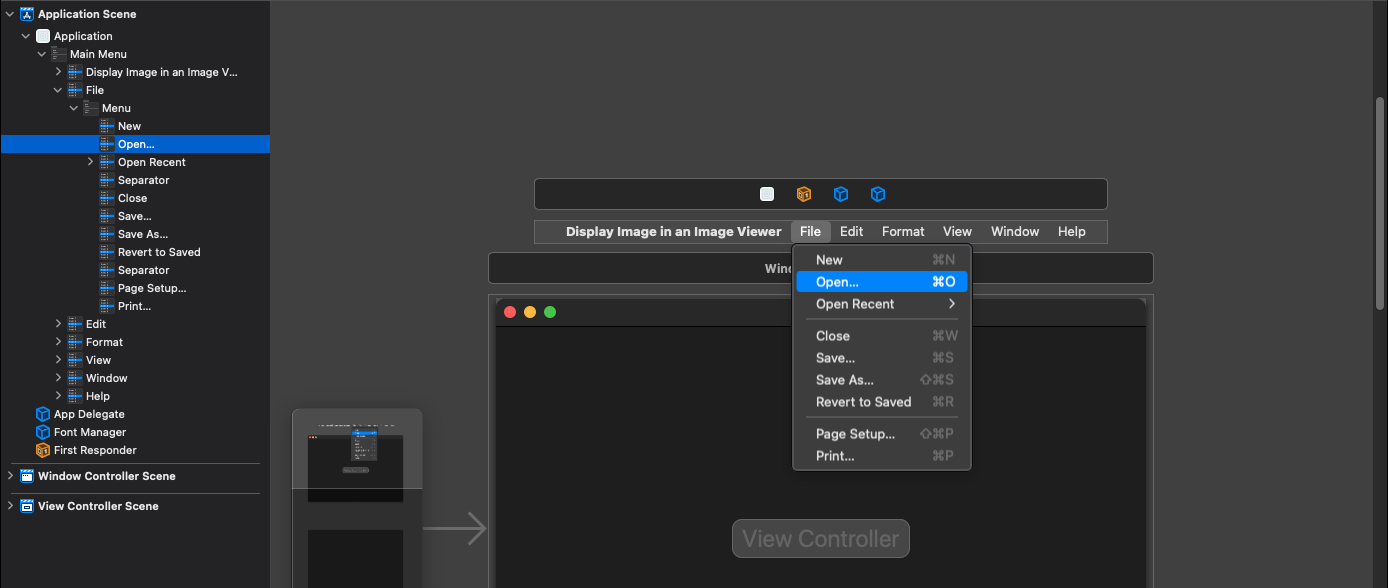
Similar to initializing the Image View, hold down Control and click Open... Drag it to the orange box icon, named First Responder, and upon release of the mouse you will see a list. Click on openClicked:. This corresponds to the openClicked function created above and links the Open... menu item to the function allowing the code to run when clicked.
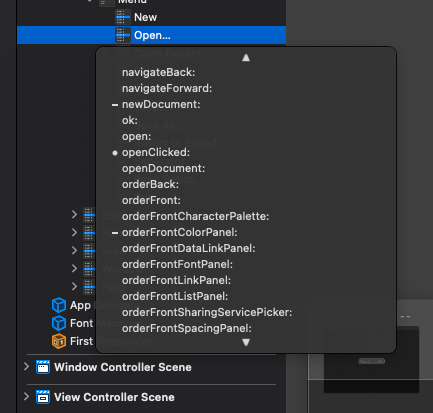
Run the same step for the Save As... menu item and select saveClicked: to link it to the saveClicked function.
Run the Project
Clean the project to clear any errors by selecting Product -> Clean Build Folder or Shift + Command + K.
Run the project by selecting Product -> Run or Command + R.
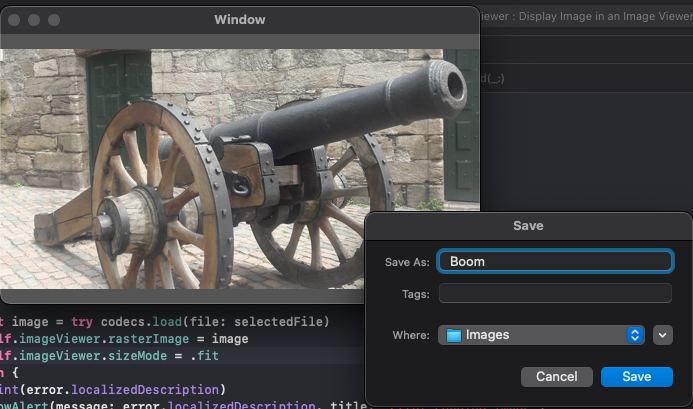
If the steps were followed correctly, the application runs and displays the empty Image Viewer. To test, follow the steps below:
- Click Open to load any selected image that LEADTOOLS supports into the viewer.
-
Click Save to export the image in the viewer to a new JPEG file in the output location specified in the Save Dialog.
Wrap-up
This tutorial showed how to load images into an ImageViewer object and export the image to disk as a JPEG image file. It showed how to use the ImageViewer and RasterCodecs classes.
