Create a Simple PACS Server - WinForms C# .NET 6
This tutorial shows how to create a simple PACS Server that handles basic connection, association, echo, and release requests from a PACS client in a C# WinForms application using the LEADTOOLS SDK.
| Overview | |
|---|---|
| Summary | This tutorial covers how create a simple PACS server in a WinForms C# Application. |
| Completion Time | 60 minutes |
| Visual Studio Project | Download tutorial project (9 KB) |
| Platform | Windows WinForms C# Application |
| IDE | Visual Studio 2022 |
| Development License | Download LEADTOOLS |
Required Knowledge
Get familiar with the basic steps of creating a project by reviewing the Add References and Set a License tutorial, before working on the Create a Simple PACS Server - WinForms C# tutorial.
Create the Project and Add LEADTOOLS References
Start with a copy of the project created in the Add References and Set a License tutorial. If you do not have that project, follow the steps in that tutorial to create it.
The references needed depend upon the purpose of the project. References can be added by one or the other of the following two methods (but not both).
If using NuGet references, this tutorial requires the following NuGet package:
Leadtools.Dicom.Pacs.Scp
If using local DLL references, the following DLLs are needed.
The DLLs are located at <INSTALL_DIR>\LEADTOOLS23\Bin\net:
Leadtools.Dicom.dllLeadtools.dllLeadtools.Core.dllLeadtools.Dicom.Server.dll
For a complete list of which DLL files are required for your application, refer to Files to be Included With Your Application.
Set the License File
The License unlocks the features needed for the project. It must be set before any toolkit function is called. For details, including tutorials for different platforms, refer to Setting a Runtime License.
There are two types of runtime licenses:
- Evaluation license, obtained at the time the evaluation toolkit is downloaded. It allows the toolkit to be evaluated.
- Deployment license. If a Deployment license file and developer key are needed, refer to Obtaining a License.
Note: Adding LEADTOOLS NuGet and local references and setting a license are covered in more detail in the Add References and Set a License tutorial.
Create the Server Class
With the project created, the references added, and the license set, coding can begin.
In the Solution Explorer, Right-click on <Project>.csproj and select Add -> New Folder. Create a folder called Utilities. Right-click on this folder and select Add -> New Item... Select the Class option and name the class Server.cs, then click Add.
The Server class is an extension of the DicomNet class and implements the methods to listen for and handle the Accept and Close requests from a connected PACS client. It also builds and sends the Association response to the client after verifying the request.
Add the Server Class Constructor and Properties
Add the using statements to the top of the Server class:
using Leadtools.Dicom;using System.Collections.Specialized;
Use the code below to define the public and private properties of the Server class along with its constructor.
The constructor calls the BuildInclusionList() which creates a collection of white-listed transfer and abstract UIDs to verify if client requests are supported by the server.
public class UserInfo // Holds user connection information{public string AETitle { get; set; }public string IPAddress { get; set; }public int Port { get; set; }}public class Server : DicomNet{// Server Propertiesprivate string _CalledAE;private int _Port = 104;private int _Peers = 1;private string _IPAddress = "";public Form1 MainForm;// Collection of connected Clientsprivate Dictionary<string, Client> _Clients = new Dictionary<string, Client>();// Collection of allowed Usersprivate List<UserInfo> _Users = new List<UserInfo>();// Get/Set Server Propertiespublic string CalledAE { get { return _CalledAE; } set { _CalledAE = value; } }public int Port { get { return _Port; } set { _Port = value; } }public int Peers { get { return _Peers; } set { _Peers = value; } }public string IPAddress { get { return _IPAddress; } set { _IPAddress = value; } }public Dictionary<string, Client> Clients { get { return _Clients; } }public List<UserInfo> Users { get { return _Users; } }// Collection of DICOM UID's supported by the serverprivate StringCollection _UidInclusionList = new StringCollection();public StringCollection UidInclusionList => _UidInclusionList;public Server() : base(null, DicomNetSecurityMode.None){BuildInclusionList();}private void BuildInclusionList(){_UidInclusionList.Add(DicomUidType.ImplicitVRLittleEndian); // Default DICOM Transfer Syntax_UidInclusionList.Add(DicomUidType.VerificationClass); // Echo Abstract Syntax}
Add the Code to Accept a Connection Request
The Server class uses the code below to verify and accept a Connection request from a client.
A Timer class is used to check and close the connection in case of a timeout.
protected override void OnAccept(DicomExceptionCode error){Client client;if (error != DicomExceptionCode.Success){MainForm.Log("Error in OnAccept with DicomExceptionCode: " + error.ToString());SendAbort(DicomAbortSourceType.Provider, DicomAbortReasonType.Unknown);}// Accept Connectionclient = new Client(this);try{Accept(client);}catch (Exception ex){MainForm.Log("Connection rejected : " + ex.Message);client.Close();client.Dispose();return;}// Add to Collection of Connected Clientsif (!Clients.ContainsKey(client.PeerAddress + "_" + client.PeerPort)){Clients.Add(client.PeerAddress + "_" + client.PeerPort, client);}else{MainForm.Log("Connection rejected. IP already connected: " + client.PeerAddress);client.Close();client.Dispose();return;}// Check against the Set Maximum Number of Peersif (Clients.Count > Peers){Clients.Remove(client.PeerAddress + "_" + client.PeerPort);MainForm.Log("Connect: Connection rejected. Max connections reached");client.Close();client.Dispose();return;}client.Timer.Tick += new EventHandler(Timer_Tick);MainForm.Log("Connect: Accepted");}// Timer Checks for Connection Timeoutprivate void Timer_Tick(object sender, EventArgs e){DicomTimer dt = sender as DicomTimer;if (dt.Client.IsConnected()){CloseClient(dt.Client);}dt.Stop();}private void CloseClient(Client client){Clients.Remove(client.PeerAddress + "_" + client.PeerPort);client.SendAbort(DicomAbortSourceType.Provider, DicomAbortReasonType.Unknown);client.CloseForced(true);if (client.Association != null)MainForm.Log("Timeout: Connection closed: " + client.Association.Calling);elseMainForm.Log("Timeout: Connection closed: " + client.PeerAddress);client.Dispose();}
Add the Code to Close a Connection
The following code handles a Close connection request from a client.
protected override void OnClose(DicomExceptionCode error, DicomNet net){if (net.Association != null)MainForm.Log("Closing connection with client: " + net.Association.Calling);elseMainForm.Log("Closing connection with client");if (Clients.ContainsKey(net.PeerAddress + "_" + net.PeerPort)){Client client = Clients[net.PeerAddress + "_" + net.PeerPort];Clients.Remove(net.PeerAddress + "_" + net.PeerPort);client.Dispose();}else{net.Dispose();}}
Add the Code to Create an Association
The DoAssociateRequest() method builds and sends the response to an Association request from the client.
public void DoAssociateRequest(Client client, DicomAssociate association){using (DicomAssociate retAssociate = new DicomAssociate(false)){if (retAssociate == null){client.SendAssociateReject(DicomAssociateRejectResultType.Permanent, DicomAssociateRejectSourceType.Provider1, DicomAssociateRejectReasonType.Application);return;}// Build the Association RequestretAssociate.MaxLength = 46726;retAssociate.Version = 1;retAssociate.Called = CalledAE;retAssociate.Calling = association.Calling;retAssociate.ImplementClass = "1.2.840.114257.1123456";retAssociate.ImplementationVersionName = "1";retAssociate.ApplicationContextName = (string)DicomUidType.ApplicationContextName;// Check if Abstract and Transfer Syntaxes are Supportedfor (int i = 0; i < association.PresentationContextCount; i++){byte id = association.GetPresentationContextID(i);string abstractSyntax = association.GetAbstract(id);retAssociate.AddPresentationContext(id, DicomAssociateAcceptResultType.Success, abstractSyntax);if (IsSupported(abstractSyntax)){for (int j = 0; j < association.GetTransferCount(id); j++){string transferSyntax = association.GetTransfer(id, j);if (IsSupported(transferSyntax)){retAssociate.AddTransfer(id, transferSyntax);break;}}if (retAssociate.GetTransferCount(id) == 0){// Presentation id doesn't have any abstract syntaxes therefore we will reject it.retAssociate.SetResult(id, DicomAssociateAcceptResultType.AbstractSyntax);}}else{retAssociate.SetResult(id, DicomAssociateAcceptResultType.AbstractSyntax);}}if (association.MaxLength != 0){retAssociate.MaxLength = association.MaxLength;}MainForm.Log("Sending Associate Accept");client.SendAssociateAccept(retAssociate);}}// Check UID against the Inclusion List and UIDs supported by LEADTOOLSprivate bool IsSupported(string uid){if (DicomUidTable.Instance.Find(uid) == null || !UidInclusionList.Contains(uid)){string uidName = DicomUidTable.Instance.Find(uid).Name;MainForm.Log("UID not supported: " + uid + " (" + uidName + ")");return false;}elsereturn true;}
Add the DicomAction Initialization Method and Completion Handler
The Server class uses the following code to initialize an instance of the DicomAction class for a supported request from a PACS client.
public DicomAction InitAction(string actionOp, ProcessType process, Client client){DicomAction action = new DicomAction(process, this, client);action.AETitle = client.Association.Calling;action.ipAddress = client.PeerAddress;client.Timer.Start();MainForm.Log(actionOp + ": Received from " + action.AETitle);return action;}private void action_ActionComplete(object sender, EventArgs e){DicomAction action = (DicomAction)sender;action.Client.Timer.Start();}
Create the Client Class
In the Solution Explorer, Right-click on Utilities folder and select Add -> New Item. Select the Class option and name the class Client.cs, then click Add.
The Client class is an extension of the DicomNet class that receives and processes requests from a connected PACS client. In this tutorial, this class handles Associate, Release, and Echo requests.
Add the Client Class Constructor and Properties
Add the using statement below to the top.
using Leadtools.Dicom; Use the code below to define the public and private properties of the Client class along with its constructor. An instance of the DicomTimer is used to check for client connection time-out.
namespace PacsServer{public class Client : DicomNet{private Server _server;private DicomAction action;// Timer to Monitor Connection Timeoutprivate DicomTimer _Timer;public DicomTimer Timer { get { return _Timer; } }public Client(Server server) : base(null, DicomNetSecurityMode.None){_server = server;_Timer = new DicomTimer(this, 30);}
OnReceiveAssociateRequest() Code
When an Association request is received by the server, the OnReceiveAssociateRequest() method is called. Use the following code to call the DoAssociateRequest() method from the Server class instance.
protected override void OnReceiveAssociateRequest(DicomAssociate association){_server.MainForm.Log("ASSOCIATE-REQUEST: Received from " + association.Calling);_server.DoAssociateRequest(this, association);_server.MainForm.Log("ASSOCIATE-REQUEST: Association accepted from " + association.Calling + " (" + PeerAddress + ")");}
OnReceiveReleaseRequest() Code
The following code handles any Release requests sent by a connected client.
protected override void OnReceiveReleaseRequest(){_server.Clients.Remove(PeerAddress + "_" + PeerPort);SendReleaseResponse();_Timer.Stop();}
OnReceiveCEchoRequest() Code
The following code handles any Echo requests sent by a connected client. It initializes and runs a DicomAction instance configured for sending an Echo response back to the client.
protected override void OnReceiveCEchoRequest(byte presentationID, int messageID, string affectedClass){action = _server.InitAction("C-ECHO-REQUEST", ProcessType.EchoRequest, this);action.PresentationID = presentationID;action.MessageID = messageID;action.Class = affectedClass;action.DoAction();}
Create the DicomAction Class
In the Solution Explorer, Right-click on the Utilities folder and select Add -> New Item. Select the Class option and name the class DicomAction.cs, then click Add.
The Client class configures and uses an instance of the DicomAction class to construct and send the appropriate response back to a connected client. In this tutorial, client Echo requests are handled by this class.
Add the DicomAction Class Constructor and Properties
Add the using statements to the top of the Server class:
using Leadtools.Dicom; Use the code below to define the public and private properties of the DicomAction class along with its constructor.
namespace PacsServer{public enum ProcessType{EchoRequest}public class DicomAction{ProcessType process;// Connection Propertiesprivate Server server;private Client client;private string _AETitle;private string _ipAddress;// Request Propertiesprivate byte _PresentationID;private int _MessageID;private string _Class;private string _Instance;// Get/Set Propertiespublic Client Client { get { return client; } }public string AETitle { get { return _AETitle; } set { _AETitle = value; } }public string ipAddress { get { return _ipAddress; } set { _ipAddress = value; } }public byte PresentationID { get { return _PresentationID; } set { _PresentationID = value; } }public int MessageID { get { return _MessageID; } set { _MessageID = value; } }public string Class { get { return _Class; } set { _Class = value; } }public string Instance { get { return _Instance; } set { _Instance = value; } }public DicomAction(ProcessType process, Server server, Client client){this.server = server;this.client = client;this.process = process;}
Add the DoAction(), IsActionSupported(), and GetUIDName() Methods
The DoAction() checks the request type and calls the relevant method to build and send a response to the client. In this tutorial, the client Echo request is handled.
public void DoAction(){if (client.Association != null){// C-ECHOif (process == ProcessType.EchoRequest)DoEchoRequest();}}
The IsActionSupported() checks if the request's class UID is supported by the server.
private bool IsActionSupported(){byte id;if (DicomUidTable.Instance.Find(Class) == null)return false;id = client.Association.FindAbstract(Class);if (id == 0 || client.Association.GetResult(id) != DicomAssociateAcceptResultType.Success)return false;return true;}
The GetUIDName() gets the name of the request's class.
private string GetUIDName(){DicomUid uid = DicomUidTable.Instance.Find(Class);if (uid == null)return Class;return uid.Name;}
Add the DoEchoRequest() Method
The DoEchoRequest() method verifies and sends an Echo response to a client.
private void DoEchoRequest(){// Check if Abstract Syntax is Supported by the LEADTOOLS Classesif (!IsActionSupported()){string name = GetUIDName();server.MainForm.Log("C-ECHO-REQUEST: Abstract syntax (" + name + ") not supported by association");client.SendCEchoResponse(_PresentationID, _MessageID, Class, DicomCommandStatusType.ClassNotSupported);return;}// Send C-Echo Response to the Clientclient.SendCEchoResponse(_PresentationID, MessageID, Class, DicomCommandStatusType.Success);server.MainForm.Log("C-ECHO-RESPONSE: Response sent to " + AETitle);}
Create the DicomTimer Class
In the Solution Explorer, Right-click on the Utilities folder and select Add -> New Item. Select the Class option and name the class DicomTimer.cs, then click Add.
The DicomTimer class is an extension of the System.Windows.Forms.Timer object and it is used to check the connection and to close and abort a connection after it times out.
using System.Windows.Forms;namespace PacsServer{public class DicomTimer : Timer{private Client _Client;public Client Client { get { return _Client; } }public DicomTimer(Client client, int time){_Client = client;Interval = (time * 1000);}}}
Form UI and Initialization
Add the following to the using block at the top of Form1.cs:
using Leadtools;using Leadtools.Dicom;
Initialize the Server
Add a call to InitServer() in the Form1() method after the SetLicense() call. This calls a method to create an instance of the Server class and initializes it with valid server information.
// Add to global variables for the formprivate Server pacsServer;// Server Propertiesprivate string serverAE = "LEAD_SERVER";private string serverIP = "0.0.0.0"; // Use valid IPprivate string serverPort = "0"; // Use valid port number// Client Propertiesprivate string clientAE = "CLIENT";private string clientIP = "0.0.0.0"; // Use valid IPprivate string clientPort = "0"; // Use valid port number
public Form1(){InitializeComponent();SetLicense();InitServer();}private void InitServer(){try{DicomEngine.Startup();pacsServer = new Server();// Server Connection InformationpacsServer.CalledAE = serverAE;pacsServer.IPAddress = serverIP;pacsServer.Port = int.Parse(serverPort);// Add Permitted User InformationpacsServer.Users.Add(new UserInfo { AETitle = clientAE, IPAddress = clientIP, Port = int.Parse(clientPort) });pacsServer.MainForm = this;pacsServer.Peers = 1; // Maximum Number of Connected Clients}catch(Exception ex){MessageBox.Show(ex.Message);}}
Start and Stop Server Menu Items
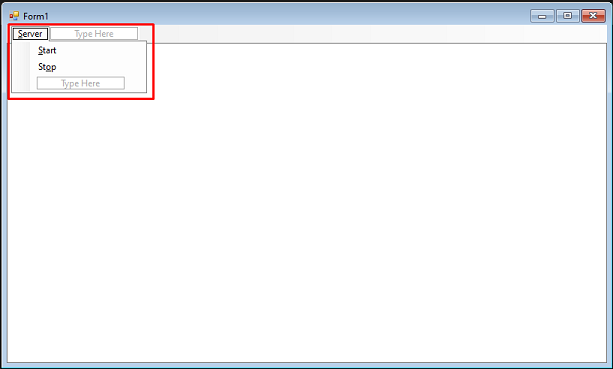
Open Form1.cs in the Solution Explorer. In the Designer, add a Server drop-down menu item, using the MenuStrip tool. Add two new items to the Server drop-down, with their text property set to &Start and St&op. Leave the new items' names as startToolStripMenuItem and stopToolStripMenuItem.

Double-click the Start and Stop menu items to create their individual event handlers. This will bring up the code behind the form.
Add the following code to the startToolStripMenuItem_Click event handler.
private void startToolStripMenuItem_Click(object sender, EventArgs e){try{DicomNet.Startup();pacsServer.Listen(pacsServer.IPAddress, pacsServer.Port, pacsServer.Peers);Log(serverAE + " has started listening on " + serverIP + ":" + serverPort);}catch(Exception ex){MessageBox.Show(ex.Message);}}
Add the following code to the stopToolStripMenuItem_Click event handler.
private void stopToolStripMenuItem_Click(object sender, EventArgs e){try{pacsServer.Close();DicomNet.Shutdown();Log(serverAE + " has stopped listening");}catch (Exception ex){MessageBox.Show(ex.Message);}}
Logging TextBox
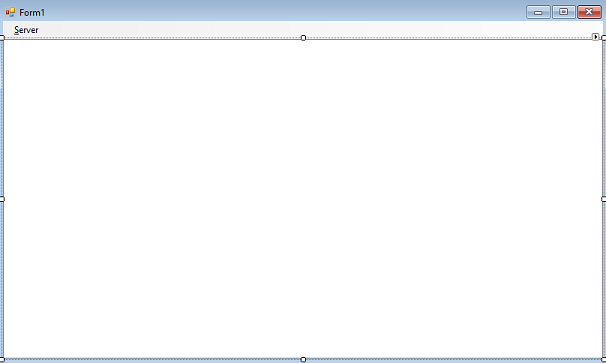
Navigate back to the Designer and add a loggingTextBox TextBox control.

Change the following properties for this TextBox control to:
- Set the Dock property to Fill
- Set the Multi-line property to True
Right-click the Designer and select View Code, or press F7, to bring up the code behind the form. Create a new method in the Form1 class named Log(string message). Add the code below to display logging messages from the Server and ClientConnection classes in the TextBox.
public void Log(string message){if (InvokeRequired){this.Invoke(new MethodInvoker(delegate{loggingTextBox.Text += message + "\r\n";}));}elseloggingTextBox.Text += message + "\r\n";}
Run the Project
Run the project by pressing F5, or by selecting Debug -> Start Debugging.
If the steps were followed correctly, the application runs and allows the user to initialize and start a simple PACS server that handles connection, association, and echo requests from connected clients.
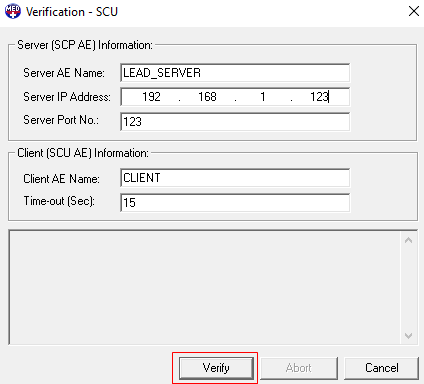
Run the CDLL Verification - SCU demo to test the server, this demo is found here:
<INSTALL_DIR>\LEADTOOLS23\Bin\CDLL\x64\DicomVrf_Original.exe
Fill-in the Server and Client AE information then click Verify to send a C-ECHO request to the server. The server will send a response back to the client.

Wrap-up
This tutorial showed how to use the DicomNet class to create the basic components for a simple PACS server that handles connection, association, echo and release requests from PACS clients.
