Creating a Bitmap Region
A bitmap region is an area of interest within a bitmap. A bitmap can have only one region at a time, but the region can be complex, including, for example, multiple noncontiguous shapes.
When a bitmap has a region, the LEADTOOLS functions that modify the pixel values (for example LBitmap::Posterize) act on the region, rather than the whole bitmap. For a list of these functions, refer to Functions Where the Region Preempts the Bitmap.
In addition, the LEADTOOLS functions that flip, reverse, rotate, shear, or resize a bitmap also transform the region to match the bitmap. For example, if you were to shear a bitmap that had a rectangular region, the region would become a parallelogram. For a list of these functions, refer to Functions that Transform the Region and the Bitmap.
By default, a bitmap does not have a region. You create a bitmap region by calling one or more of the creation functions listed in Creating and Using a Region. Each time you call one of these functions, you specify how the new region is to be added to the existing bitmap region (if there is one). The following is a list of the options:
| Option | Description |
|---|---|
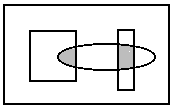
| L_RGN_AND | [0] The resulting region includes only the intersection of the existing region and the new one. The following example shows the result, where the rectangles represent the existing region, the ellipse represents the new one, and the shaded area represents the resulting region. |
 |
|
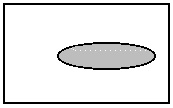
| L_RGN_SET | [1] The resulting region includes only the new region. The existing region, if any, is discarded. The following example shows the result, where the ellipse is the new region and the shaded area is the resulting region. |
 |
|
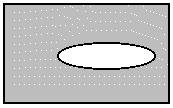
| L_RGN_SETNOT | [6] The resulting region includes everything in the bitmap, except the new region. The existing region, if any, is discarded. The following example shows the result, where the ellipse is the new region and the shaded area is the resulting region. |
 |
|
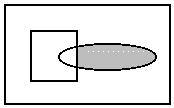
| L_RGN_ANDNOTBITMAP | [2] The resulting region includes the intersection of the area outside the existing region and the area inside the new region. The following example shows the result, where the rectangle is the existing region, the ellipse is the new one, and the shaded area is the resulting region. |
 |
|
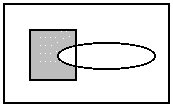
| L_RGN_ANDNOTRGN | [3] The resulting region includes the intersection of the area inside the existing region and the area outside the new region. The following example shows the result, where the rectangle is the existing region, the ellipse is the new one, and the shaded area is the resulting region. |
 |
|
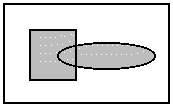
| L_RGN_OR | [4] The resulting region includes the area inside the existing region and the area inside the new region. The following example shows the result, where the rectangle is the existing region, the ellipse is the new one, and the shaded area is the resulting region. |
 |
|
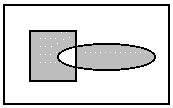
| L_RGN_XOR | [5] The resulting region includes the area inside the existing region and the area inside the new region, except for any areas where the two intersect. The following example shows the result, where the rectangle is the existing region, the ellipse is the new one, and the shaded area is the resulting region. |
 |
|
| L_RGN_LEGACY_ELLIPSE | [0x085] Pass this flag together with region set mode, to obtain ellipse regions compatible with older versions of LEADTOOLS (v18 and some old v19 DLLs). The uCombineMode is set when the region is created. |
| Valid only for LBitmapRgn::SetRgnEllipse. Not recommended unless you need to preserve backwards compatibility. |
LEADTOOLS provides the LPaint::FrameRgn function for outlining a region, but does not provide any functions for responding to the user's mouse clicks and movements one-by-one. For that purpose, you should use Windows GDI functions to draw lines or shapes in the device context while the user is designing the region. You can then call the appropriate LEADTOOLS function to create the bitmap region, and call the LPaint::FrameRgn function to outline it. For information about using the WIN32 GDI functions, refer to the WIN32 SDK online help, and from the Overviews section, select Graphics Device Interface.
To create a new curve region, or update an existing region with a curve region, use LBitmapRgn::SetRgnCurve.
Use LBitmap::SetKaufmannRgn to create a Kaufmann region. The Kauffman region is created to better define a specific area of an image. Since noise affects region creation, this function enhances the image to improve the region growing process. Regions created using this function can be used to determine the Kaufmann ratio, which is the size of the corpus callosum / the size of the brain sphere.
Use LBitmap::AutoSegment to create shrinking regions that will shrink from the contour of a specified rectangle to catch a specific object that exists within the rectangular part of the bitmap.
Use LBitmapRgn::SetRgnMagicWand to set a region based on the color of a specified point. To create a region based on the color of a specified point and a range of tolerance values, use LBitmapRgn::SetRgnBorder.
You can also use the high-level class LBitmapWindow for creating a bitmap region. This class does all of the processing required to allow the user to interactively define a bitmap region.
Topics
© 1991-2021 Apryse Sofware Corp. All Rights Reserved.
