Add and Remove Image Viewer Items - WinForms C# .NET 6
This tutorial shows how to create a WinForms C# .NET 6 application to work with ImageViewer items using the LEADTOOLS SDK.
| Overview | |
|---|---|
| Summary | This tutorial covers how to add ImageViewer items in a C# Windows WinForms Application. |
| Completion Time | 30 minutes |
| Visual Studio Project | Download tutorial project (4 KB) |
| Platform | C# Windows WinForms Application |
| IDE | Visual Studio 2022 |
| Development License | Download LEADTOOLS |
| Try it in another language |
|
Required Knowledge
Get familiar with the basic steps of creating a project by reviewing the Add References and Set a License and Display Images in an Image Viewer tutorials, before working on the Add and Remove Image Viewer Items - WinForms C# tutorial.
Saving images is not necessary for this tutorial, so saving portion can be commented out.
Create the Project and Add the LEADTOOLS References
Start with a copy of the project created in the Display Images in an Image Viewer tutorial. If you do not have that project, follow the steps in that tutorial to create it.
The references needed depend upon the purpose of the project. References can be added by one or the other of the following two methods (but not both). For this project, the following references are needed:
If NuGet references are used, this tutorial requires the following NuGet package:
Leadtools.Viewer.Controls.WinForms
If local DLL references are used, the following DLLs are needed. The DLLs are located at <INSTALL_DIR>\LEADTOOLS22\Bin\Dotnet4\x64:
Leadtools.dllLeadtools.Codecs.dllLeadtools.Codecs.Cmp.dllLeadtools.Controls.WinForms.dll
For a complete list of which Codec DLLs are required for specific formats, refer to File Format Support.
Set the License File
The License unlocks the features needed for the project. It must be set before any toolkit function is called. For details, including tutorials for different platforms, refer to Setting a Runtime License.
There are two types of runtime licenses:
- Evaluation license, obtained at the time the evaluation toolkit is downloaded. It allows the toolkit to be evaluated.
- Deployment license. If a Deployment license file and developer key are required, refer to Obtaining a License.
Note
Adding LEADTOOLS NuGet and local references and setting a license are covered in more detail in the Add References and Set a License tutorial.
Add the Add ImageViewer Items Codes
With the project created, the references added, and the license set, the ImageViewer initialized, and the load image code added, coding can begin.
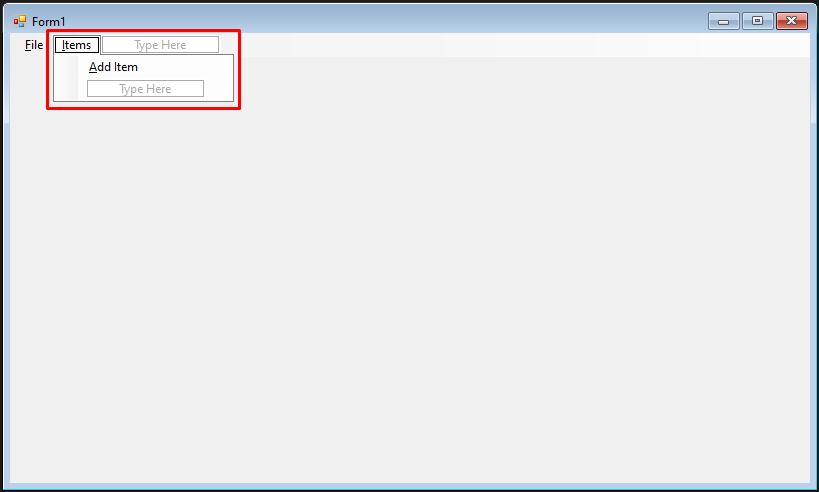
In the Solution Explorer, open Form1.cs. In the designer, add a new Items menu with an Add Item menu item to the MenuStrip. Change the text of the menu to &Items and the text of the menu item to &AddItem, which will underline the first letter of the words.

Double-click the Add Item menu item to edit its event handler. Add the following code in it:
private void addItemToolStripMenuItem_Click(object sender, EventArgs e){try{using (RasterCodecs codecs = new RasterCodecs()){LeadSize _imageSize = LeadSize.Create(130, 130);_viewer.BeginUpdate();OpenFileDialog dlg = new OpenFileDialog();dlg.InitialDirectory = @"C:\LEADTOOLS22\Resources\Images\";if (dlg.ShowDialog(this) == DialogResult.OK){using (RasterImage image = codecs.Load(dlg.FileName, 1)){LeadRect destRect = LeadRect.Create(0, 0, _imageSize.Width, _imageSize.Height);LeadRect imageRect = ImageViewer.GetDestinationRectangle(image.ImageWidth,image.ImageHeight,destRect,ControlSizeMode.Fit,ControlAlignment.Near,ControlAlignment.Near);RasterImage thumbnail = image.CreateThumbnail(imageRect.Width,imageRect.Height,32,RasterViewPerspective.TopLeft,RasterSizeFlags.Resample);ImageViewerItem item = new ImageViewerItem();item.Image = thumbnail;_viewer.Items.Add(item);}}_viewer.EndUpdate();}}catch (Exception ex){MessageBox.Show(ex.ToString());}}
Because the RasterCodecs and RasterImage classes implement IDisposable, make sure they are in a using statement for proper disposal.
Inside the Form1_Load event handler, where the ImageViewer is initialized, add the following code to view all the ImageViewer items inside the window.
ImageViewerViewLayout viewLayout = new ImageViewerVerticalViewLayout { Columns = 1 };_viewer.ViewLayout = viewLayout;ImageViewerPanZoomInteractiveMode panZoom = new ImageViewerPanZoomInteractiveMode();_viewer.InteractiveModes.Add(panZoom);
Add the Remove Item Code
In the Solution Explorer, open Form1.cs. In the designer, add a menu item to the Items menu, and set its text to &Remove Item. Double-click the new menu item to edit its event handler, then add the following code in it to remove the first item in the ImageViewer:
private void removeItemToolStripMenuItem_Click(object sender, EventArgs e){if (_viewer.Items.Count >= 1){// Remove first image_viewer.Items.RemoveAt(0);}else{MessageBox.Show("Add ImageViewerItems to test removing items.");}}
Run the Project
Run the project by pressing F5, or by selecting Debug -> Start Debugging.
If the steps were followed correctly, the application will run. To test click on File -> Open to bring up the OpenFileDialog. Select an image to load and the image will appear in the ImageViewer. Then, click Items -> Add Item to bring up the OpenFileDialog again. Select another image and the application will add that image as a thumbnail to the ImageViewer below the first image.

To test the removing image viewer items, select Items -> Remove Item and the application will remove the item at index[0] (The first RasterImage).
Wrap-up
This tutorial showed how to add and remove an Image Viewer items. Also it covered how to use the ImageViewer and ImageViewerItems classes.
