Store DICOM Image to the PACS Storage Server - WinForms C#
This tutorial shows how to store a DICOM Image into the database of a LEADTOOLS PACS Storage Server. This tutorial also shows how to establish a connection with the Storage Server through a client application.
| Overview | |
|---|---|
| Summary | This tutorial covers how to store DICOM Images to a PACS Storage Server in a WinForms C# Application. |
| Completion Time | 30 minutes |
| Visual Studio Project | Download tutorial project (10 KB) |
| Platform | Windows WinForms C# Application |
| IDE | Visual Studio 2019 |
| Development License | Download LEADTOOLS |
Required Knowledge
Get familiar with the basic steps of creating a project by reviewing the Add References and Set a License tutorial, before working on the Store DICOM Image to the PACS Storage Server - WinForms C# tutorial.
SQL Server
Note
At least SQL Server Express 2005 or newer is required for this application.
By default, the LEADTOOLS configuration demos configure the LEADTOOLS Windows services and web services to run as the LocalSystem (NT Authority\System) identity. This is a special built-in account that has full access to the local system. SQL Server 2008 R2 and earlier included this account as a login with full access to SQL Server. Microsoft considered this a security flaw and the login was removed from the newer versions of SQL Server. For more information about creating a login, refer to the Microsoft topic, SQL Server – "Create a Login", at:
- https://learn.microsoft.com/en-us/sql/relational-databases/security/authentication-access/create-a-login
If enabled in SQL Server, SQL Server authentication can be used. If using SQL authentication, before running the LEADTOOLS Database Configuration demo, the SQL login must already exist. When adding the SQL login, make sure that the option "Must change password" is unchecked (cleared). Once the SQL login and user is created, connect to the database engine in Visual Studio or SQL Server Management Studio to test.
Use either Windows or SQL authentication to log into SQL Server. The mapped user must have the correct permissions to perform the functions required by the configuration tools and demos. For development, associating the user with the sysadmin server role and the dbowner role, is the quickest method but is not recommended for production due to obvious security concerns.
Using Windows authentication requires a Windows user account, a SQL login for the Windows user account, and a SQL user account mapped to the SQL login associated with the Windows user account.
Ensure the Windows user account is set up with access to the following items:
- The web service site.
- The database provider (SQL Server) for creating, reading, writing, and removing a database.
-
The following shared folders and files:
- GlobalPacs.config
- Storage Server Directory
- Image Storage Directory
- Image Overwrite Directory
Configure and Run the LEADTOOLS PACS Storage Server Manager Demo
The demo can be found at <INSTALL_DIR>\LEADTOOLS22\Bin\DotNet4\x64\StorageServerManagerDemo_Original.exe.
If not configured already, use the dialogs to run the PACS configuration demos to set up the PACS Storage Server and Services.
During PACS Database configuration, uncheck the box to Add Default Images so that the sample image can be added using this tutorial. If already added, the images can be deleted as described below.
Once configured, use the Storage Server Manager demo to make sure that the Storage Server is configured and running:

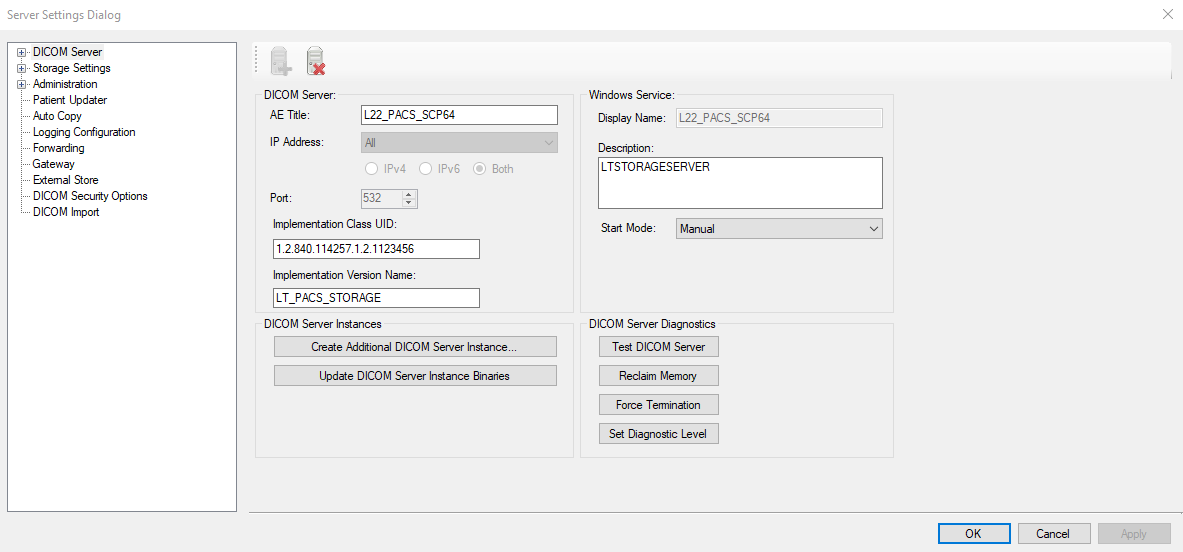
The Storage Server DICOM Server settings can be configured from the Control Panel using the DICOM Server button:

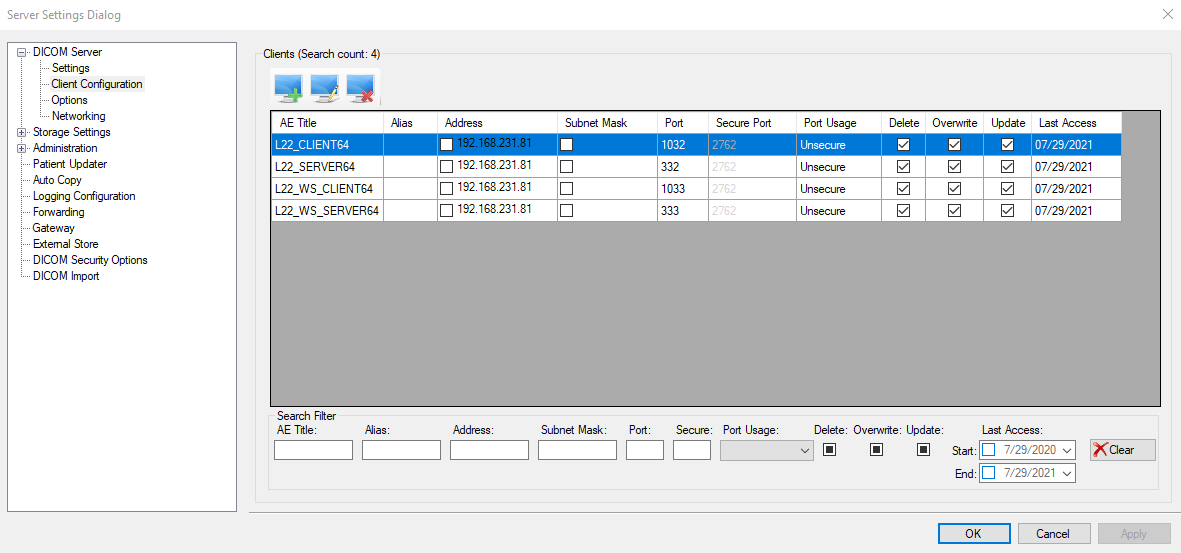
Make sure that the client to be used to connect to the Storage Server is configured correctly in the server settings. Client Configuration can be found by expanding the tree for DICOM Server in the side panel.

This tutorial will use the client AE L21_CLIENT64 that is configured by default during the initial PACS configuration.
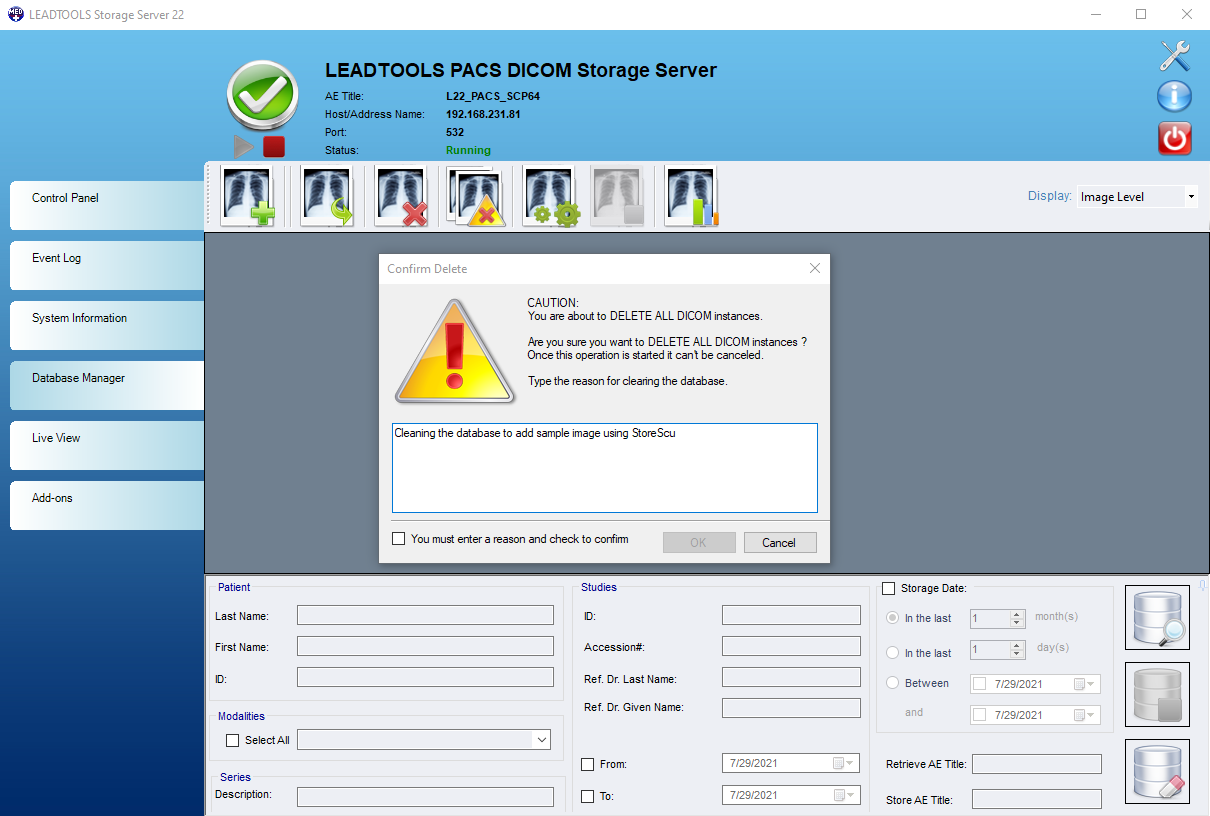
To remove the sample DICOM images from the Storage Server, use the Database Manager button from the sidebar and click the Empty Database button. Provide any desired reason in the text box, enable the checkbox, and click OK.

Create the Project and Add LEADTOOLS References
In Visual Studio, create a new C# Windows WinForms project, and add the below necessary LEADTOOLS references.
The references needed depend upon the purpose of the project. References can be added by one or the other of the following two methods (but not both).
If using NuGet references, this tutorial requires the following NuGet package:
Leadtools.Dicom.Pacs.Scu
If using local DLL references, the following DLLs are needed.
The DLLs are located at <INSTALL_DIR>\LEADTOOLS22\Bin\Dotnet4\x64:
Leadtools.dllLeadtools.Dicom.dllLeadtools.Dicom.Common.dllLeadtools.Dicom.Scu.dll
For a complete list of which DLL files are required for your application, refer to Files to be Included With Your Application.
Set the License File
The License unlocks the features needed for the project. It must be set before any toolkit function is called. For details, including tutorials for different platforms, refer to Setting a Runtime License.
There are two types of runtime licenses:
- Evaluation license, obtained at the time the evaluation toolkit is downloaded. It allows the toolkit to be evaluated.
- Deployment license. If a Deployment license file and developer key are needed, refer to Obtaining a License.
Note
Adding LEADTOOLS NuGet and local references and setting a license are covered in more detail in the Add References and Set a License tutorial.
Initialize the Store Connection
With the project created, the references added, and the license set, coding can begin.
In the Solution Explorer, open Form1.cs. Right-click on the Design Window and select View Code, or press F7, to bring up the code behind the Form. Add the following statements to the using block at the top:
// Using block at the topusing Leadtools;using Leadtools.Dicom;using Leadtools.Dicom.Scu;using Leadtools.Dicom.Scu.Common;using System;using System.IO;using System.Net;using System.Windows.Forms;
Add the below global variables.
// Add these global variablesprivate StoreScu _storeFile;private DicomScp _scp;private TextBox _storeScuClientLog;
Add a new method to the Form1 class named InitStoreScu(). Call this method inside the Main() method after the SetLicense() call. Add the below code to initialize the StoreScu class.
private void InitStoreScu(){InitUI();var ip = IPAddress.Parse("0.0.0.0"); // Change IP to client machine_storeFile = new StoreScu();_scp = new DicomScp();// Change these parameters to reflect the calling AETitle._storeFile.AETitle = "L21_CLIENT64";_storeFile.HostPort = 1040;_storeFile.HostAddress = ip;// Change these parameters to reflect the called AETitle (Storage Server)._scp.AETitle = "L21_PACS_SCP64";_scp.Port = 544;_scp.Timeout = 30;_scp.PeerAddress = _storeFile.HostAddress;// Hook event handlers_storeFile.ReceiveBuffer += new ReceiveBufferDelegate(storeFile_ReceiveBuffer);_storeFile.BeforeCStore += new BeforeCStoreDelegate(storeFile_BeforeCStore);_storeFile.AfterCStore += new AfterCStoreDelegate(storeFile_AfterCStore);// Set compression used for storing the file_storeFile.Compression = Compression.Lossless;}
Initialize the User Interface
Add a new method named InitUI(). This method will be called at the beginning of the InitStoreScu() method, as shown above. Add the below code to initialize a TextBox control used by the StoreScu as a log, along with a button that will start the store file communication when clicked.
private void InitUI(){// Resize formthis.Width = 300;this.Height = 328;// Add a TextBox for the StoreSCU and the client application to use as a log_storeScuClientLog = new TextBox();_storeScuClientLog.Name = "storeScuClientLog";_storeScuClientLog.Location = new System.Drawing.Point(12, 12);_storeScuClientLog.Width = 260;_storeScuClientLog.Height = 236;_storeScuClientLog.Multiline = true;_storeScuClientLog.Anchor = (AnchorStyles.Top | AnchorStyles.Bottom | AnchorStyles.Left | AnchorStyles.Right);this.Controls.Add(_storeScuClientLog);// Add a Store button that will start the store file communication when clickedvar storeScuButton = new Button();storeScuButton.Name = "storeScuButton";storeScuButton.Anchor = (AnchorStyles.Bottom | AnchorStyles.Left | AnchorStyles.Right);storeScuButton.Location = new System.Drawing.Point(12, 254);storeScuButton.Width = 260;storeScuButton.Height = 23;storeScuButton.Text = "Store DICOM to Storage Server";storeScuButton.Click += StoreScuButton_Click;this.Controls.Add(storeScuButton);storeScuButton.BringToFront();}
Add the StoreScu Button Code
Use the code below for the StoreScuButton_Click() event handler that will begin the communication with the Storage Server to store the sample DICOM image, IMAGE1.dcm from the sample images folder: C:\LEADTOOLS22\Resources\Images\DICOM\image1.dcm
private void StoreScuButton_Click(object sender, EventArgs e)string fileName = @"C:\LEADTOOLS22\Resources\Images\DICOM\image1.dcm";DicomEngine.Startup();DicomNet.Startup();_storeScuClientLog.Text = "Dicom engine started";_storeFile.Store(_scp, fileName);DicomNet.Shutdown();DicomEngine.Shutdown();_storeScuClientLog.Text += "Dicom engine shutdown";}
Add the C-STORE event handlers code
Use the code below for each of the respective StoreScu event handlers:
| Event | Description |
|---|---|
ReceiveBuffer |
Occurs when the connection receives buffered data, so the handler will log how many bytes are received. |
BeforeCStore |
Occurs before a C-STORE-REQ command is sent to the server, so the handler will stop the storing process if an error occurs. |
AfterCStore |
Occurs after a C-STORE-RSP command is received from the server, so the handler will log the completion of the store and record its status. |
ReceiveBuffer:
private void storeFile_ReceiveBuffer(object sender, ReceiveBufferEventArgs e){_storeScuClientLog.Text += Environment.NewLine + e.BufferSize + " bytes of data received";}
BeforeCStore:
private void storeFile_BeforeCStore(object sender, BeforeCStoreEventArgs e){if (e.Error != null){MessageBox.Show(e.Error.Message.ToString());e.Skip = SkipMethod.AllFiles;}}
AfterCStore:
private void storeFile_AfterCStore(object sender, AfterCStoreEventArgs e){_storeScuClientLog.Text += Environment.NewLine + e.FileInfo.FullName + " store complete." + Environment.NewLine + " Status: " + e.Status;}
Run the Project
Run the project by pressing F5, or by selecting Debug -> Start Debugging.
If the steps were followed correctly, the application runs and allows the user to establish communication with the LEADTOOLS PACS Storage Server and use the StoreScu to upload and store a DICOM Image file to its database.
Wrap-up
This tutorial showed how to add the necessary references to use the StoreScu and DicomScp classes to communicate with the LEADTOOLS Storage Server.
