Compare Document Contents with the Document Comparer - WinForms C# .NET 6
This tutorial shows how to compare two separate documents and annotate the text contents differences in a C# .NET 6 WinForms application using the LEADTOOLS SDK.
Note
A ready-to-use Document Comparer demo ships with the LEADTOOLS SDK installation and can be used to test out some of the available features. The focus of this tutorial is to provide guidance on creating your own application using the C#
DocumentComparerclass. The steps will allow you to annotate text contents differences as a visual aid to the reader. There are many other features that are beyond the scope of this tutorial and you can explore other tutorials of this series for additional options.
| Overview | |
|---|---|
| Summary | This tutorial covers how to compare two documents to find the text contents differences in a C# .NET 6 WinForms Application. |
| Completion Time | 30 minutes |
| Project | Download tutorial project (5 KB) |
| Platform | C# .NET 6 WinForms Application |
| IDE | Visual Studio 2022 |
| Runtime License | Download LEADTOOLS |
Required Knowledge
Get familiar with the basic steps of creating a project by reviewing the Add References and Set a License tutorial, before working on the Compare Document Contents with the Document Comparer - WinForms C# .NET 6 tutorial.
Create the Project and Add the LEADTOOLS References
Start with a copy of the project created in the Add References and Set a License tutorial. If you do not have that project, follow the steps in that tutorial to create it.
The references needed depend upon the purpose of the project. References can be added by NuGet references. For this project, the following references are needed:
This tutorial requires the following NuGet packages:
Leadtools.Annotations.WinFormsLeadtools.Document.SdkLeadtools.Document.Viewer.WinFormsLeadtools.Formats.Raster.CommonLeadtools.OcrLeadtools.PdfLeadtools.Viewer.Controls.WinForms
Set the License File
The License unlocks the features needed for the project. It must be set before any toolkit function is called. For details, including tutorials for different platforms, refer to Setting a Runtime License.
There are two types of runtime licenses:
- Evaluation license, obtained at the time the evaluation toolkit is downloaded. It allows the toolkit to be evaluated.
- Deployment license. If a Deployment license file and developer key are required, refer to Obtaining a License.
Initialize the Application
With the project created, the references added, and the license set, coding can begin.
In the Solution Explorer, open Form1.cs. Right-click on the Design Window and select View Code or press F7 to bring up the code behind the Form. Add the following statements to the using block at the top.
using Leadtools;using Leadtools.Document;using Leadtools.Caching;using Leadtools.Document.Viewer;using Leadtools.Controls;using Leadtools.Document.Compare;using Leadtools.Annotations.Engine;using Leadtools.Annotations.Automation;using Leadtools.Annotations.Rendering;
Add the following variable references to the top of the Form1 class.
private LEADDocument _virtualDocument;private LEADDocument _virtualDocument2;private FileCache _cache;private DocumentViewer _documentViewer;private DocumentViewer _documentViewer2;private DocumentDifference _documentDifference;private IList<PageCharactersDifference> _deletions;private IList<PageCharactersDifference> _insertions;private AnnAutomationManager _automationManager;private AnnAutomationManager _automationManager2;
Modify your Form1() function to match below. This will populate it with the functions we are creating in this tutorial.
public Form1(){InitializeComponent();SetLicense();InitUI();InitDocumentViewers();}
Initialize the User Interface
Inside the Form1 class, add a new method called InitUI(). This method will be called inside the Form1() function, as shown above. Add the below code to the InitUI() function in order to initialize the user interface for the application.
private void InitUI(){// Add a panel to fill the rest, for the document viewervar docViewerSplitContainer = new SplitContainer();docViewerSplitContainer.Name = "docViewerSplitContainer";docViewerSplitContainer.BackColor = Color.DarkGray;docViewerSplitContainer.SplitterDistance = docViewerSplitContainer.Width / 2;docViewerSplitContainer.BorderStyle = BorderStyle.None;docViewerSplitContainer.Dock = DockStyle.Fill;this.Controls.Add(docViewerSplitContainer);// Add a top panel to host the application controlsvar topPanel = new Panel();topPanel.Name = "topPanel";topPanel.Height = 30;topPanel.Dock = DockStyle.Top;topPanel.BorderStyle = BorderStyle.FixedSingle;this.Controls.Add(topPanel);docViewerSplitContainer.BringToFront();var loadDocumentsButton = new Button();loadDocumentsButton.Name = "loadDocumentsButton";loadDocumentsButton.Text = "Load &Documents";loadDocumentsButton.Click += (sender, e) => LoadBothDocuments();loadDocumentsButton.TabIndex = 0;loadDocumentsButton.Width = 120;topPanel.Controls.Add(loadDocumentsButton);var compareButton = new Button();compareButton.Name = "compareButton";compareButton.Text = "&Compare";compareButton.Click += (sender, e) => CompareDocuments();compareButton.Left = loadDocumentsButton.Left + loadDocumentsButton.Width;topPanel.Controls.Add(compareButton);}
Initialize the Document Viewers
Inside the Form1 class, add a new method called InitDocumentViewers(), which will also be referenced in the Form1() function, as shown above. Add the below code to the InitDocumentViewers() function in order to initialize the two Document Viewer instances.
private void InitDocumentViewers(){var createOptions = new DocumentViewerCreateOptions();// Set the UI part where the Document Viewer is displayedSplitContainer sc = (SplitContainer) this.Controls.Find("docViewerSplitContainer", false)[0];createOptions.ViewContainer = sc.Panel1;// Enable annotationscreateOptions.UseAnnotations = true;// Now create the viewer_documentViewer = DocumentViewerFactory.CreateDocumentViewer(createOptions);_documentViewer.View.ImageViewer.Zoom(ControlSizeMode.FitAlways, 1.0, _documentViewer.View.ImageViewer.DefaultZoomOrigin);_cache = new FileCache{CacheDirectory = Path.GetFullPath(@".\CacheDir"),};_virtualDocument = DocumentFactory.Create(new CreateDocumentOptions() { Cache = _cache, UseCache = true });createOptions = new DocumentViewerCreateOptions();// Set the UI part where the Document Viewer is displayedcreateOptions.ViewContainer = sc.Panel2;// Enable annotationscreateOptions.UseAnnotations = true;// Now create the viewer_documentViewer2 = DocumentViewerFactory.CreateDocumentViewer(createOptions);_documentViewer2.View.ImageViewer.Zoom(ControlSizeMode.FitAlways, 1.0, _documentViewer2.View.ImageViewer.DefaultZoomOrigin);_virtualDocument2 = DocumentFactory.Create(new CreateDocumentOptions() { Cache = _cache, UseCache = true });}
Add the Load and Set Document Code
Since there are two DocumentViewer instances, there will be three functions to add for loading the documents. Below you will find instructions for the three loading functions, one for each viewer and one that handles both viewers.
Left Viewer Load Code
Inside the Form1 class, add a method called LoadLeftDocument(). This method will be called in the loadButton.Click += (sender, e) => LoadDocument(); line of code, inside the InitUi() method. Add the below code inside the LoadLeftDocument() method to load the specified document and set the document inside the left-hand viewer.
private void LoadLeftDocument(){OpenFileDialog ofd = new OpenFileDialog();ofd.Filter = "All Files|*.*";if (ofd.ShowDialog() == DialogResult.OK){LEADDocument leadDocument = DocumentFactory.LoadFromFile(ofd.FileName, new LoadDocumentOptions { UseCache = true, Cache = _cache, LoadEmbeddedAnnotations = true });_virtualDocument.Pages.Clear();for (int i = 0; i < leadDocument.Pages.Count; i++){_virtualDocument.Pages.Add(leadDocument.Pages[i]);}}_documentViewer.BeginUpdate();_documentViewer.SetDocument(_virtualDocument);_documentViewer.View.Invalidate();if (_documentViewer.Thumbnails != null)_documentViewer.Thumbnails.Invalidate();_automationManager = _documentViewer.Annotations.AutomationManager;_automationManager.RenderingEngine = new AnnWinFormsRenderingEngine();_documentViewer.Annotations.Initialize();_documentViewer.EndUpdate();}
Right Viewer Load Code
Inside the Form1 class, add a method called LoadRightDocument(). This method will be called in the loadButton.Click += (sender, e) => LoadDocument(); line of code inside the InitUi() method. Add the below code inside the LoadRightDocument() method to load the specified document and set the document inside the right-hand viewer.
private void LoadRightDocument(){OpenFileDialog ofd2 = new OpenFileDialog();ofd2.Filter = "All Files|*.*";if (ofd2.ShowDialog() == DialogResult.OK){LEADDocument leadDocument = DocumentFactory.LoadFromFile(ofd2.FileName, new LoadDocumentOptions { UseCache = true, Cache = _cache, LoadEmbeddedAnnotations = true });_virtualDocument2.Pages.Clear();for (int i = 0; i < leadDocument.Pages.Count; i++){_virtualDocument2.Pages.Add(leadDocument.Pages[i]);}}_documentViewer2.BeginUpdate();_documentViewer2.SetDocument(_virtualDocument2);_documentViewer2.View.Invalidate();if (_documentViewer2.Thumbnails != null)_documentViewer2.Thumbnails.Invalidate();_automationManager2 = _documentViewer2.Annotations.AutomationManager;_automationManager2.RenderingEngine = new AnnWinFormsRenderingEngine();_documentViewer2.Annotations.Initialize();_documentViewer2.EndUpdate();}
Both Viewers Load Code
Inside the Form1 class, add a method called LoadBothDocuments(). This method will be called in the loadButton.Click += (sender, e) => LoadBothDocuments(); line of code inside the InitUi() method. Add the below code inside the LoadBothDocuments() method to load the specified documents and set the documents inside the appropriate viewers.
private void LoadBothDocuments(){LoadLeftDocument();LoadRightDocument();}
Note
You can use the samples here for this tutorial.
Add the Document Comparison Code
Inside the Form1 class, add a method called CompareDocuments(). This method will be called in the compareButton.Click += (sender, e) => CompareDocuments(); line of code inside the InitUi() method. Add the below code inside the CompareDocuments method to compare the loaded documents and annotate the differences in the viewer.
private void CompareDocuments(){if (_virtualDocument.Pages.Count == 0 || _virtualDocument2.Pages.Count == 0){MessageBox.Show("You need a document in each viewer before you can use the comparison feature");return;}var docList = new List<LEADDocument>(){_virtualDocument,_virtualDocument2};var comparer = new DocumentComparer();_documentDifference = comparer.CompareDocument(docList);if (!_documentDifference.HasDeletions() && !_documentDifference.HasInsertions()){MessageBox.Show("These documents are identical.");return;}_documentViewer.BeginUpdate();_documentViewer2.BeginUpdate();if (_documentDifference.HasDeletions()){_deletions = _documentDifference.GetDeletions();AnnotateDeletions();}if (_documentDifference.HasInsertions()){_insertions = _documentDifference.GetInsertions();AnnotateInsertions();}_documentViewer.EndUpdate();_documentViewer2.EndUpdate();}
Add the Annotation Code
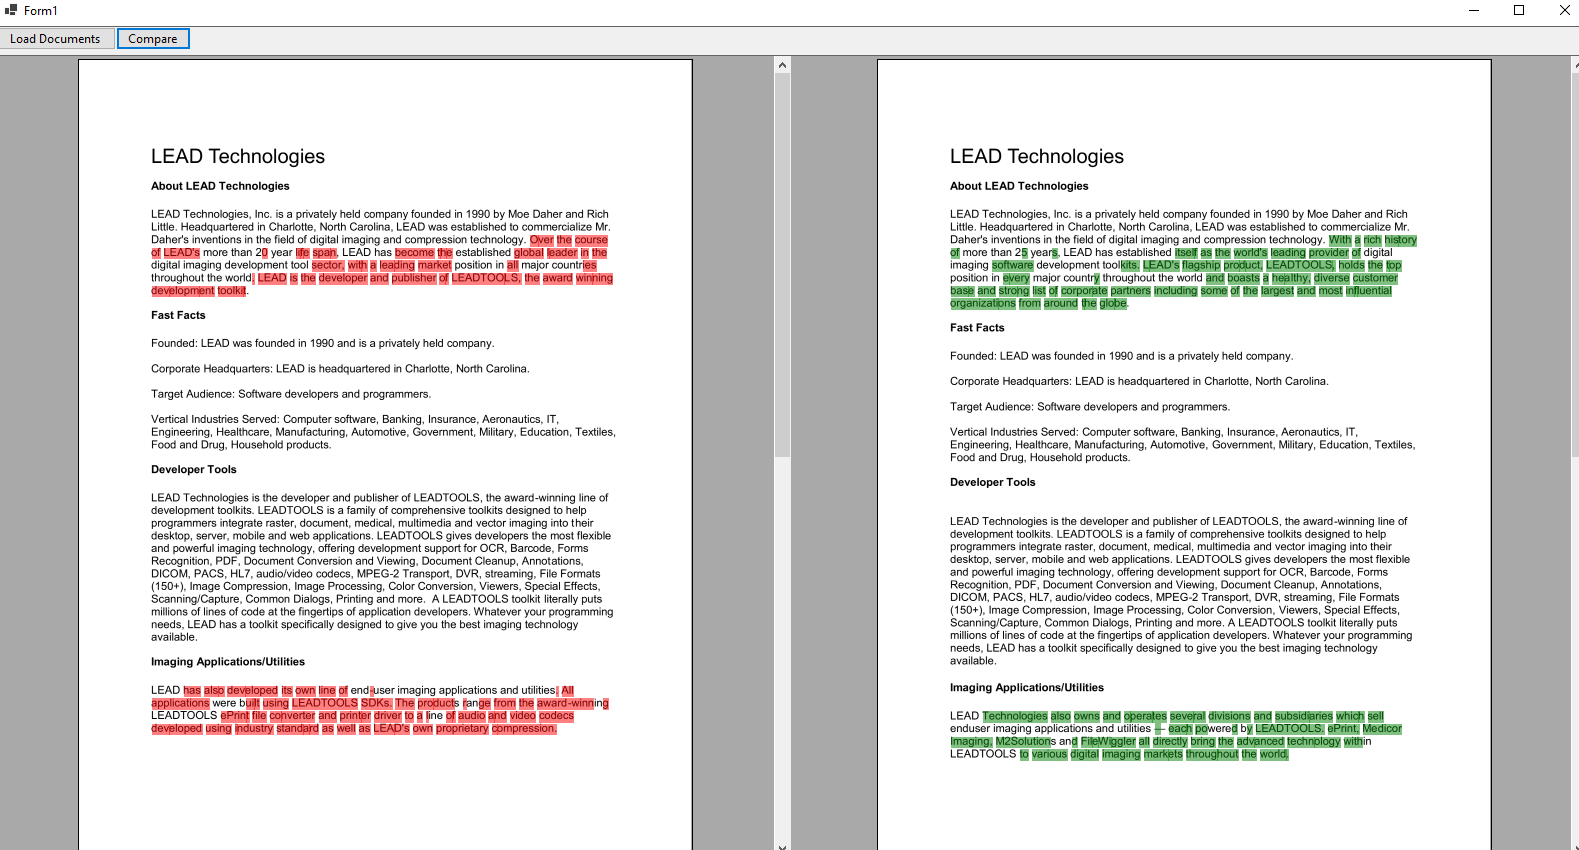
We will need to add annotation support in order to show the user where the document differences are located. Any additions to the document will be annotated in _documentViewer2 object on the right side and any deletions to the document will be annotated in the _documentViewer object, located on the left side.
Inside the Form1 class, add a method called AnnotateDeletions(). This method will be called in the CompareDocuments() method if _documentDifference.HasDeletions() comes back as true. Add the below code inside the AnnotateDeletions method to annotate the deletions for the documentDifferences object into _documentViewer.
private void AnnotateDeletions(){foreach (var annCont in _documentViewer.Annotations.Automation.Containers){annCont.Children.Clear();annCont.UserMode = AnnUserMode.Run;}foreach (var deletion in _deletions){foreach (var diffLoc in deletion.GetLocations()){AnnHiliteObject rec = new AnnHiliteObject();rec.Rect = diffLoc.Bounds;rec.HiliteColor = "Red";//rec.Stroke = AnnStroke.Create(AnnSolidColorBrush.Create("red"), LeadLengthD.Create(1));_documentViewer.Annotations.Automation.Containers[diffLoc.PageNumber - 1].Children.Add(rec);}}}
Inside the Form1 class, add a method called AnnotateInsertions(). This method will be called in the CompareDocuments() method if _documentDifference.HasInsertions() comes back as true. Add the below code inside the AnnotateInsertions method to annotate the insertions from the documentDifference object into _documentViewer2.
private void AnnotateInsertions(){foreach (var annCont in _documentViewer2.Annotations.Automation.Containers){annCont.Children.Clear();annCont.UserMode = AnnUserMode.Run;}foreach (var insertion in _insertions){foreach (var diffLoc in insertion.GetLocations()){AnnHiliteObject rec = new AnnHiliteObject();rec.Rect = diffLoc.Bounds;//rec.Stroke = AnnStroke.Create(AnnSolidColorBrush.Create("green"), LeadLengthD.Create(1));rec.HiliteColor = "Green";_documentViewer2.Annotations.Automation.Containers[diffLoc.PageNumber - 1].Children.Add(rec);}}}
Run the Project
Run the project by pressing F5, or by selecting Debug -> Start Debugging.
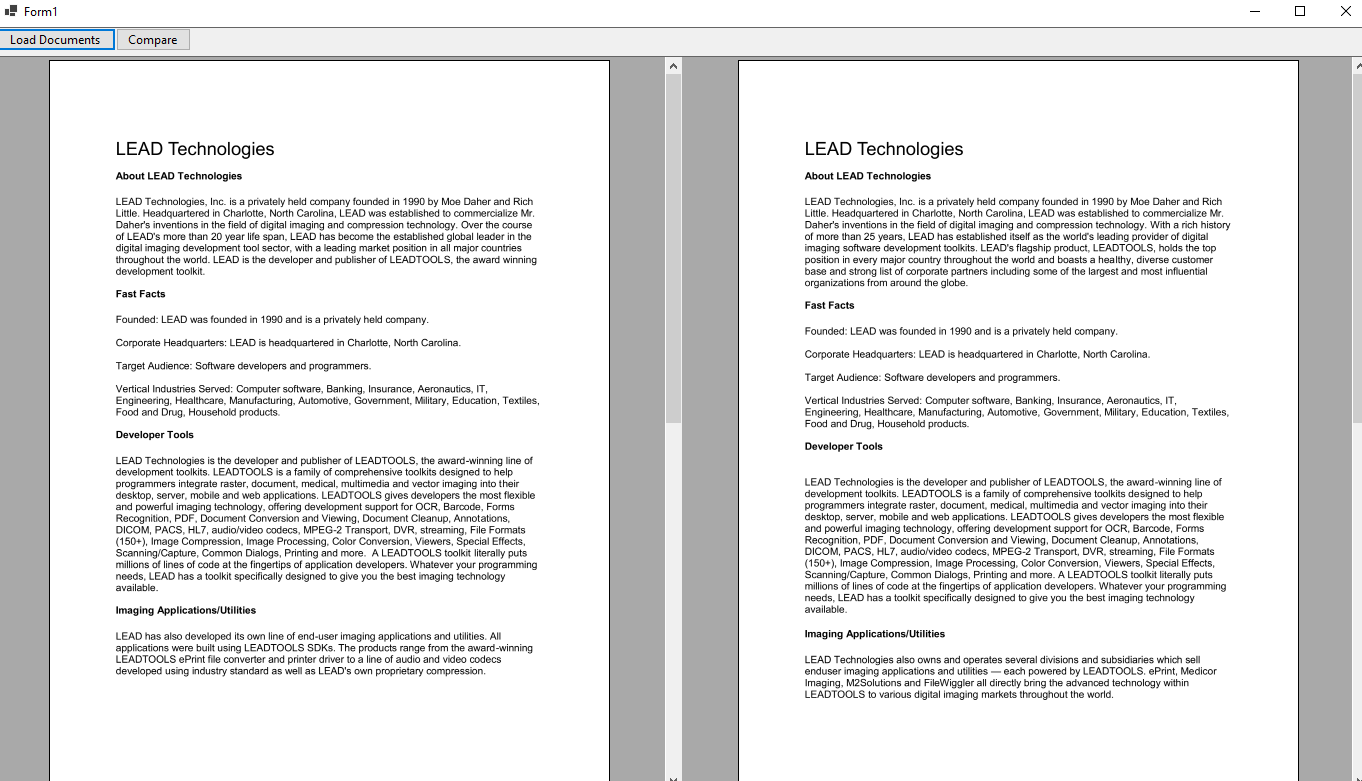
If the steps were followed correctly, the application will run. To test, click on the Load Both button to bring up the OpenFileDialog for each viewer in the pane. Select the documents to load and the documents should appear in each viewer as shown below:

After this, you will be able to press the Compare button to comparing the two loaded documents. Below is an example of the documents after the comparison has been completed.

Wrap-up
This tutorial showed how to use the DocumentComparer class to compare the contents of two documents in a C# .NET 6 WinForms application.
