Draw and Edit Annotations on Documents - WinForms C# .NET 6
This tutorial shows how to use the automated annotation features of the LEADTOOLS SDK in a WinForms C# .NET 6 application using the DocumentViewer control.
| Overview | |
|---|---|
| Summary | This tutorial covers automated annotation features in a C# WinForms Application using the Document Viewer. |
| Completion Time | 30 minutes |
| Visual Studio Project | Download tutorial project (55 KB) |
| Platform | WinForms C# Application |
| IDE | Visual Studio 2022 |
| Development License | Download LEADTOOLS |
| Try it in another language |
|
Required Knowledge
Before working on the Draw and Edit Annotations on Documents - WinForms C# tutorial, get familiar with the basic steps of creating a project by reviewing the Add References and Set a License and the Display Files in the Document Viewer tutorials.
Create the Project and Add LEADTOOLS References
Start with a copy of the project created in the Display Files in the Document Viewer tutorial. If the project is not available, follow the steps in that tutorial to create it.
The references needed depend upon the purpose of the project. References can be added by one or the other of the following two methods (but not both). For this project, the following references are needed:
If using NuGet references, this tutorial requires the following NuGet packages and their dependencies:
Leadtools.Annotations.WinFormsLeadtools.Document.SdkLeadtools.Document.Viewer.WinForms
If local DLL references are used, the following DLLs are needed. The DLLs are located at <INSTALL_DIR>\LEADTOOLS22\Bin\net:
Leadtools.dllLeadtools.Annotations.Automation.dllLeadtools.Annotations.Engine.dllLeadtools.Annotations.WinForms.dllLeadtools.Caching.dllLeadtools.Codecs.dllLeadtools.Controls.WinForms.dllLeadtools.Document.dllLeadtools.Document.Pdf.dllLeadtools.Document.Viewer.WinForms.dll
For a complete list of which DLL files are required for your application, refer to Files to be Included in your Application.
Set the License File
The License unlocks the features needed for the project. It must be set before any toolkit function is called. For details, including tutorials for different platforms, refer to the Setting a Runtime License tutorial.
There are two types of runtime licenses:
- Evaluation license, obtained at the time the evaluation toolkit is downloaded. It allows the toolkit to be evaluated.
- Deployment license. If you need a Deployment license file and developer key, refer to Obtaining a License.
Note
Adding LEADTOOLS NuGet and local references and setting a license are covered in more detail in the Add References and Set a License tutorial.
Add the Annotations Toolbar Panel
With the project created, the references added, the license set, and the Document Viewer code added, coding can begin.
Go to Form1.cs in the Solution Explorer. Right-click on the Design Window and select View Code or press F7 to bring up the code behind the Form.
Add the following statements to the using block at the top:
// Using block at the topusing Leadtools;using Leadtools.Document;using Leadtools.Caching;using Leadtools.Document.Viewer;using Leadtools.Controls;using Leadtools.Annotations.Automation;using Leadtools.Annotations.WinForms;
Add the code below to the InitUI() method to create the panel that will hold the annotations toolbar:
var annToolbarPanel = new Panel();annToolbarPanel.Name = "annToolBarPanel";annToolbarPanel.Width = 200;annToolbarPanel.Dock = DockStyle.Right;annToolbarPanel.BackColor = Color.LightBlue;annToolbarPanel.BorderStyle = BorderStyle.FixedSingle;this.Controls.Add(annToolbarPanel);
Modify the DocumentViewer to use Annotations
In the InitDocumentViewer() method, change createOptions.UseAnnotations value to true and add a call to InitAnnotations() method.
var createOptions = new DocumentViewerCreateOptions();// Set the UI part where the Document Viewer is displayedcreateOptions.ViewContainer = this.Controls.Find("docViewerPanel", false)[0];// Set the UI part where the Thumbnails are displayedcreateOptions.ThumbnailsContainer = this.Controls.Find("thumbPanel", false)[0];// Enable using annotationscreateOptions.UseAnnotations = true;// Now create the viewer_documentViewer = DocumentViewerFactory.CreateDocumentViewer(createOptions);// Initialize AnnotationsInitAnnotations();
Add the Automation Annotation Code
Use the code below for the InitAnnotations() method, to initialize the automation manager, create and populate the toolbar, and enable a context menu to show when right-clicking an annotation in the Document Viewer.
private void InitAnnotations(){// The annotations toolbar will be added herevar annToolbarPanel = this.Controls.Find("annToolBarPanel", true)[0];// Get the automation manager from the document viewervar automationManager = _documentViewer.Annotations.AutomationManager;// Create the manager helper. This sets the rendering enginevar automationManagerHelper = new AutomationManagerHelper(automationManager);// Tell the document viewer that automation manager helper is created_documentViewer.Annotations.Initialize();// Create the toolbarautomationManagerHelper.ModifyToolBarParentVisiblity = true;automationManagerHelper.CreateToolBar();var annToolBar = automationManagerHelper.ToolBar;annToolBar.Dock = DockStyle.Fill;annToolBar.AutoSize = true;annToolBar.LayoutStyle = ToolStripLayoutStyle.Flow;annToolbarPanel.Controls.Add(annToolBar);annToolBar.BringToFront();// Handler for showing the context menu when the user right-clicks on an annotation objectEventHandler<AnnAutomationEventArgs> onShowContextMenu = (sender, e) =>{// If not clicked on an annotation objectif (e == null)return;// Get the object typevar automationObject = e.Object as AnnAutomationObject;if (automationObject == null)return;// Convert the point to client coordinatesvar imageViewer = _documentViewer.View.ImageViewer;var position = imageViewer.PointToClient(Cursor.Position);var automation = _documentViewer.Annotations.Automation;// Show its context menuvar contextMenu = automationObject.ContextMenu as ObjectContextMenu;if (contextMenu != null){contextMenu.Automation = automation;contextMenu.Show(imageViewer, position);}};// Handler for showing the object properties dialogEventHandler<AnnAutomationEventArgs> onShowObjectProperties = (sender, e) =>{// Get the automation object from the document viewerusing (var dlg = new AutomationUpdateObjectDialog()){dlg.UserName = _documentViewer.UserName;dlg.Automation = sender as AnnAutomation;dlg.ShowDialog(this);e.Cancel = !dlg.IsModified;}};// Handle extra annotations using the Operation event_documentViewer.Operation += (sender, e) =>{switch (e.Operation){case DocumentViewerOperation.LoadingAnnotations:// Disable the panel containing the toolbar when loading it, then enable it when doneannToolbarPanel.Enabled = e.IsPostOperation;break;case DocumentViewerOperation.CreateAutomation:if (e.IsPostOperation){// Automation object has been created, use it to perform any extra task not handled by the// document viewer by default// Handle showing the context menu when the user right-clicks on an object and when they// select properties_documentViewer.Annotations.Automation.OnShowContextMenu += onShowContextMenu;_documentViewer.Annotations.Automation.OnShowObjectProperties += onShowObjectProperties;}break;case DocumentViewerOperation.DestroyAutomation:if (!e.IsPostOperation){// Automation is about to be destroyed, remove any events we used_documentViewer.Annotations.Automation.OnShowContextMenu -= onShowContextMenu;_documentViewer.Annotations.Automation.OnShowObjectProperties -= onShowObjectProperties;}break;default:break;}};}
Run the Project
Run the project by pressing F5, or by selecting Debug -> Start Debugging.
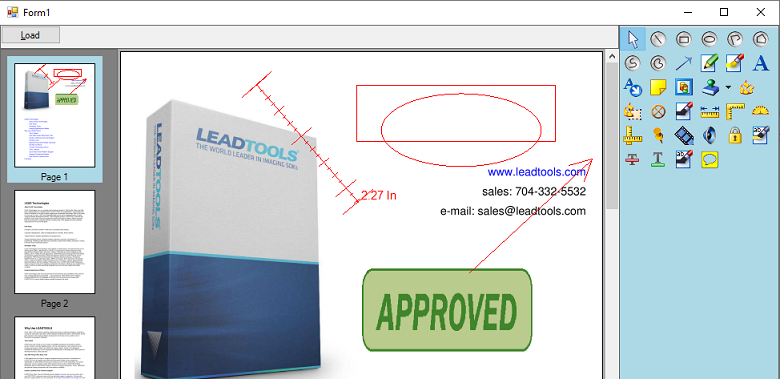
If the steps were followed correctly, the application runs and any of the annotations on the toolbar can be selected to draw on the loaded document. The following image shows the Document Viewer, with the annotation toolbar on the right of the viewer.

Wrap-up
This tutorial showed how to use the AutomationManager, AutomationManagerHelper and AnnAutomation classes with the DocumentViewer control to draw and edit automated annotations.
