Compare Images with the Document Comparer - WinForms C# .NET 6
This tutorial shows how to compare two separate images with the Document Comparer in a C# .NET Core application using LEADTOOLS SDK.
Note
A ready-to-use Document Comparer demo ships with the LEADTOOLS SDK installation and can be used to test out some of the available features. The focus of this tutorial is to provide guidance on creating your own application using the C#
DocumentComparerclass to compare between supported image file formats, such as PNG versus PNG, JPG versus JPG, etc. The steps will allow you to annotate image differences as a visual aid to the reader. There are many other features that are beyond the scope of this tutorial and you can explore other tutorials of this series for additional options.
| Overview | |
|---|---|
| Summary | This tutorial covers how to compare two images in a C# .NET 6 WinForms Application. |
| Completion Time | 30 minutes |
| Project | Download tutorial project (5 KB) |
| Platform | C# .NET 6 WinForms Application |
| IDE | Visual Studio 2022 |
| Runtime License | Download LEADTOOLS |
Required Knowledge
Get familiar with the basic steps of creating a project by reviewing the Add References and Set a License tutorial, before working on the Compare Images with the Document Comparer - WinForms C# .NET 6 tutorial.
Create the Project and Add the LEADTOOLS References
Start with a copy of the project created in the Add References and Set a License tutorial. If you do not have that project, follow the steps in that tutorial to create it.
The references needed depend upon the purpose of the project. References can be added by NuGet references. For this project, the following references are needed:
This tutorial requires the following NuGet packages:
Leadtools.Annotations.WinFormsLeadtools.Document.SdkLeadtools.Document.Viewer.WinFormsLeadtools.Formats.Raster.CommonLeadtools.OcrLeadtools.PdfLeadtools.Viewer.Controls.WinForms
Set the License File
The License unlocks the features needed for the project. It must be set before any toolkit function is called. For details, including tutorials for different platforms, refer to Setting a Runtime License.
There are two types of runtime licenses:
- Evaluation license, obtained at the time the evaluation toolkit is downloaded. It allows the toolkit to be evaluated.
- Deployment license. If a Deployment license file and developer key are required, refer to Obtaining a License.
Initialize the Application
With the project created, the references added, and the license set, coding can begin.
In the Solution Explorer, open Form1.cs. Right-click on the Design Window and select View Code or press F7 to bring up the code behind the Form. Add the following statements to the using block at the top.
using Leadtools;using Leadtools.Document;using Leadtools.Caching;using Leadtools.Document.Viewer;using Leadtools.Controls;using Leadtools.Document.Compare;using Leadtools.Annotations.Engine;using Leadtools.Annotations.Automation;using Leadtools.Annotations.Rendering;
Add the following variable references to the top of the Form1 class.
private LEADDocument _virtualDocument;private LEADDocument _virtualDocument2;private FileCache _cache;private DocumentViewer _documentViewer;private DocumentViewer _documentViewer2;private DocumentDifference _documentDifference;private IList<PageCharactersDifference> _deletions;private IList<PageCharactersDifference> _insertions;private AnnAutomationManager _automationManager;private AnnAutomationManager _automationManager2;private ImageViewer _combinedViewer;
Modify your Form1() function to match below. This will populate it with the functions we are creating in this tutorial.
public Form1(){InitializeComponent();SetLicense();InitUI();InitDocumentViewers();InitComparisonViewer();}
Initialize the User Interface
Inside the Form1 class, add a new method called InitUI(). This method will be called inside the Form1() function, as shown above. Add the below code to the InitUI() function in order to initialize the user interface for the application.
private void InitUI(){// Add a panel to fill the rest, for the document viewervar docViewerSplitContainer = new SplitContainer();docViewerSplitContainer.Name = "docViewerSplitContainer";docViewerSplitContainer.BackColor = Color.DarkGray;docViewerSplitContainer.SplitterDistance = docViewerSplitContainer.Width / 2;docViewerSplitContainer.BorderStyle = BorderStyle.None;docViewerSplitContainer.Dock = DockStyle.Fill;this.Controls.Add(docViewerSplitContainer);// Add a top panel to host the application controlsvar topPanel = new Panel();topPanel.Name = "topPanel";topPanel.Height = 30;topPanel.Dock = DockStyle.Top;topPanel.BorderStyle = BorderStyle.FixedSingle;this.Controls.Add(topPanel);docViewerSplitContainer.BringToFront();var loadImagesButton = new Button();loadImagesButton.Name = "loadBothButton";loadImagesButton.Text = "Load &Images";loadImagesButton.Click += (sender, e) => LoadBothImages();loadImagesButton.TabIndex = 0;loadImagesButton.Width = 100;topPanel.Controls.Add(loadImagesButton);var compareButton = new Button();compareButton.Name = "compareButton";compareButton.Text = "&Compare";compareButton.Click += (sender, e) => CompareImages(true);compareButton.Left = loadImagesButton.Left + loadImagesButton.Width;topPanel.Controls.Add(compareButton);var stopCompareButton = new Button();stopCompareButton.Name = "stopCompareButton";stopCompareButton.Text = "&Stop Comparing";stopCompareButton.Click += (sender, e) => CompareImages(false);stopCompareButton.Left = compareButton.Left;topPanel.Controls.Add(stopCompareButton);//Compare Viewer elementsvar compareViewContainer = new Panel();compareViewContainer.Name = "compareViewContainer";compareViewContainer.BackColor = Color.DarkGray;compareViewContainer.BorderStyle = BorderStyle.None;compareViewContainer.Dock = DockStyle.Fill;this.Controls.Add(compareViewContainer);}
Initialize the Document Viewers
Inside the Form1 class, add a new method called InitDocumentViewers(), which will also be referenced in the Form1() function, as shown above. Add the below code to the InitDocumentViewers() function in order to initialize the two Document Viewer instances.
private void InitDocumentViewers(){var createOptions = new DocumentViewerCreateOptions();// Set the UI part where the Document Viewer is displayedSplitContainer sc = (SplitContainer) this.Controls.Find("docViewerSplitContainer", false)[0];createOptions.ViewContainer = sc.Panel1;// Enable annotationscreateOptions.UseAnnotations = true;// Now create the viewer_documentViewer = DocumentViewerFactory.CreateDocumentViewer(createOptions);_documentViewer.View.ImageViewer.Zoom(ControlSizeMode.FitAlways, 1.0, _documentViewer.View.ImageViewer.DefaultZoomOrigin);_cache = new FileCache{CacheDirectory = Path.GetFullPath(@".\CacheDir"),};_virtualDocument = DocumentFactory.Create(new CreateDocumentOptions() { Cache = _cache, UseCache = true });createOptions = new DocumentViewerCreateOptions();// Set the UI part where the Document Viewer is displayedcreateOptions.ViewContainer = sc.Panel2;// Not using annotations for nowcreateOptions.UseAnnotations = true;// Now create the viewer_documentViewer2 = DocumentViewerFactory.CreateDocumentViewer(createOptions);_documentViewer2.View.ImageViewer.Zoom(ControlSizeMode.FitAlways, 1.0, _documentViewer2.View.ImageViewer.DefaultZoomOrigin);_virtualDocument2 = DocumentFactory.Create(new CreateDocumentOptions() { Cache = _cache, UseCache = true });}
Note
This tutorial makes use of the Document Viewer instead of the Image Viewer because the Document Comparer requires
DocumentPagesbe used in order to complete the comparison.
Initialize the Comparison Viewer
Inside the Form1 class, add a new method named InitComparisonViewer(), which we previously referenced in the Form1() function. Add the below code to the InitComparisonViewer() function in order to initialize the Image Viewer instance that will show the comparison image.
private void InitComparisonViewer(){_combinedViewer = new ImageViewer();_combinedViewer.Dock = DockStyle.Fill;_combinedViewer.BackColor = Color.DarkGray;SplitContainer sc = (SplitContainer)this.Controls["compareViewSplitContainer"];sc.Panel1.Controls.Add(_combinedViewer);_combinedViewer.BringToFront();}
Add the Load and Set Image Code
Since there are two DocumentViewer instances, there will be three functions to add for loading the images. Below you will find instructions for the three loading functions, one for each viewer and one that handles both viewers.
Left Viewer Load Code
Inside the Form1 class, add a new method called LoadLeftImage(). This method will be called in the loadLeftButton.Click += (sender, e) => LoadLeftImage(); line of code inside the InitUi() method. Add the below code inside the LoadLeftImage() method to load the specified image and set the image inside the left-hand viewer.
private void LoadLeftImage(){OpenFileDialog ofd = new OpenFileDialog();ofd.Filter = "Image Files|*.JPG;*.JPEG;*.PNG;*.TIF;*.TIFF";if (ofd.ShowDialog() == DialogResult.OK){LEADDocument leadDocument = DocumentFactory.LoadFromFile(ofd.FileName, new LoadDocumentOptions { UseCache = true, Cache = _cache, LoadEmbeddedAnnotations = true });_virtualDocument.Pages.Clear();for (int i = 0; i < leadDocument.Pages.Count; i++){_virtualDocument.Pages.Add(leadDocument.Pages[i]);}}_documentViewer.BeginUpdate();_documentViewer.SetDocument(_virtualDocument);_documentViewer.View.Invalidate();if (_documentViewer.Thumbnails != null)_documentViewer.Thumbnails.Invalidate();_automationManager = _documentViewer.Annotations.AutomationManager;_automationManager.RenderingEngine = new AnnWinFormsRenderingEngine();_documentViewer.Annotations.Initialize();_documentViewer.EndUpdate();}
Right Viewer Load Code
Inside the Form1 class, add a new method called LoadRightImage(). This method will be called in the loadRightButton.Click += (sender, e) => LoadImage(); line of code inside the InitUi() method. Add the below code inside the LoadRightImage() method to load the specified image and set the image inside the right-hand viewer.
private void LoadRightImage(){OpenFileDialog ofd2 = new OpenFileDialog();ofd2.Filter = "Image Files|*.JPG;*.JPEG;*.PNG;*.TIF;*.TIFF";if (ofd2.ShowDialog() == DialogResult.OK){LEADDocument leadDocument = DocumentFactory.LoadFromFile(ofd2.FileName, new LoadDocumentOptions { UseCache = true, Cache = _cache, LoadEmbeddedAnnotations = true });_virtualDocument2.Pages.Clear();for (int i = 0; i < leadDocument.Pages.Count; i++){_virtualDocument2.Pages.Add(leadDocument.Pages[i]);}}_documentViewer2.BeginUpdate();_documentViewer2.SetDocument(_virtualDocument2);_documentViewer2.View.Invalidate();if (_documentViewer2.Thumbnails != null)_documentViewer2.Thumbnails.Invalidate();_automationManager2 = _documentViewer2.Annotations.AutomationManager;_automationManager2.RenderingEngine = new AnnWinFormsRenderingEngine();_documentViewer2.Annotations.Initialize();_documentViewer2.EndUpdate();}
Both Viewers Load Code
Inside the Form1 class, add a method called LoadBothImages(). This method will be called in the loadBothButton.Click += (sender, e) => LoadBothImages(); line of code inside the InitUi() method. Add the below code inside the LoadBothImages() method to load the specified images and set the images inside the appropriate viewers.
private void LoadBothImages(){MessageBox.Show("Pick the left image.");LoadLeftImage(loadButton);MessageBox.Show("Pick the right image.");LoadRightImage(loadButton);}
Note
You can use the sample images here for this tutorial.
Add the Document Comparison Code
Inside the Form1 class, add a new method called CompareImages(bool flag). This method will be called in the compareButton.Click += (sender, e) => CompareImages(true); and stopCompareButton.Click += (sender, e) => CompareImages(false); lines of code inside the InitUi() method. Add the below code inside the CompareImages method to compare the loaded images.
private void CompareImages(bool flag){if(!flag){BringTwoViewerToFront();return;}RasterImage image = RasterImage.Create(1, 1, 1, 1, RasterColor.Black);_combinedViewer.BeginUpdate();//Get ammount of pagesvar pageCount = _documentViewer.PageCount;if (pageCount < _documentViewer2.PageCount){pageCount = _documentViewer2.PageCount;}for (int i = 0; i < pageCount; i++){var comparer = new DocumentComparer();IList<DocumentPage> pages = new List<DocumentPage>() {_documentViewer.Document.Pages[i],_documentViewer2.Document.Pages[i]};var combineResult = comparer.CompareRasterPage(pages, new RasterCompareOptions());if (i == 0){image = new RasterImage(combineResult);}else{image.AddPage(combineResult);}}_combinedViewer.Image = image;_combinedViewer.EndUpdate();BringSingleViewerToFront();}
Document Viewer Controls
Inside the Form1 class, add two methods called BringTwoViewerToFront() and BringSingleViewerToFront(). These methods will be used by the CompareImages() function to control which viewer should be visible to the user. Add the below code inside the BringTwoViewersToFront() function and the BringSingleViewerToFront() functions respectively.
private void BringTwoViewerToFront(){this.Controls["docViewerSplitContainer"].BringToFront();this.Controls["topPanel"].Controls["compareButton"].BringToFront();}private void BringSingleViewerToFront(){this.Controls["compareViewContainer"].BringToFront();this.Controls["topPanel"].Controls["stopCompareButton"].BringToFront();}
Run the Project
Run the project by pressing F5, or by selecting Debug -> Start Debugging.
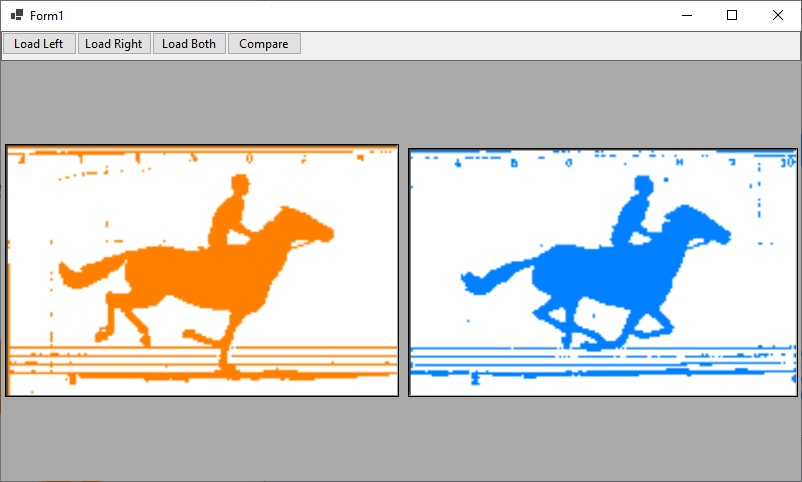
If the steps were followed correctly, the application will run. To test, click on the Load Images button to bring up the OpenFileDialog for each viewer in the form. Select the images to load and the images should appear in each viewer as shown below.

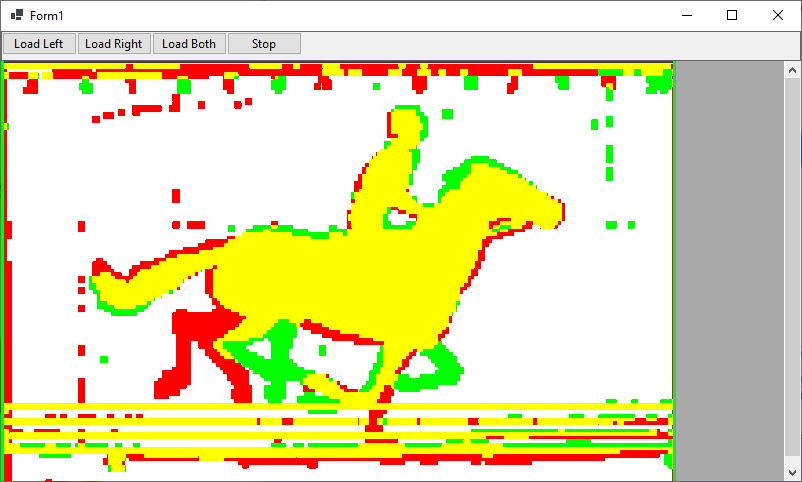
After this, you will be able to press the Compare button to comparing the two loaded images, below is an example of the images after the comparison has been completed.

If you wish to stop comparing images, or wish to choose a different image to compare with, click the Stop button.
Wrap-up
This tutorial showed how to use the DocumentComparer class to compare two images in a C# .NET 6 WinForms application.
