Display Files in the Document Viewer - HTML5 JavaScript
This tutorial shows how to create an HTML5 JavaScript application that uses the LEADTOOLS SDK to load and annotate a document in the HTML5 JavaScript Document Viewer.
| Overview | |
|---|---|
| Summary | This tutorial covers how to use LEADTOOLS Document Viewer SDK technology in an HTML5 JavaScript Application. |
| Completion Time | 30 minutes |
| Visual Studio Project | Download tutorial project (3 KB) |
| Platform | JS Web Application |
| IDE | Visual Studio Code - Client |
| Development License | Download LEADTOOLS |
| Try it in another language |
|
Required Knowledge
Get familiar with the basic steps of creating a project by reviewing the Add References and Set a License - HTML5 JavaScript tutorial, before working on the Display Files in the Document Viewer - HTML5 JavaScript tutorial.
This tutorial makes use of http-server, a console command for running a static file server. To install http-server first install Node.js and then install http-server.
Create the Project and Add LEADTOOLS References
Start with a copy of the project created in the Add References and Set a License - HTML5 JavaScript tutorial. If that project is unavailable, follow the steps in that tutorial to create it.
Inside the project folder create a new file, style.css, which will handle the body layout.
The references needed depend upon the purpose of the project. References can be added by .js files located at <INSTALL_DIR>\LEADTOOLS22\Bin\JS.
For this project, the following references are needed:
Leadtools.jsLeadtools.Annotations.Automation.jsLeadtools.Annotations.Designer.jsLeadtools.Annotations.Engine.jsLeadtools.Annotations.Rendering.JavaScript.jsLeadtools.Controls.jsLeadtools.Document.jsLeadtools.Document.Viewer.jsLeadtools.ImageProcessing.Main.jsLeadtools.ImageProcessing.Color.jsLeadtools.ImageProcessing.Core.jsLeadtools.ImageProcessing.Effects.js
Make sure to copy these files to the project's lib folder.
For a complete list of which JS files are required for your application, refer to Files to be Included with your Application
Set the License File
The License unlocks the features needed for the project. It must be set before any toolkit function is called. For details including tutorials for different platforms, refer to Setting a Runtime License.
There are two types of runtime licenses:
- Evaluation license, obtained at the time the evaluation toolkit is downloaded. It allows the toolkit to be evaluated.
- Deployment license. If a Deployment license file and developer key are needed, refer to Obtaining a License.
Note
Adding LEADTOOLS references and setting a license are covered in more detail in the Add References and Set a License - HTML5 JavaScript tutorial.
Write the HTML File
With the project created, dependencies added, and the license set, coding can begin.
Open the index.html file located in the project folder. Add the following lines in the <head> tag to import the JS files and attach the dependencies to the index.html page. Then add the following <select> elements to the body of the index.html page, which will be used to select the current user-mode, and the various types of annotation objects.
<head><meta charset="UTF-8" /><meta name="viewport" content="width=device-width, initial-scale=1.0" /><script src="https://code.jquery.com/jquery-2.2.4.min.js"integrity="sha256-BbhdlvQf/xTY9gja0Dq3HiwQF8LaCRTXxZKRutelT44=" crossorigin="anonymous"></script><script src="./lib/Leadtools.js"></script><script src="./lib/Leadtools.Controls.js"></script><script src="./lib/Leadtools.Annotations.Engine.js"></script><script src="./lib/Leadtools.Annotations.Designers.js"></script><script src="./lib/Leadtools.Annotations.Rendering.Javascript.js"></script><script src="./lib/Leadtools.Annotations.Automation.js"></script><script src="./lib/Leadtools.ImageProcessing.Main.js"></script><script src="./lib/Leadtools.ImageProcessing.Color.js"></script><script src="./lib/Leadtools.ImageProcessing.Core.js"></script><script src="./lib/Leadtools.ImageProcessing.Effects.js"></script><script src="./lib/Leadtools.Document.js"></script><script src="./lib/Leadtools.Document.Viewer.js"></script><link rel="stylesheet" type="text/css" href="style.css"><!-- The JS file that will load the HTML5/JS Document Viewer into the display --><script src="app.js" type="text/javascript"></script></head><body><div class="container"><div class="toolbar"><div class="vcenter push-right"><label for="interactiveSelect">Interactive mode:</label><select id="interactiveSelect"></select></div><div class="vcenter push-right"><label for="annotationsSelect">Annotations objects:</label><select id="annotationsSelect"></select></div><div id="output" class="vcenter push-right"></div><div id="serviceStatus" class="vcenter push-right"></div></div><div class="docContainer"><div class="sidepanel" id="thumbnails"></div><div class="centerpanel" id="viewer"></div><div class="sidepanel" id="bookmarks"></div></div></div></body>
Write the CSS File
Open the style.css file located in the project folder. Remove the default body styling and add the below lines of code to the body.
/*Remove default body styling.Set the body to flex as a column;*/body {margin: 0;display: flex;flex-direction: column;}.container {margin: 10px;width: calc(100% - 20px);height: calc(100vh - 20px);}.toolbar {height: 5%;width: 100%;border-bottom: 2px solid #333;flex-direction: row;display: flex;}#bookmarks{overflow: hidden;}.vcenter {margin-top: auto;margin-bottom: auto;}.hcenter{margin-left: auto;margin-right: auto;}.push-right{margin-left: 10px;}.docContainer{height: 95%;width: 100%;display: flex;flex-direction: row;}.sidepanel{width: 15%;height: 100%;}.centerpanel{width:100%;height:100%;}/* Styles for Elements Mode. */.lt-item, .lt-image-border {/* Box Shadow (view, item, image border) */box-shadow: #333 2px 2px 5px 1px;}.lt-view,.lt-thumb-item {/* View */margin: 5px;padding: 5px;}.lt-item {/* Item */border: 2px solid #6ecaab;background-color: #b2decf;padding: 10px;}.lt-image-border {/* Image Border */border: 3px solid #444;background-color: white;}.lt-thumb-item {/* Thumbnail Item */border: 2px solid #6ecaab;background-color: #b2decf;}.lt-thumb-item.lt-thumb-item-selected {/* Selected Thumbnail Item */border: 2px solid #59b2ba;background-color: #8ce1e1;}.lt-thumb-item-hovered {/* Hovered Thumbnail Item */border: 2px solid #52b996;background-color: #87c7b1;}.small-modal {max-width: 200px;width: 200px;}
Write the JS File
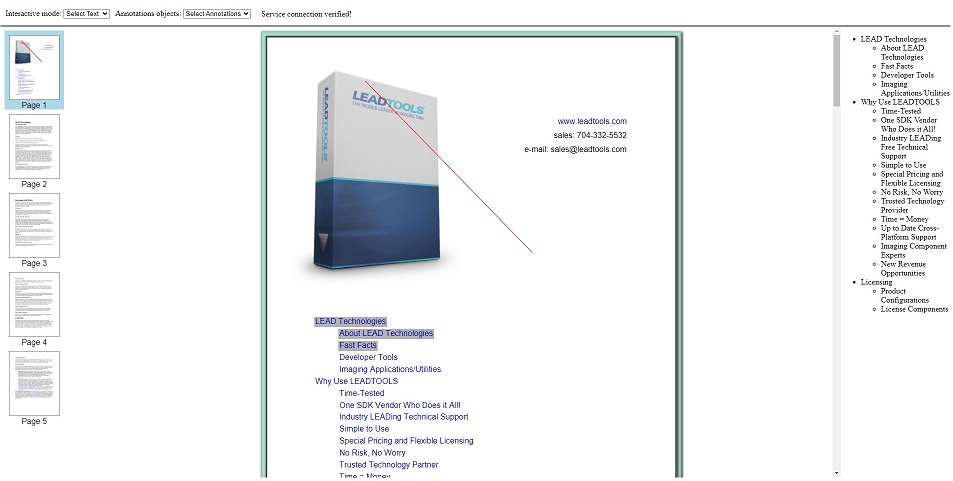
Open the app.js file located in the project folder. Add the below code to create a DocumentViewer object, add Automated Annotation support, and load a default document.
window.onload = function () {var licenseUrl = "./Leadtools/LEADTOOLS.lic.txt";var developerKey = "ADD THE CONTENTS OF THE LEADTOOLS.lic.key.txt FILE";lt.RasterSupport.setLicenseUri(licenseUrl, developerKey, function (setLicenseResult) {// Check the status of the licenseif (setLicenseResult.result) {console.log("LEADTOOLS client license set successfully");} else {var msg = "LEADTOOLS License is missing, invalid or expired\nError:\n";console.log(msg);alert(msg);}});class ViewerInitializer {constructor(callback) {this.callback = callback;this.init();}static showServiceError = (jqXHR, statusText, errorThrown) => {alert("Error returned from service. See the console for details.")const serviceError = lt.Document.ServiceError.parseError(jqXHR, statusText, errorThrown);console.error(serviceError);}init = () => {this.initFactory();this.testConnection();}initFactory = () => {// To communicate with the DocumentService, it must be running!// Change these parameters to match the path to the service.lt.Document.DocumentFactory.serviceHost = "http://localhost:40000";lt.Document.DocumentFactory.servicePath = "";lt.Document.DocumentFactory.serviceApiPath = "api";}testConnection = () => {const serviceStatus = document.getElementById("serviceStatus");serviceStatus.innerHTML = "Connecting to service: " + lt.Document.DocumentFactory.serviceUri;lt.Document.DocumentFactory.verifyService().done((serviceData) => {serviceStatus.innerHTML = "Service connection verified!";this.createDocumentViewer();}).fail((jqXHR, statusText, errorThrown) => {serviceStatus.innerHTML = "Service connection unavailable.";ViewerInitializer.showServiceError(jqXHR, statusText, errorThrown);});}createDocumentViewer = () => {// Initialize the user interfaceconst interactiveSelect = document.getElementById("interactiveSelect");// Add the interactive commands that will be in the interactiveSelect dropdownconst panZoomOption = document.createElement("option");panZoomOption.innerHTML = "Pan / Zoom";panZoomOption.value = lt.Document.Viewer.DocumentViewerCommands.interactivePanZoom;interactiveSelect.appendChild(panZoomOption);const textOption = document.createElement("option");textOption.value = lt.Document.Viewer.DocumentViewerCommands.interactiveSelectText;textOption.innerHTML = "Select Text";interactiveSelect.appendChild(textOption);let documentViewer = null;interactiveSelect.onchange = (e) => documentViewer.commands.run(e.target.value, null);const annotationsSelect = document.getElementById("annotationsSelect");// Add the annotations that will be in the annotationsSelect dropdownconst annSelectOption = document.createElement("option");annSelectOption.innerHTML = "Select Annotations";annSelectOption.value = lt.Annotations.Engine.AnnObject.selectObjectId.toString();annotationsSelect.appendChild(annSelectOption);const annLineOption = document.createElement("option");annLineOption.innerHTML = "Line Object";annLineOption.value = lt.Annotations.Engine.AnnObject.lineObjectId.toString();annotationsSelect.appendChild(annLineOption);const annRectOption = document.createElement("option");annRectOption.innerHTML = "Rectangle Object";annRectOption.value = lt.Annotations.Engine.AnnObject.rectangleObjectId.toString();annotationsSelect.appendChild(annRectOption);annotationsSelect.onchange = (e) => {const value = +e.currentTarget.value;documentViewer.annotations.automationManager.currentObjectId = value;}// Init the document viewer, pass along the panelsconst createOptions = new lt.Document.Viewer.DocumentViewerCreateOptions();// We are not going to use elements mode in this examplecreateOptions.viewCreateOptions.useElements = false;createOptions.thumbnailsCreateOptions.useElements = false;// The middle panel for the viewcreateOptions.viewContainer = document.getElementById("viewer");// The left panel for the thumbnailscreateOptions.thumbnailsContainer = document.getElementById("thumbnails");// The right panel for the bookmarkscreateOptions.bookmarksContainer = document.getElementById("bookmarks");createOptions.useAnnotations = true;// Create the document viewerdocumentViewer = lt.Document.Viewer.DocumentViewerFactory.createDocumentViewer(createOptions);// We prefer SVG viewingdocumentViewer.view.preferredItemType = lt.Document.Viewer.DocumentViewerItemType.svg;// Create html5 rendering enginedocumentViewer.annotations.automationManager.renderingEngine = new lt.Annotations.Rendering.AnnHtml5RenderingEngine();// Initialize documentViewer annotationsdocumentViewer.annotations.initialize();documentViewer.annotations.automationManager.currentObjectIdChanged.add(function (sender, e) {// When done drawing, the manager will return to the select object; so we need to force the annotationsSelect element to return to the select object optionannotationsSelect.value = sender.currentObjectId;});this.loadDefaultDoc(documentViewer, interactiveSelect)}loadDefaultDoc = async (viewer, interactiveSelect) => {// Load a PDF documenttry {const url = "https://demo.leadtools.com/images/pdf/leadtools.pdf";let doc = await lt.Document.DocumentFactory.loadFromUri(url, null);doc.isReadOnly = false;viewer.setDocument(doc);const panZoom = lt.Document.Viewer.DocumentViewerCommands.interactivePanZoom;interactiveSelect.value = panZoom;viewer.commands.run(panZoom, null)if (this.callback)this.callback(viewer);if (doc.isStructureSupported && !doc.structure.isParse) {await doc.structure.parse()}} catch (error) {console.error(error)}}}new ViewerInitializer();}
Run the Project
Before running the front end HTML5/JS Document Viewer, run the Document Service. The LEADTOOLS SDK installation provides three examples of the Document Service for the following platforms:
- .NET Framework
- .NET Core
- Java
For instructions on how to set up and configure the Document Service, in the three platforms previously listed, refer to the steps in the Get Started with the Document Viewer Demo - HTML5 JavaScript tutorial.
For the purposes of this tutorial, the .NET Framework Document Service is used and it can be found here: <INSTALL_DIR>\LEADTOOLS22\Examples\Document\JS\DocumentServiceDotNet\fx.
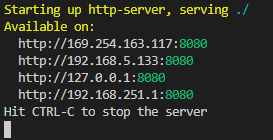
Once you have the back-end Document Service running, open the Command Line and cd into the project folder. Use the following command to run a static file server: http-server
The server should start and run on http://localhost:8080. A message should appear in the console indicating all the ports that the server is available on.

To test, select from any of the different Document Viewer Commands and annotations to be drawn and displayed on the document.

Wrap-up
This tutorial showed how to initialize, load, and display a document in an HTML5/JS Document Viewer application. It also showed how to add Automated Annotations support.
