Is this page helpful?
Add References and Set a License - ASP.NET and TypeScript
This tutorial shows how to get started with the LEADTOOLS SDK in an ASP.NET web application using TypeScript.
| Overview | |
|---|---|
| Summary | This tutorial covers how to set a license in an ASP.NET web application using TypeScript. |
| Completion Time | 30 minutes |
| Visual Studio Project | Download tutorial project (1 MB) |
| Platform | ASP.NET Web Application |
| Runtime Target | .NET 6 or higher |
| IDE | Visual Studio 2022 |
| Runtime License | Download LEADTOOLS |
| Try it in another language |
|
Required Knowledge
This tutorial uses Visual Studio 2022 and the ASP.NET web development workload.
If you need to install the workload but already have Visual Studio, go to Tools > Get Tools and Features..., which opens the Visual Studio Installer. Choose the ASP.NET and web development workload, then choose Modify.
Create the Project
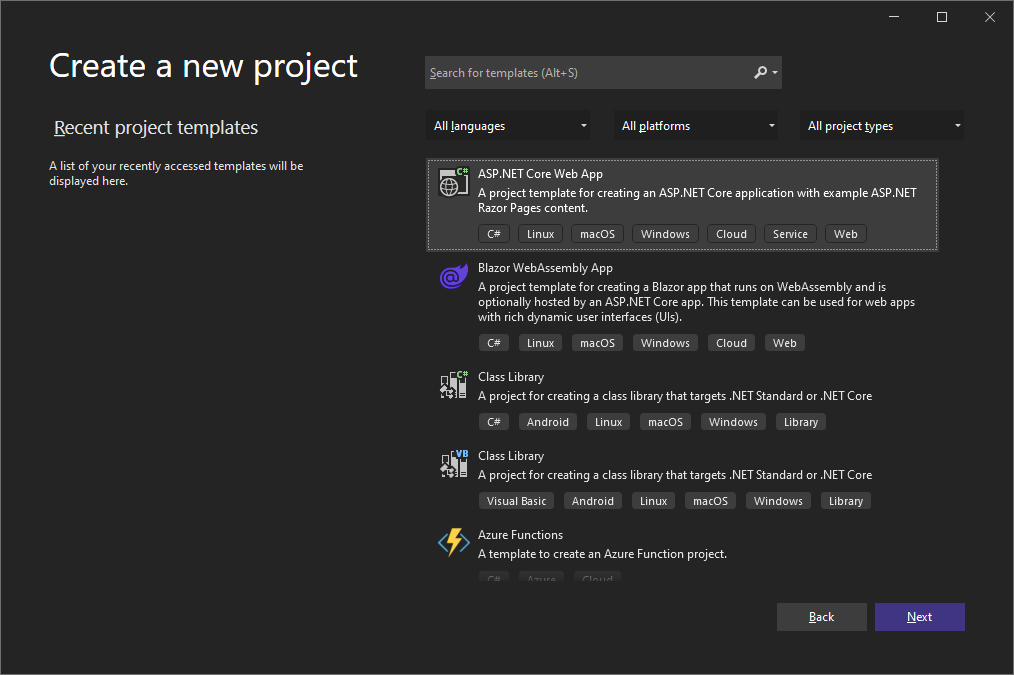
Launch Visual Studio and select Create a new project. Select ASP .NET Web App and click Next.

Add the project name and specify the location where the project to be saved to and click Create.
Add the TypeScript Package and Configuration File
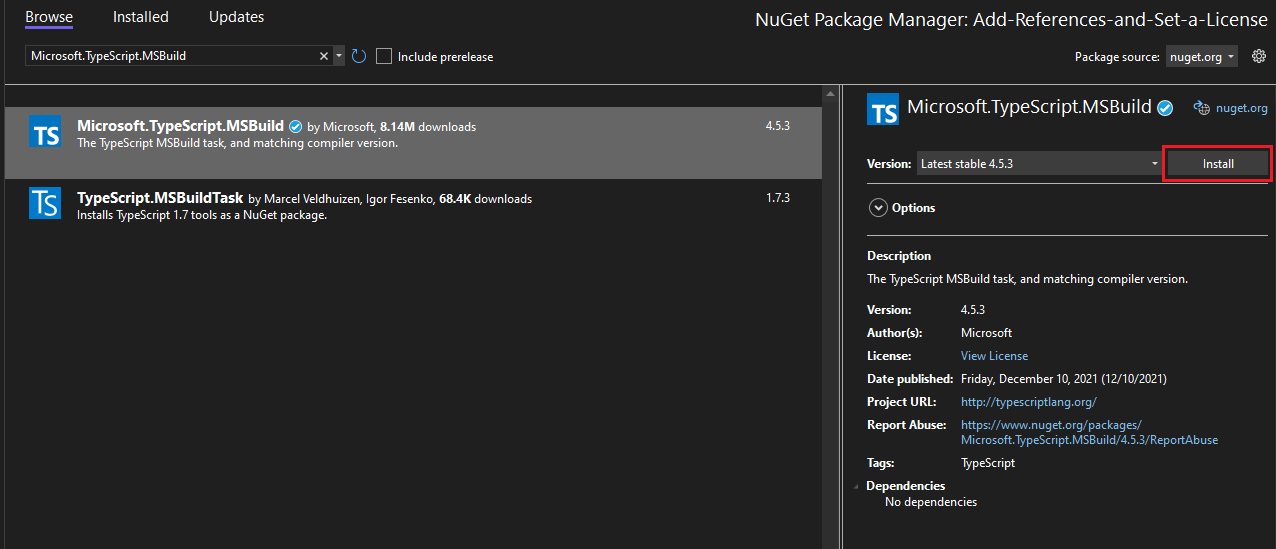
In the Solution Explorer. Right-click the project and choose Manage NuGet Packages. In the Browse tab, search for Microsoft.TypeScript.MSBuild, and then click Install on the right to install the package.

Next, right-click the project and choose Add -> New Item. Choose the TypeScript JSON Configuration file, and then click Add.
Open the tsconfig.json file and replace the default code with the following code:
{"compileOnSave": true,"compilerOptions": {"noImplicitAny": false,"noEmitOnError": true,"removeComments": false,"sourceMap": true,"target": "es5","outDir": "wwwroot/js"},"include": ["scripts/**/*"]}
The outDir option specifies the output folder for the plain JavaScript files that are transpiled by the TypeScript compiler.
Add the Script File
In the Solution Explorer, right-click the project and choose Add -> New Folder to add a folder called scripts. Right-click the created folder and choose Add -> New Item. Choose the TypeScript File, type the name app.ts for the filename, and then click Add.
Add the License File
In the Solution Explorer, right-click the wwwroot node and choose Add -> New Folder to add a folder called lic.
Right-Click on the created folder and choose Add -> Existing Item..., then use the dialog to add the LEADTOOLS.lic.txt license file into this folder. Note that the licenses ending in .txt are for JavaScript. The license files that do not end in .txt are for server and desktop applications. The license files can be found in the following directory: <INSTALL_DIR>\LEADTOOLS22\Support\Common\License
Add LEADTOOLS Dependencies
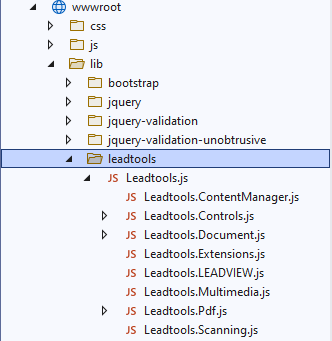
In the Solution Explorer, right-click the lib sub-folder of the wwwroot node and choose Add -> New Folder to add a folder called leadtools. Right-Click on the leadtools folder and choose Add -> Existing Item.... Use the dialog to add the Leadtools.js file from the <INSTALL_DIR>\LEADTOOLS22\Bin\JS\ folder. Leadtools.js is the kernel of the LEADTOOLS JavaScript support and is required by all other libraries.
Adding Leadtools.js in this manner will also add all other JS files dependent on it.

Only the Leadtools.js is needed for this tutorial, the rest can be removed.
Next, in the Solution Explorer, right-click the scripts folder and choose Add -> New Folder to add a folder called leadtools. Right-Click on the leadtools folder and choose Add -> Existing Item.... Use the dialog to add the Leadtools.d.ts file from the <INSTALL_DIR>\LEADTOOLS22\Bin\JS\ folder. Leadtools.d.ts contains the type definitions for the objects defined in Leadtools.js and is needed to be able to use those objects in TypeScript.
Import the LEADTOOLS Logic and Dependencies
Open the Pages/index.chtml file. Add the following script tags inside to import the application logic and LEADTOOLS dependencies.
<script src="~/lib/leadtools/Leadtools.js"></script><script src="~/js/app.js"></script>
Add the Set License Code
Open the scripts/app.ts file. This file is where the LEADTOOLS set license call will be added. Add the appropriate code block from the two options below.
Development License
If you have a JS license (LEADTOOLS.LIC.TXT) and key file (LEADTOOLS.LIC.KEY.TXT), use the code below to set your license:
window.onload = function setLicense() {var licenseUrl = "./lic/LEADTOOLS.lic.txt";var developerKey = "ADD THE CONTENTS OF YOUR LEADTOOLS.lic.key.txt FILE";lt.RasterSupport.setLicenseUri(licenseUrl, developerKey, function (setLicenseResult) {// Check the status of the licenseif (setLicenseResult.result) {console.log("LEADTOOLS client license set successfully");} else {var msg = "LEADTOOLS License is missing, invalid or expired\nError:\n";console.log(msg);alert(msg);}});}
Note
Make sure to replace the value of the
developerKeystring with the contents of the license Key text file.
Evaluation License
If you are evaluating and do not have a JS license or key file, you can use the code below to set your license:
window.onload = function setLicense() {var licenseUrl = "https://demo.leadtools.com/licenses/js/LEADTOOLSEVAL.txt";var developerKey = "EVAL";lt.RasterSupport.setLicenseUri(licenseUrl, developerKey, function (setLicenseResult) {// Check the status of the licenseif (setLicenseResult.result) {console.log("LEADTOOLS client license set successfully");} else {var msg = "LEADTOOLS License is missing, invalid or expired\nError:\n";console.log(msg);alert(msg);}});}
Run the Project
The project can then be built and run through Visual Studio using IIS Express. After running in the selected browser, the following message is displayed to the developers console (F12) to inform that the license has been set successfully.

Wrap-up
This tutorial showed how to set a client-side LEADTOOLS license in an ASP.NET web application using TypeScript.
