Work with Automated Annotations - HTML5 JavaScript
This tutorial shows how to create a JavaScript application that works with LEADTOOLS Automated Annotations.
| Overview | |
|---|---|
| Summary | This tutorial covers how to use automated annotations. |
| Completion Time | 20 minutes |
| Visual Studio Project | Download tutorial project (1 MB) |
| Platform | JS Web Application |
| IDE | Visual Studio Code - Client |
| Development License | Download LEADTOOLS |
Required Knowledge
Get familiar with the basic steps of creating a project and loading files inside the HTML5/JS Image Viewer by reviewing the Add References and Set a License - HTML5 JavaScript and Display Images in an Image Viewer - HTML5 JavaScript tutorials, before working on the Work with Automated Annotations - HTML5 JavaScript tutorial.
This tutorial makes use of http-server, a console command for running a static file server. To install http-server first install Node.js and then install http-server.
Create the Project and Add LEADTOOLS References
Create a project folder that contains the following:
index.htmlfileapp.jsfilelibfolderLEADTOOLSfolder
The references needed depend upon the purpose of the project. This tutorial requires the following JS files, which can be found here: <INSTALL_DIR>\LEADTOOLS22\Bin\JS
Leadtools.jsLeadtools.Controls.jsLeadtools.Annotations.EngineLeadtools.Annotations.Rendering.JavaScript.jsLeadtools.Annotations.Designers.jsLeadtools.Annotations.Automation.jsLeadtools.Demos.jsLeadtools.Demos.Annotations.js
Make sure to copy these files to the lib folder and to import them in the index.html file.
Note
The
Leadtools.Demos.jsandLeadtools.Demos.Annotations.jslibraries are in this directory:<INSTALL_DIR>\LEADTOOLS22\Bin\JS\DemoLibraries\.
Set the License File
The License unlocks the features needed for the project. It must be set before any toolkit function is called. For details including tutorials for different platforms, refer to Setting a Runtime License.
There are two types of runtime licenses:
- Evaluation license, obtained at the time the evaluation toolkit is downloaded. It allows the toolkit to be evaluated.
- Deployment license. If a Deployment license file and developer key are needed, refer to Obtaining a License.
Default Annotation Resources
The annotation framework allows the user to define the images to be used for various annotations (stamps, point, lock, and hotspot). A default set of images for these objects is included with the toolkit. For this tutorial, we will use the default images here: <INSTALL_DIR>\LEADTOOLS22\Examples\Annotation\JS\AnnotationsDemo\site\Resources.
In order to make these objects available to your application, copy the Resources directory to the project folder.
Start with the HTML File
With the project created, dependencies and resources added, license set, and the display an image code added, coding can begin.
Open the index.html file located in the project folder and add the following lines in the <head> tag:
<head><meta charset="UTF-8" /><meta name="viewport" content="width=device-width, initial-scale=1.0" /><title>LEADTOOLS Demo</title><script type="text/javascript" src="./lib/Leadtools.js"></script><script type="text/javascript" src="./lib/Leadtools.Controls.js"></script><script type="text/javascript" src="./lib/Leadtools.Annotations.Engine.js"></script><script type="text/javascript" src="./lib/Leadtools.Annotations.Rendering.JavaScript.js"></script><script type="text/javascript" src="./lib/Leadtools.Annotations.Designers.js"></script><script type="text/javascript" src="./lib/Leadtools.Annotations.Automation.js"></script><script type="text/javascript" src="./lib/Leadtools.Demos.js"></script><script type="text/javascript" src="./lib/Leadtools.Demos.Annotations.js"></script><script type="text/javascript" src="./app.js"></script></head>
This will attach the LEADTOOLS dependencies to the index.html page.
Then add the following <select> elements to the body of the index.html:
<body><!-- DIV to use as the container for the LEADTOOLS image viewer --><divid="imageViewerDiv"style="width: 600px; height: 600px; background-color: darkgray"></div><label for="currentObject">Annotation Object:</label><select id="currentObject"></select><label for="userMode">User mode:</label><select id="userMode"><option>Design</option><option>Run</option></select></body>
These options will be used to select the current user-mode, and the various types of annotation objects.
Update the JavaScript File
To set up the automation manager and the automation object for the application, open the app.js file and replace its contents with the following code:
window.onload = function () {// Get the container DIVconst imageViewerDiv = document.getElementById("imageViewerDiv");// Create the image viewer inside itconst createOptions = new lt.Controls.ImageViewerCreateOptions(imageViewerDiv);const imageViewer = new lt.Controls.ImageViewer(createOptions);// Add handler to show an alert on errorsimageViewer.itemError.add(function (sender, e) {alert("Error loading " + e.data.srcElement.src);});imageViewer.imageUrl = "https://demo.leadtools.com/images/png/pngimage.png";// Create and set up the automation manager using the HTML5 rendering engineconst renderingEngine = new lt.Annotations.Rendering.AnnHtml5RenderingEngine();const manager = new lt.Annotations.Automation.AnnAutomationManager.create(renderingEngine);// Create the default annotations objectsmanager.createDefaultObjects();const currentObject = document.getElementById("currentObject");const automationObjCount = manager.objects.count;for (let i = 0; i < automationObjCount; i++) {// Get the objectlet automationObj = manager.objects.item(i);// Add its name to the select elementlet name = automationObj.name;let id = automationObj.id;currentObject.options[currentObject.options.length] = new Option(name, id);}// Hook to its change eventcurrentObject.addEventListener("change", function () {// Get the object IDlet id = parseInt(currentObject.options[currentObject.selectedIndex].value);// Set it as the current object in the managermanager.currentObjectId = id;});// When the current object ID changes, we need to update our selectmanager.currentObjectIdChanged.add(function (sender, e) {let currentObjectId = manager.currentObjectId;for (let i = 0; i < currentObject.options.length; i++) {let id = parseInt(currentObject.options[i].value);if (id === currentObjectId) {currentObject.selectedIndex = i;break;}}});const userMode = document.getElementById("userMode");// Hook to its change eventuserMode.addEventListener("change", function () {// Get the selected modelet mode = userMode.options[userMode.selectedIndex].innerHTML;if (mode == "Design") {manager.userMode = lt.Annotations.Engine.AnnUserMode.design;} else {manager.userMode = lt.Annotations.Engine.AnnUserMode.run;}});// Create an instance of the Automation control object that works with LEADTOOLS ImageViewerconst automationControl = new lt.Demos.Annotations.ImageViewerAutomationControl();// Attach our image viewerautomationControl.imageViewer = imageViewer;// Set the image viewer interactive modeconst automationInteractiveMode = new lt.Demos.Annotations.AutomationInteractiveMode();automationInteractiveMode.automationControl = automationControl;imageViewer.defaultInteractiveMode = automationInteractiveMode;// set up the automation (will create the container as well)const automation = new lt.Annotations.Automation.AnnAutomation(manager,automationControl);// Add handler to update the container size when the image size changesimageViewer.itemChanged.add(function (sender, e) {let container = automation.container;container.size = container.mapper.sizeToContainerCoordinates(imageViewer.imageSize);});// set up this automation as the active oneautomation.active = true;// Hook to the run even so we know when an object enters run modeautomation.run.add(function (sender, e) {// e is of type AnnRunDesignerEventArgsif (e.operationStatus ==lt.Annotations.Engine.AnnDesignerOperationStatus.start) {// Get the object being runalert("In run mode, you clicked an object of id " + e.object.id);}});// Optional: Add the resources to the automation manageraddResources(manager);};function addResources(manager) {// Add images for the stamp, point, hot spot, and lock annotationsconst resources = new lt.Annotations.Engine.AnnResources();manager.resources = resources;const rubberStampsResources = resources.rubberStamps;const imagesResources = resources.images;rubberStampsResources[lt.Annotations.Engine.AnnRubberStampType.stampApproved] = new lt.Annotations.Engine.AnnPicture("resources/objects/RubberStamps/approved.png");rubberStampsResources[lt.Annotations.Engine.AnnRubberStampType.stampAssigned] = new lt.Annotations.Engine.AnnPicture("resources/objects/RubberStamps/Assigned.png");rubberStampsResources[lt.Annotations.Engine.AnnRubberStampType.stampClient] = new lt.Annotations.Engine.AnnPicture("resources/objects/RubberStamps/Client.png");rubberStampsResources[lt.Annotations.Engine.AnnRubberStampType.stampChecked] = new lt.Annotations.Engine.AnnPicture("resources/objects/RubberStamps/checked.png");rubberStampsResources[lt.Annotations.Engine.AnnRubberStampType.stampCopy] = new lt.Annotations.Engine.AnnPicture("resources/objects/RubberStamps/Copy.png");rubberStampsResources[lt.Annotations.Engine.AnnRubberStampType.stampDraft] = new lt.Annotations.Engine.AnnPicture("resources/objects/RubberStamps/Draft.png");rubberStampsResources[lt.Annotations.Engine.AnnRubberStampType.stampExtended] = new lt.Annotations.Engine.AnnPicture("resources/objects/RubberStamps/Extended.png");rubberStampsResources[lt.Annotations.Engine.AnnRubberStampType.stampFax] = new lt.Annotations.Engine.AnnPicture("resources/objects/RubberStamps/Fax.png");rubberStampsResources[lt.Annotations.Engine.AnnRubberStampType.stampFaxed] = new lt.Annotations.Engine.AnnPicture("resources/objects/RubberStamps/Faxed.png");rubberStampsResources[lt.Annotations.Engine.AnnRubberStampType.stampImportant] = new lt.Annotations.Engine.AnnPicture("resources/objects/RubberStamps/Important.png");rubberStampsResources[lt.Annotations.Engine.AnnRubberStampType.stampInvoice] = new lt.Annotations.Engine.AnnPicture("resources/objects/RubberStamps/Invoice.png");rubberStampsResources[lt.Annotations.Engine.AnnRubberStampType.stampNotice] = new lt.Annotations.Engine.AnnPicture("resources/objects/RubberStamps/Notice.png");rubberStampsResources[lt.Annotations.Engine.AnnRubberStampType.stampPaid] = new lt.Annotations.Engine.AnnPicture("resources/objects/RubberStamps/Paid.png");rubberStampsResources[lt.Annotations.Engine.AnnRubberStampType.stampOfficial] = new lt.Annotations.Engine.AnnPicture("resources/objects/RubberStamps/Official.png");rubberStampsResources[lt.Annotations.Engine.AnnRubberStampType.stampOnFile] = new lt.Annotations.Engine.AnnPicture("resources/objects/RubberStamps/Onfile.png");rubberStampsResources[lt.Annotations.Engine.AnnRubberStampType.stampPassed] = new lt.Annotations.Engine.AnnPicture("resources/objects/RubberStamps/Passed.png");rubberStampsResources[lt.Annotations.Engine.AnnRubberStampType.stampPending] = new lt.Annotations.Engine.AnnPicture("resources/objects/RubberStamps/Pending.png");rubberStampsResources[lt.Annotations.Engine.AnnRubberStampType.stampProcessed] = new lt.Annotations.Engine.AnnPicture("resources/objects/RubberStamps/Processed.png");rubberStampsResources[lt.Annotations.Engine.AnnRubberStampType.stampReceived] = new lt.Annotations.Engine.AnnPicture("resources/objects/RubberStamps/Received.png");rubberStampsResources[lt.Annotations.Engine.AnnRubberStampType.stampRejected] = new lt.Annotations.Engine.AnnPicture("resources/objects/RubberStamps/rejected.png");rubberStampsResources[lt.Annotations.Engine.AnnRubberStampType.stampRelease] = new lt.Annotations.Engine.AnnPicture("resources/objects/RubberStamps/Release.png");rubberStampsResources[lt.Annotations.Engine.AnnRubberStampType.stampSent] = new lt.Annotations.Engine.AnnPicture("resources/objects/RubberStamps/Sent.png");rubberStampsResources[lt.Annotations.Engine.AnnRubberStampType.stampShipped] = new lt.Annotations.Engine.AnnPicture("resources/objects/RubberStamps/Shipped.png");rubberStampsResources[lt.Annotations.Engine.AnnRubberStampType.stampTopSecret] = new lt.Annotations.Engine.AnnPicture("resources/objects/RubberStamps/topsecret.png");rubberStampsResources[lt.Annotations.Engine.AnnRubberStampType.stampUrgent] = new lt.Annotations.Engine.AnnPicture("resources/objects/RubberStamps/urgent.png");rubberStampsResources[lt.Annotations.Engine.AnnRubberStampType.stampVoid] = new lt.Annotations.Engine.AnnPicture("resources/objects/RubberStamps/void.png");imagesResources.add(new lt.Annotations.Engine.AnnPicture("resources/objects/Point.png"));imagesResources.add(new lt.Annotations.Engine.AnnPicture("resources/objects/lock.png"));imagesResources.add(new lt.Annotations.Engine.AnnPicture("resources/objects/hotspot.png"));}
Run the Project
Open the Command Line, and navigate to the project folder. Use the following command to run a static file server.
http-server
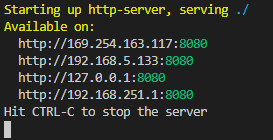
The server should start and run on http:localhost:8080. A message should appear in the console indicating all of the ports that the server is available on.

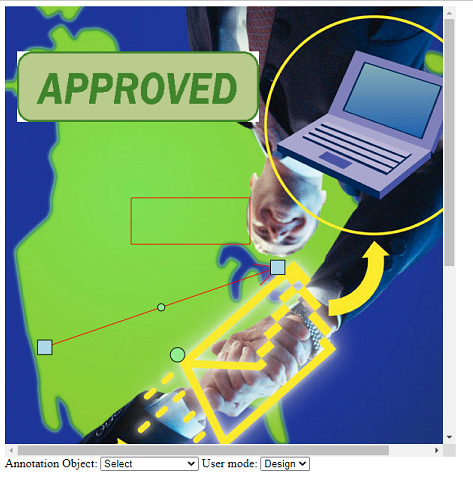
While in design mode, the user can select various annotations objects and draw them on the displayed image. When an object is clicked in run mode, an alert is shown indicating which object was clicked. The application can handle how annotations behave in run mode by handling the automation run event.

Wrap-up
This tutorial showed how to work with automated annotations in a HTML5/JS application.
