Implement User-Defined Annotations - WinForms C# .NET 6
This tutorial shows how to create user-defined annotation objects, thumb (control points) styles, and line ending styles in a WinForms C# .NET 6 application using the LEADTOOLS SDK.
| Overview | |
|---|---|
| Summary | This tutorial covers how to create user-defined annotation objects in a WinForms C# application. |
| Completion Time | 45 minutes |
| Visual Studio Project | Download tutorial project (9 KB) |
| Platform | Windows WinForms C# Application |
| IDE | Visual Studio 2022 |
| Development License | Download LEADTOOLS |
Required Knowledge
Get familiar with the basic steps of creating a project by reviewing the Add References and Set a License and Draw and Edit Annotations on Documents tutorials before working on the Implement User-Defined Objects With LEADTOOLS Annotations - WinForms C# .NET 6 tutorial.
Create the Project and Add LEADTOOLS References
Start with a copy of the project created in the Draw and Edit Annotations on Documents tutorial. If the project is not available, follow the steps in that tutorial to create it.
The references needed depend upon the purpose of the project. References can be added by one or the other of the following two methods (but not both). For this project, the following references are needed:
if using NuGet references, this tutorial requires the following NuGet packages and their dependencies:
Leadtools.Annotations.WinformsLeadtools.Document.SdkLeadtools.Document.Viewer.Winforms
If local DLL references are used, the following DLLs are needed. The DLLs are located at <INSTALL_DIR>\LEADTOOLS22\Bin\net:
Leadtools.dllLeadtools.Annotations.Automation.dllLeadtools.Annotations.Engine.dllLeadtools.Annotations.WinForms.dllLeadtools.Caching.dllLeadtools.Codecs.dllLeadtools.Controls.WinForms.dllLeadtools.Document.dllLeadtools.Document.Pdf.dllLeadtools.Document.Viewer.WinForms.dll
For a complete list of which DLL files are required for your application, refer to Files to be Included With Your Application.
Set the License File
The License unlocks the features needed for the project. It must be set before any toolkit function is called. For details, including tutorials for different platforms, refer to the Setting a Runtime License tutorial.
There are two types of runtime licenses:
- Evaluation license, obtained at the time the evaluation toolkit is downloaded. It allows the toolkit to be evaluated.
- Deployment license. If you need a Deployment license file and developer key, refer to Obtaining a License.
Note
Adding LEADTOOLS NuGet and local references and setting a license are covered in more detail in the Add References and Set a License tutorial.
User-Defined Triangle Object
With the project created, the references added, the license set, and annotations added, coding can begin.
The object being created is a simple triangle. This object will have three points for the end points of the triangle and it will use a stroke for the triangle edges and a fill for the interior.
Add the following statements to the using block at the top:
using Leadtools;using Leadtools.Document;using Leadtools.Caching;using Leadtools.Document.Viewer;using Leadtools.Controls;using Leadtools.Annotations.Automation;using Leadtools.Annotations.WinForms;using Leadtools.Annotations.Designers;using Leadtools.Annotations.Engine;using Leadtools.Annotations.Rendering;
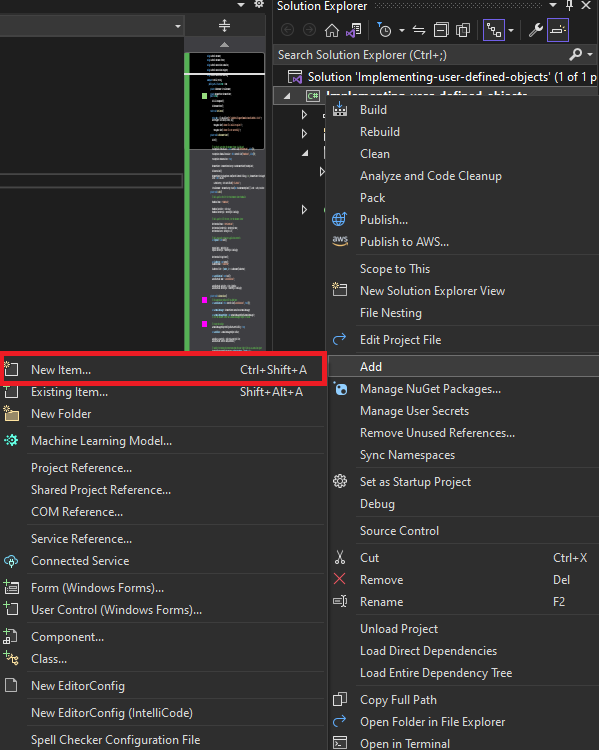
Add a new C# class called AnnTriangleObject.cs to the project:

Add the following code to the new AnnTriangleObject.cs file:
Add the AnnTriangleDrawDesigner class below the AnnTriangleObject class:
// The draw designerpublic class AnnTriangleDrawDesigner : AnnDrawDesigner{public AnnTriangleDrawDesigner(IAnnAutomationControl automationControl, AnnContainer container, AnnObject annObject) :base(automationControl, container, annObject){}// Override the Pointer Down event and add three points for the trianglepublic override bool OnPointerDown(AnnContainer sender, AnnPointerEventArgs e){// See if the base class wants to handle the eventbool handled = base.OnPointerDown(sender, e);if (handled)return true;// Will work on left button onlyif (e.Button != AnnMouseButton.Left)return false;// Get the current number of points in the objectAnnObject annObject = this.TargetObject;int pointCount = annObject.Points.Count;if (pointCount < 3){// Add the current pointannObject.Points.Add(e.Location);// If there are zero points, then add another one.// When the pointer is moved, the last point will also move (second in this case)if (pointCount == 0)annObject.Points.Add(e.Location);if (pointCount == 0){if (!this.StartWorking())return true;}}else{// Now that there are three points, the process is finishedthis.EndWorking();}return true;}// Override the Pointer Move eventpublic override bool OnPointerMove(AnnContainer sender, AnnPointerEventArgs e){bool handled = base.OnPointerMove(sender, e);// See if we have points// If so, move the last point in the object to this new locationAnnObject annObject = this.TargetObject;if (annObject.Points.Count > 0){annObject.Points[annObject.Points.Count - 1] = e.Location;Working();return true;}return false;}public override bool OnPointerUp(AnnContainer sender, AnnPointerEventArgs e){base.OnPointerUp(sender, e);return true;}}
Add the InitializeTriangleObject method to the main form:
private static void InitializeTriangleObject(AutomationManagerHelper annotations){// Create a new automation objectAnnAutomationObject automationObj = new AnnAutomationObject();// Set the object IDautomationObj.Id = AnnTriangleObject.MyId;automationObj.Name = "Triangle";// Set its designersautomationObj.DrawDesignerType = typeof(AnnTriangleDrawDesigner);automationObj.EditDesignerType = typeof(AnnPolylineEditDesigner);automationObj.RunDesignerType = typeof(AnnRunDesigner);// Set the templateAnnTriangleObject annObj = new AnnTriangleObject();// Set the default strokeannObj.Stroke = AnnStroke.Create(AnnSolidColorBrush.Create("red"), LeadLengthD.Create(2));annObj.Fill = AnnSolidColorBrush.Create("yellow");automationObj.ObjectTemplate = annObj;// Set the renderer, same as the AnnPolylineObjectIAnnObjectRenderer polylineRenderer = annotations.AutomationManager.RenderingEngine.Renderers[AnnObject.PolylineObjectId];IAnnObjectRenderer renderer = new AnnPolylineObjectRenderer();renderer.LabelRenderer = polylineRenderer.LabelRenderer;renderer.LocationsThumbStyle = polylineRenderer.LocationsThumbStyle;renderer.RotateGripperThumbStyle = polylineRenderer.RotateGripperThumbStyle;renderer.RotateCenterThumbStyle = polylineRenderer.RotateCenterThumbStyle;annotations.AutomationManager.RenderingEngine.Renderers[AnnTriangleObject.MyId] = renderer;// Set its context menu and toolbar imageAnnAutomationObject extData = new AnnAutomationObject();extData.ContextMenu = new Leadtools.Annotations.WinForms.ObjectContextMenu();extData.DrawCursor = Cursors.Cross;Bitmap bitmap = new Bitmap(24, 24, System.Drawing.Imaging.PixelFormat.Format32bppArgb);using (Graphics g = Graphics.FromImage(bitmap)){g.Clear(Color.Transparent);g.DrawLine(Pens.Black, 12, 2, 22, 22);g.DrawLine(Pens.Black, 22, 22, 2, 22);g.DrawLine(Pens.Black, 2, 22, 12, 2);}extData.ToolBarToolTipText = "Triangle";extData.ContextMenu = new ObjectContextMenu();automationObj.ToolBarImage = bitmap;automationObj.UserData = extData;annotations.AutomationManager.Objects.Add(automationObj);}
Next, call InitializeTriangleObject below the _documentViewer.Annotations.Initialize() call in the InitAnnotations method:
_documentViewer.Annotations.Initialize();// Create the triangle automation objectInitializeTriangleObject(automationManagerHelper);
Run the project by pressing F5, or by selecting Debug -> Start Debugging.
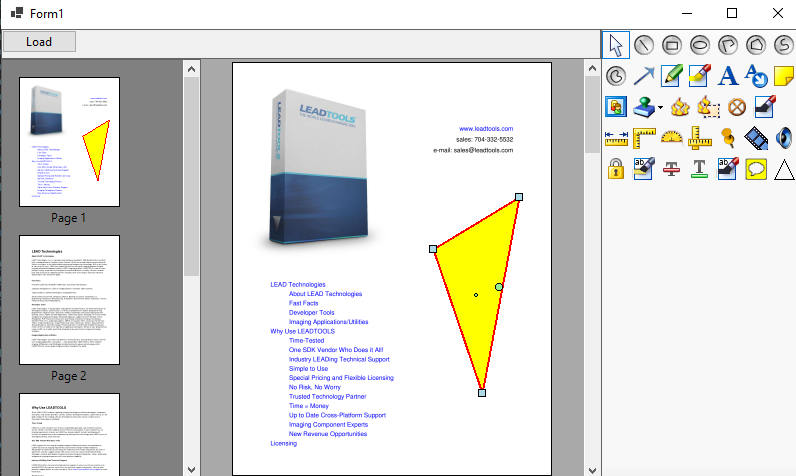
If the steps were followed correctly, the application will run, and there will be a new triangle icon in the annotation toolbar. Load a document and test the new triangle annotation. The result should be similar to the image below:

User-Defined Thumb Styles
With LEADTOOLS Annotations, it is possible to create custom thumbs (control points). Create custom styles for the location, rotation center and rotation gripper thumbs.
To implement a user-defined thumb style, create a class that implements the IAnnThumbStyle interface. Then, assign the custom thumb style class to an IAnnObjectRenderer interface, which will then use the custom thumb style when rendering annotation objects.
First, create a new class in the AnnTrangleObject.cs file, derived from the base class AnnThumbStyle, and override the AddPath method:
public class AnnTriangleThumbStyle : AnnThumbStyle{protected override AnnThumbStyle Create(){return new AnnTriangleThumbStyle();}protected override void AddPath(System.Drawing.Drawing2D.GraphicsPath path, LeadRectD rect){if (path != null){// Add the trianglefloat left = (float)rect.Left;float right = (float)rect.Right;float width = (right - left) / 2;float top = (float)rect.Top;float bottom = (float)rect.Bottom;path.AddLine(left, bottom, left + width, top);path.AddLine(left + width, top, right, bottom);path.AddLine(right, bottom, left, bottom);path.CloseFigure();}}}
In the main form, replace the code after the "Set the renderer, same as the AnnPolylineObject" comment in the InitializeTriangleObject method:
// Get the current polyline renderer (Need to use some of the properties that are not changing)IAnnObjectRenderer polylineRenderer = annotations.AutomationManager.RenderingEngine.Renderers[AnnObject.PolylineObjectId];// Create the new rendererIAnnObjectRenderer renderer = new AnnPolylineObjectRenderer();// Use the existing label renderer. It is not being changedrenderer.LabelRenderer = polylineRenderer.LabelRenderer;// Now, use the new triangle thumbs:// Change the location thumb styleAnnTriangleThumbStyle locationThumb = new AnnTriangleThumbStyle();locationThumb.Size = LeadSizeD.Create(72 * 2, 72 * 2);locationThumb.Stroke = AnnStroke.Create(AnnSolidColorBrush.Create("black"), LeadLengthD.Create(1));locationThumb.Fill = AnnSolidColorBrush.Create("#7F0000FF");renderer.LocationsThumbStyle = locationThumb;// Change the rotation center thumb styleAnnTriangleThumbStyle rotateCenterThumb = new AnnTriangleThumbStyle();rotateCenterThumb.Size = LeadSizeD.Create(72, 72);rotateCenterThumb.Stroke = AnnStroke.Create(AnnSolidColorBrush.Create("black"), LeadLengthD.Create(1));rotateCenterThumb.Fill = AnnSolidColorBrush.Create("#EFFF0000");renderer.RotateCenterThumbStyle = rotateCenterThumb;// Change the Rotation gripper thumb styleAnnTriangleThumbStyle rotateGripperThumb = new AnnTriangleThumbStyle();rotateGripperThumb.Size = LeadSizeD.Create(72 * 2, 72 * 2);rotateGripperThumb.Stroke = AnnStroke.Create(AnnSolidColorBrush.Create("black"), LeadLengthD.Create(1));rotateGripperThumb.Fill = AnnSolidColorBrush.Create("#3F00FF00");renderer.RotateGripperThumbStyle = rotateGripperThumb;annotations.AutomationManager.RenderingEngine.Renderers[AnnTriangleObject.MyId] = renderer;
Run the project by pressing F5, or by selecting Debug -> Start Debugging.
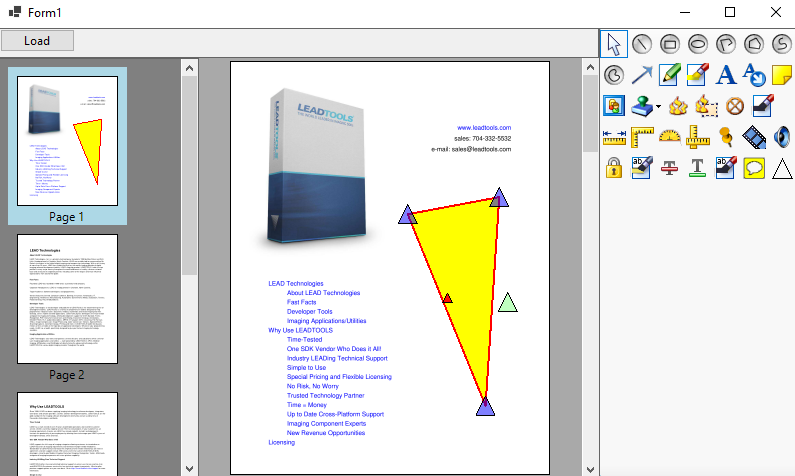
If the steps were followed correctly, the triangle annotation object has an updated thumb point style. Load a document and test the updated triangle annotation. The result should be similar to the image below:

User-Defined Ending Style
Add a new C# class to the project and name it AnnCrossLineEnding.cs.
Set this new class to inherit from AnnLineEnding. Then, override some members and implement new functionality for the custom ending style by adding the following code to the new class:
public class AnnCrossLineEnding : AnnLineEnding{protected override AnnLineEnding Create(){return new AnnCrossLineEnding();}public override AnnLineEnding Clone(){AnnCrossLineEnding arrowLineEnding = base.Clone() as AnnCrossLineEnding;arrowLineEnding.Closed = _closed;return arrowLineEnding;}public override int Id{// Note when creating custom ending style you add unique Id that is not used before// for existing ending style the ids all are negative so set id = 1 for the custom ending styleget { return 1; }}// This is the property that controls if the ending style cross shape is closedprivate bool _closed = false;public bool Closed{get { return _closed; }set { _closed = value; }}// Returns the array of points that composes style shape , this will be used when rendering the style and also when hit testing itpublic override LeadPointD[] GetStylePoints(LeadPointD lineStart, LeadPointD lineEnd){double length = this.Length.Value / 2;// First cross on line startdouble lineStartX = lineStart.X;double lineStartY = lineStart.Y;LeadPointD pt0 = LeadPointD.Create(lineStartX - length, lineStartY - length);LeadPointD pt1 = LeadPointD.Create(lineStartX + length, lineStartY + length);LeadPointD pt2 = LeadPointD.Create(lineStartX - length, lineStartY + length);LeadPointD pt3 = LeadPointD.Create(lineStartX + length, lineStartY - length);return new LeadPointD[] { pt0, pt1, pt2, pt3 };}// Here you can specify if you want the style to be hit testable and you can move the object by dragging itpublic override bool HitTest(LeadPointD point, double hitTestBuffer, LeadPointD lineStart, LeadPointD lineEnd){return false;}// Saving the custom style to the XML documentpublic override XmlNode Serialize(AnnSerializeOptions options, XmlNode parentNode, XmlDocument document, string elementName){XmlNode styleNode = base.Serialize(options, parentNode, document, elementName);XmlNode element = document.CreateElement("StyleClosed");element.InnerText = _closed.ToString();styleNode.AppendChild(element);return styleNode;}// Loading the custom style from XML documentpublic override void Deserialize(AnnDeserializeOptions options, XmlNode element, XmlDocument document){base.Deserialize(options, element, document);XmlNode childNode = element.SelectSingleNode("StyleClosed");if (childNode != null){_closed = bool.Parse(childNode.FirstChild.Value);}}public override string FriendlyName{get{return "Line Ending";}}}
Add the following declaration to the using block in the main form:
using System.Xml; Add the following code to the InitUI method, before the loadButton deceleration:
var lineEndingButton = new Button();lineEndingButton.Name = "lineEndingButton";lineEndingButton.Text = "&Add Custom Line Ending";lineEndingButton.Width = 175;lineEndingButton.Dock = DockStyle.Left;lineEndingButton.Click += (sender, e) => AddCustomLineEnding();topPanel.Controls.Add(lineEndingButton);var saveAnnotations = new Button();saveAnnotations.Name = "saveAnnotations";saveAnnotations.Text = "&Save Annotations";saveAnnotations.Width = 175;saveAnnotations.Dock = DockStyle.Left;saveAnnotations.Click += (sender, e) => SaveAnnotations();topPanel.Controls.Add(saveAnnotations);
Add the following class to the main form:
// The custom polyline renderer that will take care of rendering custom ending stylepublic class AnnCustomPolylineObjectRenderer : AnnPolylineObjectRenderer{public override void Render(AnnContainerMapper mapper, AnnObject annObject){base.Render(mapper, annObject);}public override void RenderEndingStyles(AnnContainerMapper mapper, AnnPolylineObject annPolyLineObject){// Call the base to draw the original ending stylesbase.RenderEndingStyles(mapper, annPolyLineObject);// Now draw the ending styleAnnCrossLineEnding startStyle = annPolyLineObject.StartStyle as AnnCrossLineEnding;AnnCrossLineEnding endStyle = annPolyLineObject.EndStyle as AnnCrossLineEnding;AnnWinFormsRenderingEngine engine = this.RenderingEngine as AnnWinFormsRenderingEngine;LeadPointCollection objectPoints = annPolyLineObject.Points;int count = objectPoints.Count;if (count < 2)return;if (annPolyLineObject.SupportsLineEndings){LeadPointD firstPoint = objectPoints[0];if (startStyle != null)RenderCrossLineEnding(startStyle, engine, mapper, annPolyLineObject.FixedStateOperations, firstPoint, objectPoints[1]);if (endStyle != null)RenderCrossLineEnding(endStyle, engine, mapper, annPolyLineObject.FixedStateOperations, objectPoints[count - 1], objectPoints[count - 2]);}}private void RenderCrossLineEnding(AnnCrossLineEnding crossLineEnding, AnnWinFormsRenderingEngine engine, AnnContainerMapper mapper, AnnFixedStateOperations operations, LeadPointD lineStart, LeadPointD lineEnd){AnnStroke stroke = mapper.StrokeFromContainerCoordinates(crossLineEnding.Stroke, operations);if (stroke != null){LeadPointD[] endingStylePoints = mapper.PointsFromContainerCoordinates(crossLineEnding.GetStylePoints(lineStart, lineEnd), operations);if (endingStylePoints != null && endingStylePoints.Length == 4){using (Pen pen = AnnWinFormsRenderingEngine.ToPen(stroke)){engine.Context.DrawLine(pen, AnnWinFormsRenderingEngine.ToPoint(endingStylePoints[0]), AnnWinFormsRenderingEngine.ToPoint(endingStylePoints[1]));engine.Context.DrawLine(pen, AnnWinFormsRenderingEngine.ToPoint(endingStylePoints[2]), AnnWinFormsRenderingEngine.ToPoint(endingStylePoints[3]));if (crossLineEnding.Closed){engine.Context.DrawLine(pen, AnnWinFormsRenderingEngine.ToPoint(endingStylePoints[0]), AnnWinFormsRenderingEngine.ToPoint(endingStylePoints[3]));engine.Context.DrawLine(pen, AnnWinFormsRenderingEngine.ToPoint(endingStylePoints[2]), AnnWinFormsRenderingEngine.ToPoint(endingStylePoints[1]));}}}}}}
Integrate the new custom polyline object renderer to the annotations framework. add the code in the InitAnnotations() method after line var automationManagerHelper = new AutomationManagerHelper(automationManager);:
// Hook the custom polyline renderer to the existing rendererAnnPolylineObjectRenderer polyLineRenderer = automationManager.RenderingEngine.Renderers[AnnObject.LineObjectId] as AnnPolylineObjectRenderer;AnnCustomPolylineObjectRenderer cutomerRenderer = new AnnCustomPolylineObjectRenderer();cutomerRenderer.LocationsThumbStyle = polyLineRenderer.LocationsThumbStyle;cutomerRenderer.RotateCenterThumbStyle = polyLineRenderer.RotateCenterThumbStyle;cutomerRenderer.RotateGripperThumbStyle = polyLineRenderer.RotateGripperThumbStyle;automationManager.RenderingEngine.Renderers[AnnObject.LineObjectId] = cutomerRenderer;
Add the following logic for the lineEndingButton and saveButton in the main form:
// Adds the custom line endings to the currently selected annotation line objectprivate void AddCustomLineEnding(){AnnAutomation automation = _documentViewer.Annotations.AutomationManager.Automations[0];AnnCrossLineEnding startStyle = new AnnCrossLineEnding();startStyle.Length = automation.Container.Mapper.LengthToContainerCoordinates(20);AnnCrossLineEnding endStyle = new AnnCrossLineEnding();endStyle.Length = automation.Container.Mapper.LengthToContainerCoordinates(20);endStyle.Closed = true;int annChildrenCount = automation.Container.Children.Count;if(annChildrenCount == 0 ){MessageBox.Show("No lines found");return;}AnnPolylineObject? annPolylineObject = automation.Container.Children[annChildrenCount-1] as AnnPolylineObject;if (annPolylineObject != null){annPolylineObject.StartStyle = startStyle;annPolylineObject.EndStyle = endStyle;automation.Invalidate(LeadRectD.Empty);}}// Saves added annotations to an XML fileprivate void SaveAnnotations(){if(_documentViewer.Document == null){MessageBox.Show("No file found in the Document Viewer");return;}AnnAutomation automation = _documentViewer.Annotations.AutomationManager.Automations[0];AnnContainer container = automation.Container;AnnCodecs annCodecs = new AnnCodecs();AnnDeserializeOptions options = new AnnDeserializeOptions();annCodecs.DeserializeOptions = options;// Hook to the DeserializeObject event to create the custom ending style instance when loading from xmloptions.DeserializeObject += delegate (object sender2, AnnSerializeObjectEventArgs args){AnnPolylineObject? polyLine = args.AnnObject as AnnPolylineObject;if (polyLine != null && polyLine.Id == AnnObject.LineObjectId){if (polyLine.StartStyle == null){if (args.TypeName == "1") //The custom ending style id is 1{polyLine.StartStyle = new AnnCrossLineEnding();}}else if (polyLine.EndStyle == null){if (args.TypeName == "1") // The custom ending style id is 1{polyLine.EndStyle = new AnnCrossLineEnding();}}}}!;SaveFileDialog saveFileDialog = new SaveFileDialog();saveFileDialog.Filter = "XML File | *.xml";if (saveFileDialog.ShowDialog() == DialogResult.OK){annCodecs.Save(saveFileDialog.FileName, container, AnnFormat.Annotations, 1);}}
Run the project by pressing F5, or by selecting Debug -> Start Debugging.
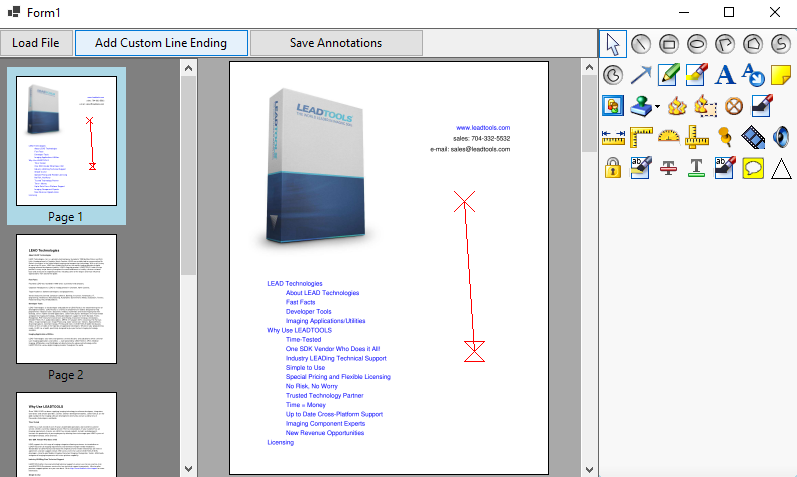
If the steps were followed correctly, the application will run, and the Add Custom Line Ending and Save Custom Style buttons are now on the toolbar.
Load a document and use the line tool to draw a line on the document. Click the "Add Custom Line Ending" button to add the new line endings to the line.
Save the added annotations to an XML file by using the Save Annotations button.

Wrap-up
This tutorial showed how to use the AnnPolylineObject, AnnThumbStyle, and AnnLineEnding classes to create custom user-defined annotation objects, thumb control styles, and line ending styles.
